Custom HTML Tags in Google Tag Manager (2026 Guide)
Ever wondered how Custom HTML Tags help you control website tracking, without touching the code?
Custom HTML Tags in Google Tag Manager (GTM) enable you to add your own code, such as JavaScript, tracking pixels, or third-party widgets, directly to your site; you do not need to edit the site’s core files.
They’re incredibly useful when custom scripts aren’t available through built-in templates, offering a flexible way to implement advanced tracking, marketing scripts, and interactive features.
In this guide, you’ll learn what Custom HTML Tags are, how they work, and when to use them. You’ll learn how to set them up and simplify reporting with Analytify in WordPress. We’ll also go over best practices, troubleshooting tips, and alternative tagging methods.
Let’s get started!
Custom HTML Tags (TOC):
What are Custom HTML Tags in Google Tag Manager?
Custom HTML tags in GTM allow you to add your own code, like JavaScript, tracking pixels, or widgets, directly to your website without editing the site’s code manually. These tags are especially useful when you want to add scripts or features that aren’t supported by the default tag templates in GTM.
They offer you great flexibility by allowing you to include various types of functionality, such as tracking pixels from third-party platforms, chat widgets, pop-ups, or even custom JavaScript code for advanced user interaction tracking.
For example, you can use HTML custom tags to embed a Facebook pixel, install a live chat tool, or trigger a script only when a user scrolls to a certain point.
How do Custom HTML Tags Work in Google Tag Manager?
You start by creating a new tag in your GTM container and selecting the Custom HTML tag type. Next, you paste your custom code, such as JavaScript, tracking pixels, or widget scripts, into the tag. After that, you set up triggers that define when the tag should fire. Triggers can be based on user actions, such as page views, button clicks, scroll depth, or form submissions.
When a user visits your website and the trigger condition is met, GTM automatically injects and runs your custom code on the page. For example, you can display a pop-up, load a live chat widget, or track specific user behaviors.
Some scripts may use methods like document.write(), but that can slow down your site. It’s better to load scripts asynchronously so they don’t block your page from loading. Overall, Custom HTML tags offer a flexible way to enhance your site’s functionality without needing to touch the actual code.
Here are some common use cases for HTML custom Tags in Google Tag Manager:
- Integrating Third-Party Analytics Tools
Add tracking codes from platforms like Hotjar or Mixpanel to analyze user behavior. - Adding Marketing Pixels
Install conversion tracking or remarketing pixels to track ad performance and retarget users. - Implementing A/B Testing Scripts
Insert scripts from testing tools like Optimizely to run experiments without modifying site code. - Installing Chat Widgets
Add customer support or live chat tools, such as Tawk.to Intercom or Drift for user engagement. - Custom Event Tracking
Track user actions like clicks, scrolls, or form submissions that require more advanced logic than GTM’s default tags provide. - Cookie Consent Tools
Load cookie banners or GDPR/CCPA-compliant scripts based on the user’s region or preference.
How to Set Up Custom HTML Tags in GTM (Step by Step)
A step-by-step guide to setting up Custom HTML Tags in GTM is given below. Follow these simple steps to get started:
Step 1: Log in to Google Tag Manager
- Go to Google Tag Manager.
- Choose the container for the website where you want to add the tag.
Step 2: Create a New Tag
- In the left sidebar, click Tags.
- Then click the blue New button.
Step 3: Configure the Tag
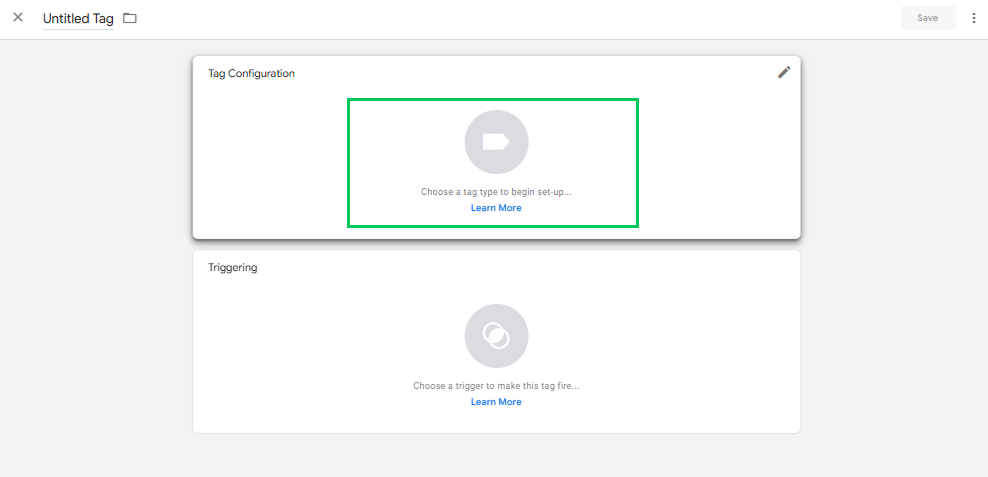
- Next, click Tag Configuration.
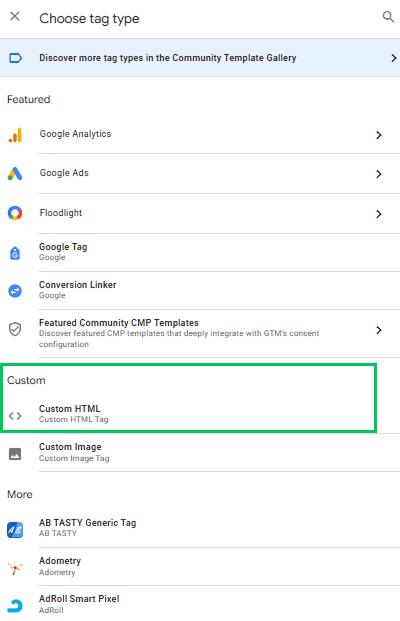
- Now, from the list of tag types, select Custom HTML.
\
Step 4: Add Your Code
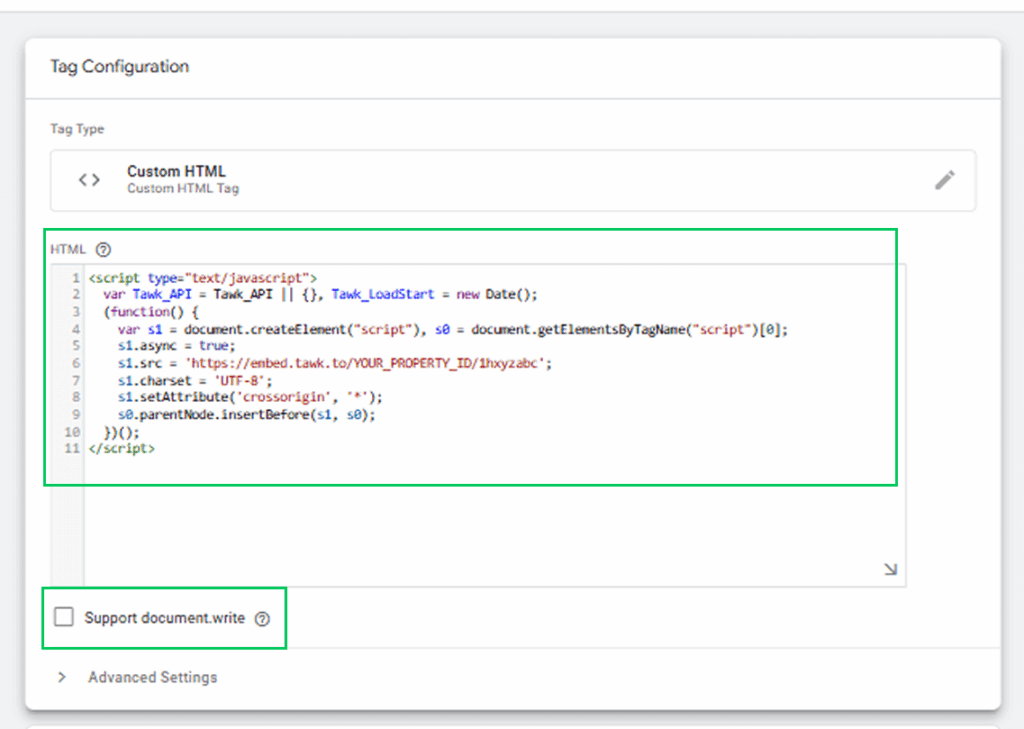
- In the Custom HTML editor box, paste your custom code.
- This could be a chat widget, remarketing pixel, A/B testing script, or any custom JavaScript or HTML.
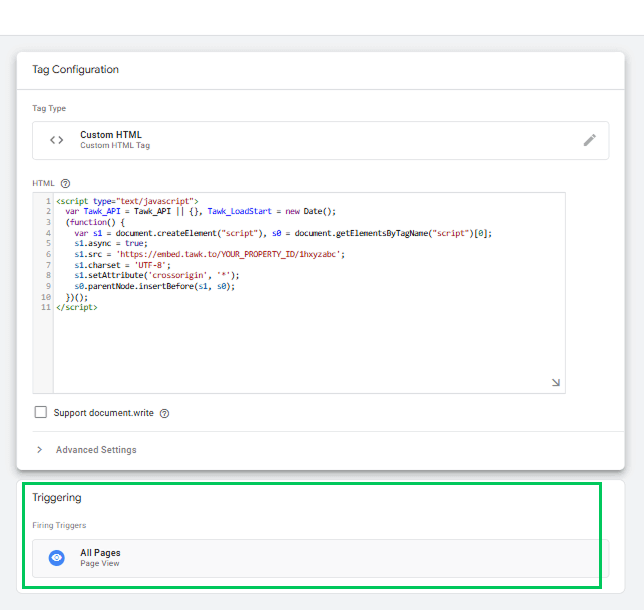
Example: Add a Live Chat Widget (Tawk.to)
Tawk. to is a free live chat application that enables website owners to communicate with visitors in real-time. It’s commonly used for customer support, lead generation, and user engagement. You can install Tawk.to widget on your site by pasting its script into a Custom HTML tag in Google Tag Manager.
Note:
- Replace YOUR_PROPERTY_ID with the actual property ID from your Tawk.to account.
- Avoid using document.write() as it may block page loading. Use async or defer scripts if possible.
Step 5: Set the Trigger
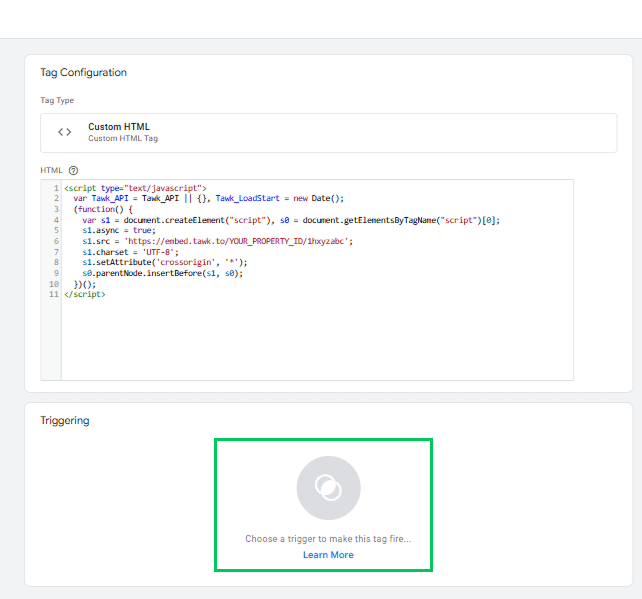
- Then, click Triggering.
- Choose when the tag should fire:
- All Pages: If you want the tag to load across the entire site.
- Specific Page Views: like a thank-you page or product page.
- Custom Triggers: such as button clicks, scroll depth, etc.
- All Pages: If you want the tag to load across the entire site.
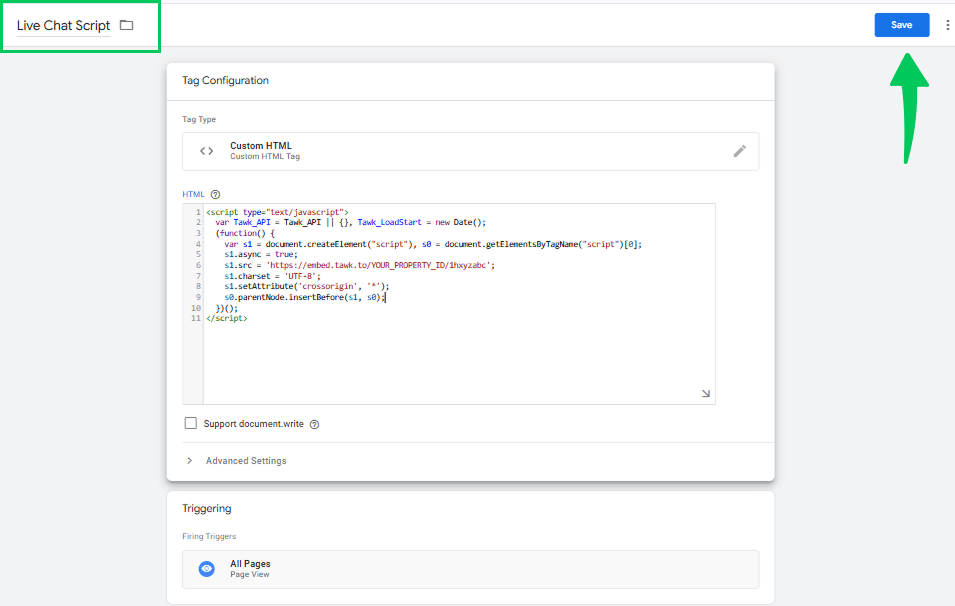
Step 6: Save the Tag
- Now, click Save in the upper right corner.
- Name your tag clearly (e.g., Live Chat Script).
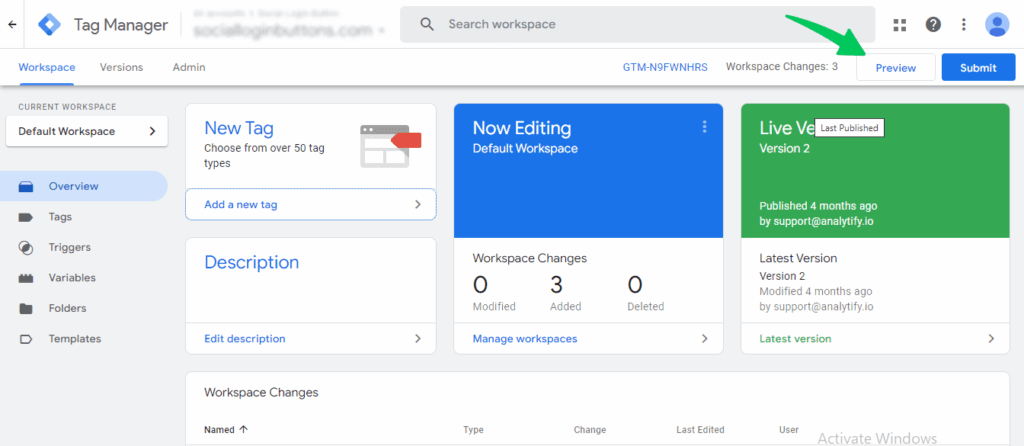
Step 7: Preview and Test
- Click Preview in GTM to open Tag Assistant.
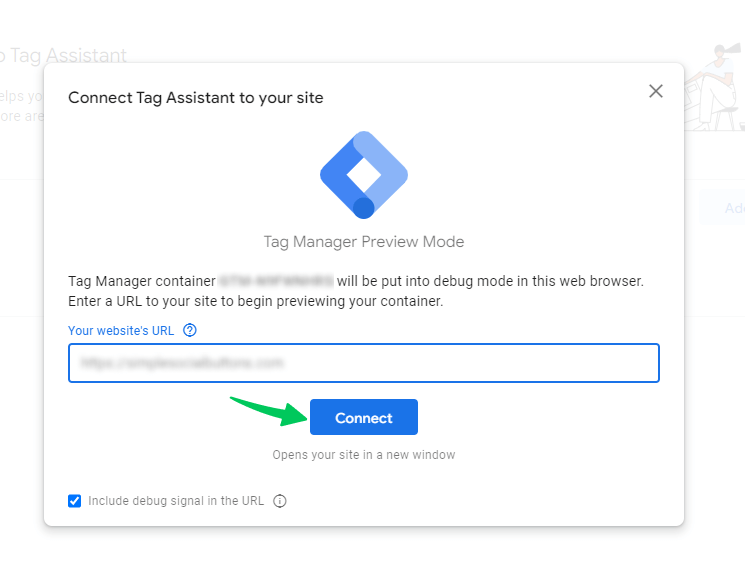
- Enter your site’s URL and click Connect.
- Navigate your site to see if the tag fires as expected.
- Use browser developer tools or tools like Facebook Pixel Helper or Google Tag Assistant to verify that your script is functioning properly.
Step 8: Publish the Tag
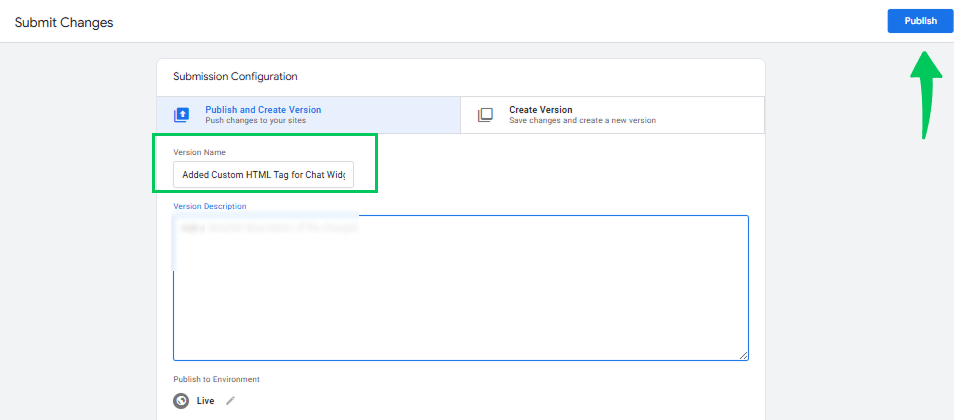
- Once testing is successful, go back to GTM and click Submit.
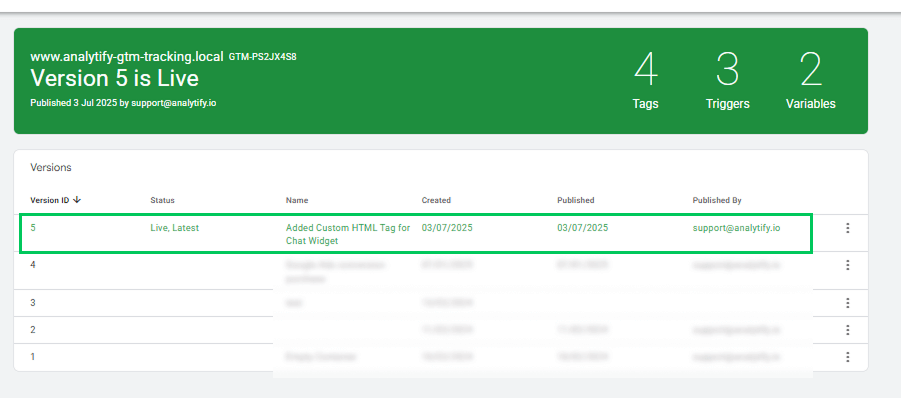
- Add a version name and description (e.g., Added Custom HTML Tag for Chat Widget ).
- Click Publish.
Congratulations! Your Custom HTML tag is now live and will run based on the trigger you set.
Enhance Your Google Analytics Insights with Analytify
Join 50,000+ beginners & professionals who use Analytify to simplify their Website Analytics!
After setting up your Custom HTML tags in GTM to track specific events, clicks, or third-party tools, you can take your data analysis a step further with Analytify.
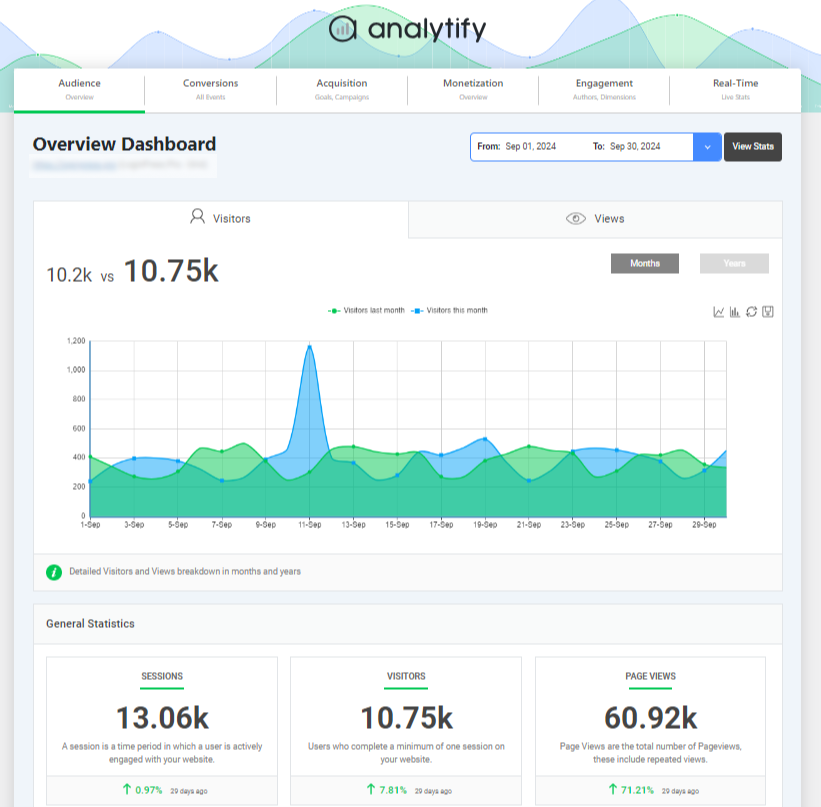
Analytify is one of the best plugins for WordPress users, bringing Google Analytics directly into your WordPress dashboard and eliminating the need to log in separately or navigate complex GA4 reports. Analytify can be an alternative to GTM.
For wordpress users, Analytify automatically pulls the data from GA4 and presents it in a clean, user-friendly format right inside your WordPress admin panel.
Whether you’re tracking conversions, user behavior, or campaign performance, Analytify’s real-time dashboard and detailed reports make it easy to understand what’s working and what needs attention, perfect for marketers, bloggers, and store owners who want insights without complexity.
Still scratching your head about why your GA4 custom events aren’t showing up in reports? The solution might just be mastering some advanced Google Tag Manager features. Learning about Custom HTML tags in GTM gives you incredible power to deploy specific tracking codes, integrate with unique tools, and ensure every single important user interaction gets accurately captured.
Best Practices for Using Custom HTML Tags in Google Tag Manager
When using Custom HTML tags in GTM, it’s important to follow best practices to keep your site secure, fast, and well-organized:
- Minimize Use: Use Custom HTML tags only when GTM’s built-in tag templates or third-party integrations don’t meet your needs. Relying too much on custom code can make management harder and increase the risk of errors.
- Asynchronous Loading: Ensure your scripts load asynchronously (using the async or defer attributes) to prevent blocking the rest of your webpage from loading. This helps maintain good site speed and user experience.
- Avoid Inline JavaScript: Try not to include JavaScript directly in HTML tags. Use external scripts whenever possible to enhance security, simplify debugging, and maintain a cleaner codebase.
- Use Data Layer Variables: Pull data from GTM’s Data Layer instead of hardcoding values. This ensures accuracy and consistency, particularly when handling dynamic content such as product names or transaction values.
- Version Control: Name your tags clearly and document any updates or changes. This makes it easier to track edits, collaborate with others, and manage tags over time.
Troubleshooting Common Issues with Custom HTML Tags in GTM
When working with Custom HTML tags in Google Tag Manager, you may run into a few issues. Here’s how to identify and fix the most common ones:
- Tag Not Firing: If your tag isn’t firing, first double-check your trigger settings. Ensure the conditions you’ve set are being met on the page. Use GTM’s Preview Mode to see if the tag is loading and firing as expected.
- Script Errors: Errors in your custom code can prevent the tag from functioning properly. Open your browser’s developer tools (Console tab) to spot JavaScript errors. Fix any syntax issues or missing elements in your script.
- Performance Impact: If your site becomes slower after adding a Custom HTML tag, the script might be blocking other resources. Optimize your code and use asynchronous loading to avoid affecting page speed.
- Data Layer Variables Undefined: If your tag relies on Data Layer variables, make sure they’re pushed into the Data Layer before your tag runs. You can check this using GTM’s preview or developer tools.
By checking these areas, you can quickly troubleshoot and fix most Custom HTML tag issues.
Alternatives to Custom HTML Tags in Google Tag Manager
While Custom HTML tags offer flexibility, they should only be used when other, more efficient options aren’t available. Here are some effective alternatives:
- Tag Templates
Google Tag Manager offers built-in tag templates for various popular platforms, including Google Ads, GA4, Facebook, LinkedIn, and more. These templates are optimized for performance, easy to configure, and reduce the chances of script errors. - Custom Templates
If you need reusable functionality that isn’t available in built-in templates, you can create your own Custom Tag Templates in GTM. These templates use a secure sandbox and help standardize implementation, making it easier for teams to manage tags without needing to write raw HTML or JavaScript. - Server-Side Tagging
For advanced users and larger websites, server-side tagging is a powerful alternative. It moves tag execution from the browser to a secure server, giving you more control over data collection, improving privacy compliance, and reducing the load on the client side for faster page speeds.
Frequently Asked Questions About Custom HTML Tags
1. What are Custom HTML Tags in GTM?
Custom HTML Tags in GTM are user-defined tags that enable you to insert custom HTML, JavaScript, or third-party scripts directly into your website. They offer flexibility when built-in tag templates don’t meet your needs.
2. Where are the contents of a GTM Custom HTML tag inserted on a page?
The contents of a Custom HTML tag in GTM are injected into the page wherever GTM is loaded, typically in the <head> or just after the <body> tag. The tag’s script is executed based on the trigger conditions you set, such as page load, clicks, or form submissions.
3. What are some of the Best GTM Custom Tags to use?
Some of the best GTM custom tags include:
Facebook Pixel (if not using a template)
Live chat scripts (e.g., Tawk.to or Drift)
Cookie consent banners
Scroll tracking or timer-based JavaScript events.
Heatmap tracking tools like Hotjar
4. How do I create GTM Custom HTML Tags?
To create GTM custom HTML tags, go to your Google Tag Manager account, click on “Tags,” then “New,” and choose “Custom HTML” as the tag type. Paste your custom code and configure the trigger that determines when the tag fires.
5. What are Google Analytics Custom Tags?
Google Analytics custom tags are user-defined tags that you create in Google Tag Manager (GTM) to send specific tracking data to Google Analytics (GA4). Unlike the default GA4 configuration tag, a custom tag allows you to track more specific events, user interactions, or custom parameters based on your needs.
Final Thoughts: Custom HTML Tags in GTM
Custom HTML Tags in Google Tag Manager give you the freedom to insert custom code like tracking pixels, chat widgets, and JavaScript snippets, without editing your site’s core files. We discussed real use cases, including installing marketing tools, tracking custom events, and enhancing user interaction.
You also followed a step-by-step setup process, explored troubleshooting tips, and discovered best practices, such as using async loading and Data Layer variables. For WordPress users, we introduced how Analytify can simplify your Google Analytics reports by showing custom tag data in a clean, real-time dashboard.
Whether you’re adding advanced tracking, optimizing performance, or exploring alternatives like tag templates and server-side tagging, Custom HTML Tags offer powerful ways to customize your website’s behavior through GTM.
For further guidance, read these articles:
Have you tried using Custom HTML Tags in GTM before? What was your use case? Share your experience in the comments below!


