The Ultimate Guide On Translating A WordPress Plugin
Translating a plugin on WordPress is easier than you might think. If you haven’t translated any plugin before, this is the right post for you!
The very first step in this process is to find the right plugin that you want to translate; this could be either your own plugin or any other WordPress plugin on WordPress.org. Here, we will share The Ultimate guide on Translating A WordPress Plugin.
The Ultimate guide on Translating a WordPress Plugin
Finding the Right Plugin
By finding the right plugin means that the plugin you want to translate should be “translation-ready” because not all plugins are translatable. Now, how would you make sure that the Plugin is translatable? Unfortunately, the WordPress plugin repository doesn’t allow you to search for plugins that have been localized, so it is best to check the plugin’s features list to see if it is translation ready or contact the developer directly.
If the plugin is translatable you can normally find a link with the description of translating the plugin. Remember, it is completely up to the developers of the plugin if they mention such a link or not
But there is another way to check if the plugin is localized or not; you can use the link below and replace the “plugin-slug” with the actual slug of the plugin, it will take you directly to the translation page of the plugin.
https://translate.wordpress.org/projects/wp-plugins/plugin-slug
Translating the Plugin
Now the real job, translating a WordPress Plugin. There are three known ways to translate a plugin:
- Translating directly through WordPress.org.
- Using a Gettext translations editor.
- Using a translation plugin, there are several such plugins on the WordPress plugin repository to get the job done.
Translating Through WordPress.org
1. After choosing the right plugin and successfully getting into the translation page in WordPress.org as mentioned above, you
can find there a table of languages with the percentage of already translated strings into that certain language. Here select the
language you want to translate into.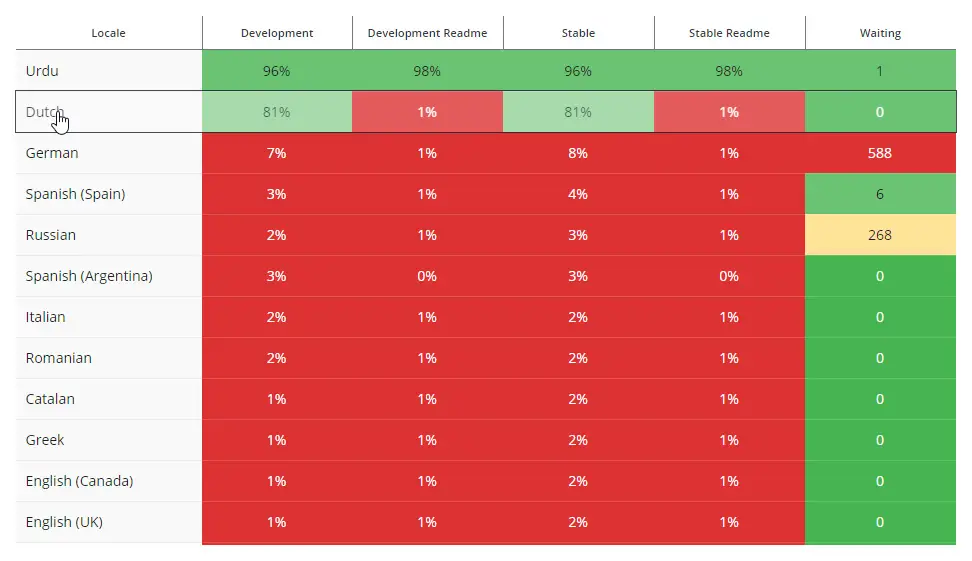
2. Selecting the language will take you to another page where you will find the table of different trunks under the “Set / Sub Project” heading
and their percentage of translated and untranslated strings. Trunks have just categorized stings by WordPress.Here select the trunk you
want to translate first.
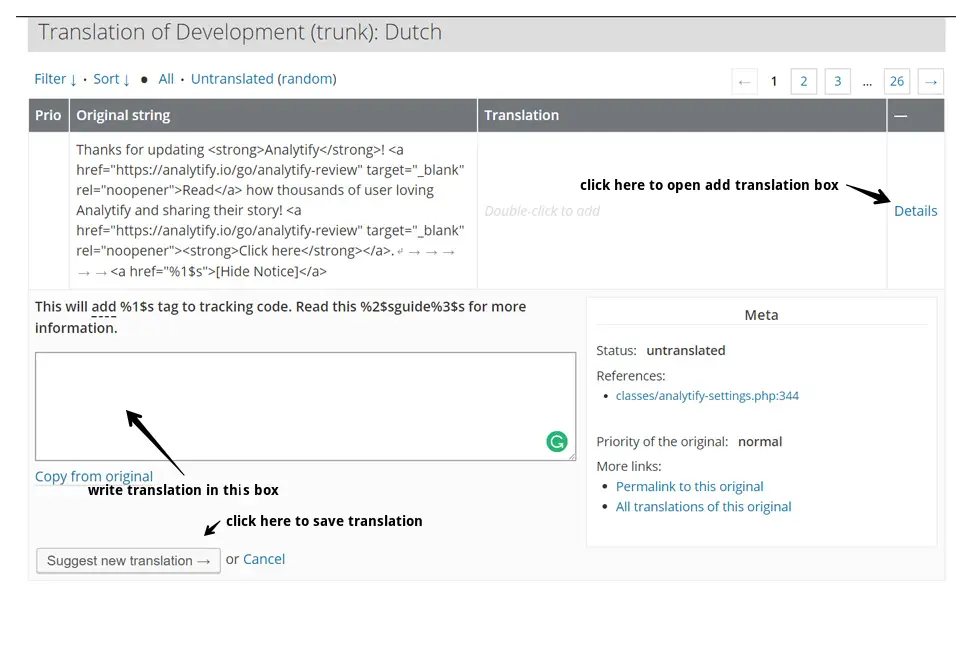
3. After selecting the option you will be taken to all the strings in that trunk. Now you can filter through the “Untranslated” option which will bring all untranslated strings or you can just start right away browsing through strings. To translate, click on “Details” next to any string and write its translation in the box.
Following are some important rules that you should keep in mind when translating:
• While writing translation none of the HTML tags should not be removed.
• The position of HTML tags should not be disturbed.
• The Printf / Sprintf formats i.e. “%1$s” should be placed very carefully and at exactly the same position in the translated string where they were in the untranslated string.
After writing the string click on “Suggest new translation” to save.
After you have done translating strings, a request will be sent automatically to the authors of the plugin to accept the translated strings to be added to their plugin.
Translating With Gettext Translations Editor
We are going to use Poedit, it is a very popular Gettext editor. Although Poedit is free in order to make new POT or translation files, you will have to buy the pro version of it. There are also many other free gettext editors that will let you create new POT files like gted editor.
This option is suitable if you are going to translate your own plugin before uploading it to WordPress.org, it is the best WordPress translating plugin. but even if it’s not your own plugin you can still translate it like this and then send the translated POT file to the author of the plugin. You can do as you like.
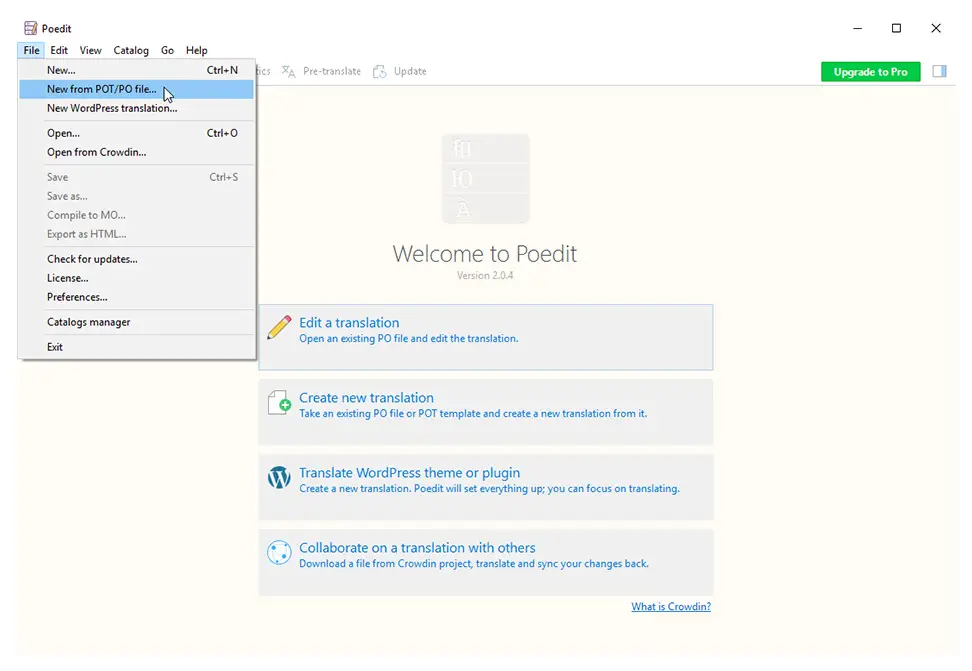
1. Open the application and select “New from POT/PO file” from the Files menu, and locate your plugins default language template which is normally located in the languages folder.
2. From the drop-down menu select the language you want the plugin to translate into.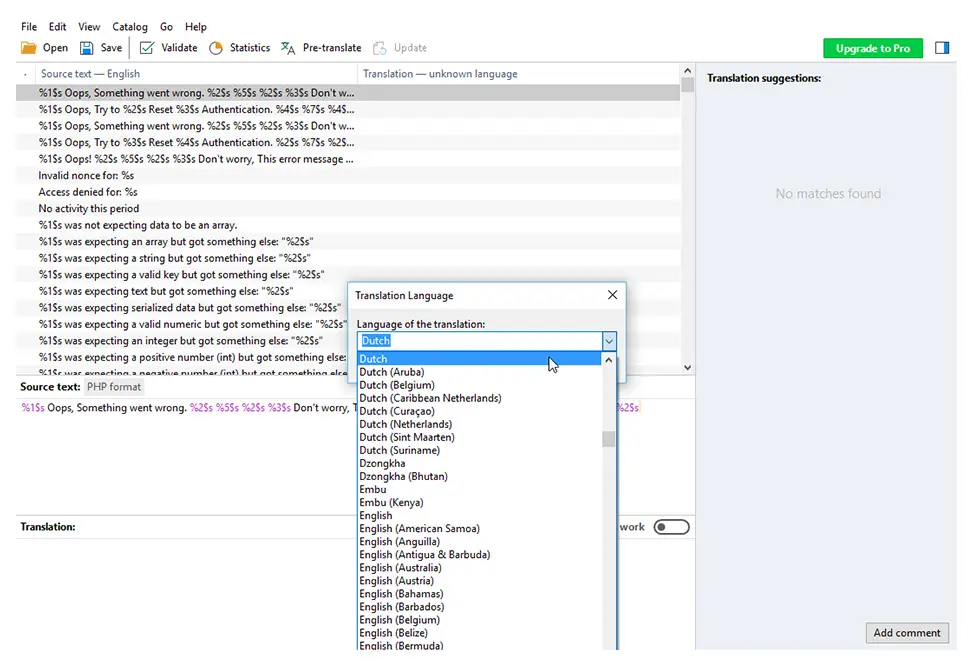
3. All of the plugin strings will come forward. Now select any string from here and write the translation in the box below. Remember the same rules of translation we discussed above in the first method also apply here. 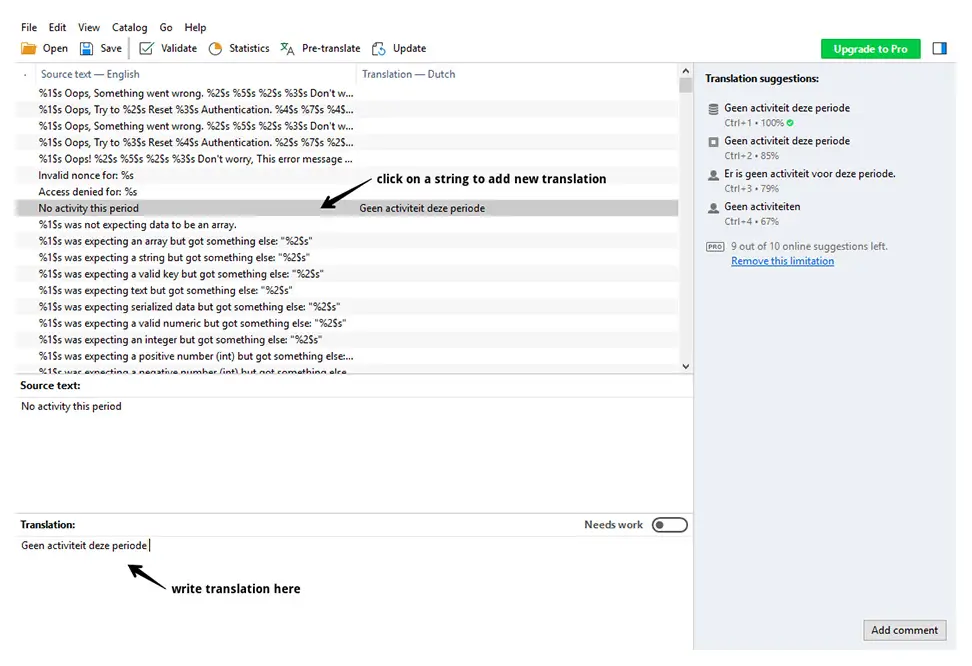
5. Finally when you have translated the strings save the file in the languages folder. You can use this file in your own plugin or if you were translating for some other plugin on WordPress, you can send this file to the developers. The contact information of developers is commonly present in the information tab of the plugin.
Translating With Translation Plugins
There are dozens of translation plugin available in the WordPress repository and the method for translating through any of these translation plugins varies from one another, so it is not possible to discuss each and every one of them rather we will discuss the features of a few popular of those plugins that will help you to choose what’s best for you.
1. WPML
WPML is a paid and the most popular WordPress translating plugin and comes with one year of premium support. It enables you to translate every aspect such as pages, posts, custom post types, etc. in the easiest possible way. It also helps you to connect with professional translation services, where you can hire someone to translate your content. WPML also offers add-ons that provide additional features.
2. Weglot
In the free WordPress translating plugins list, Weglot is one of the best. It provides very efficient and user-friendly translation solutions and automatically detects and translates your content. After translation, it automatically optimizes your translated versions for search engines. Also, you have the option to manually edit translations provided, or like WPML it allows you to order professional translation to ensure the best quality. Weglot is compatible with all Themes and Plugins!
3. Polylang
Polylang is free and easy to use translation plugin and also provide add-ons. It will let you create multilingual content in as many languages as you need. Polylang allows your users to choose their preferred language from their profiles, and it automatically downloads the respective WordPress language packs. Polylang fully supports RTL (Right To Left) languages and works with most WordPress themes.
4. qTranslate
In functionalities, translation lies in between WPML and Polylang. It’s free and gives you the ability to switch between languages while editing in order to work on content in different languages at the same time. It comes with tons of settings with which you can play with. qTranslate like Polylang and WPML also provides a number of useful add-ons.
5. Google Language Translator
Google Language Translator plugin uses Google’s language-translation tool to translate string using shortcodes. This plugin is also free and very handy when you want an easy and fast setup, moreover, it allows viewers to switch between a preferred set of languages and a wide range of Google translator options. Google Language Translator supports 80 languages.
We hope it would be helpful enough for you to start translating your plugins with out Ultimate Guide On Translating A WordPress Plugin . If you have any questions feel free to ask in the comments section.

