
How to Use Google Analytics Email Reports (2025)
Ever wondered how to get Google Analytics scheduled email reports?
Google Analytics email reports offer a powerful solution. This feature allows users to automatically send customized report summaries directly to their email, ensuring that key insights and data are readily available without manually accessing the analytics dashboard.
It not only streamlines your workflow but also ensures that you’re always informed about your website’s performance, making data-driven decisions easier. Whether you’re a seasoned marketer or new to the digital realm, understanding and utilizing Google Analytics 4 email reports and their automated scheduling feature is a step towards more strategic, data-informed decision-making. This article will guide you in all the steps to set up Google Analytics scheduled email reports.
Google Analytics Email Reports (TOC):
What are Google Analytics Scheduled Email Reports?
At its core, Google Analytics scheduled email reports are a feature designed to automate the process of receiving important analytics directly to your inbox. This feature allows users to set up daily, weekly, monthly, or custom-time email reports from Google Analytics. Its primary goal is to provide website owners, marketers, and analysts with regular website performance updates without manually checking their Google Analytics dashboard.
Using the Scheduled Email feature, users can customize which data they receive, tailoring reports to focus on metrics that matter most to their business goals. Whether it’s user engagement, traffic sources, conversion rates, or any other vital analytics, these reports bring the insights directly to you. The value of Google Analytics email reports lies in their ability to keep you consistently informed, enabling proactive adjustments to your digital strategy. With Google Analytics 4 email reports, this becomes even more potent due to GA4’s advanced tracking capabilities and user-centric data models.
Why Use Google Analytics Email Reports?
Google Analytics email reports serve as your eyes on the ever-changing dynamics of your website’s performance. But why should you integrate Google Analytics scheduled email reports into your analytics strategy? Let’s break down the benefits:
- Effortless Monitoring: Google Analytics email reports automate the process of tracking your website’s performance. It means you receive timely insights without navigating through complex dashboards. It’s about bringing simplicity to the complex world of web analytics.
- Customized Insights: With GA4 email reports, you can tailor the information you receive to match your specific needs. Whether it’s tracking user behavior, conversion rates, or specific campaign performances, these reports ensure you’re only focusing on what matters most to you.
- Strategic Decision-Making: Email reports from Google Analytics equip you with the data needed to make informed decisions quickly. This timely access to data means you can adjust your strategies on the go, optimizing for better outcomes based on current performance trends.
- Enhanced Collaboration: Sharing Google Analytics 4 email reports with team members or stakeholders is seamless. By ensuring that everyone receives the same data at the same time, it fosters a collaborative environment for strategic discussions and decision-making.
- Time-Saving: Google Analytics automated email reports save you significant time. Instead of manually pulling reports, you and your team can focus on analysis and implementation, enhancing productivity and efficiency.
- Historical Data Comparison: Scheduled email reports make it easier to compare current performance against past data. This historical insight is crucial for understanding trends over time, helping you to anticipate future changes and adapt accordingly.
How to Set Up Google Analytics Automated Email Reports
Setting up automated email reports in Google Analytics (GA4) is a powerful way to keep your team updated with regular insights into your website or app’s performance. This section will share details step by step, ensuring you can easily schedule and manage up to 50 standard and custom reports for email delivery.
Schedule a Report
- Navigate to Reports: In your GA4 account, click on Reports in the left-hand menu.
- Open the Desired Report: Browse and open the report you intend to schedule for email delivery.
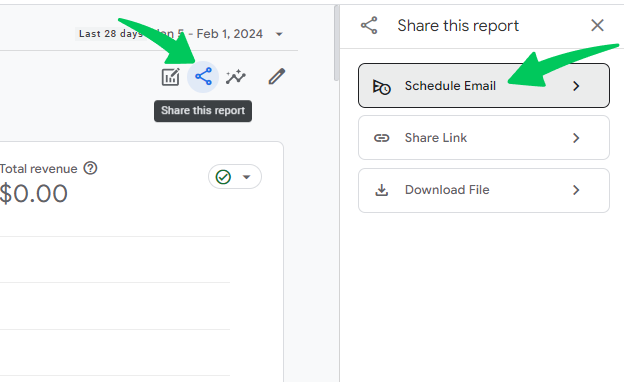
- Share and Schedule: At the top right of the report, click on Share this report >> Schedule email.
If the Schedule email is not visible, you may not have the necessary permissions; only administrators can schedule reports.
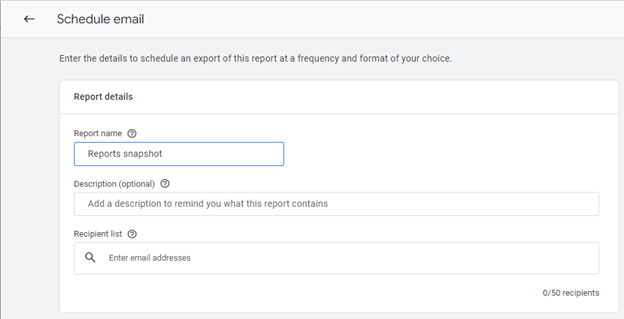
- Complete the Scheduling Form: Fill in the following details to set up your report:
- Report Name: Enter a unique name for your email report, which will appear in the email subject as “GA4 Scheduled Email: [report name]”.
- Description: Provide a suitable description for internal clarity.
- Recipient List: Add up to 50 email addresses of users with access to the GA4 property. Note: If a user has multiple emails associated with their account, the report will be sent to their Gmail address.
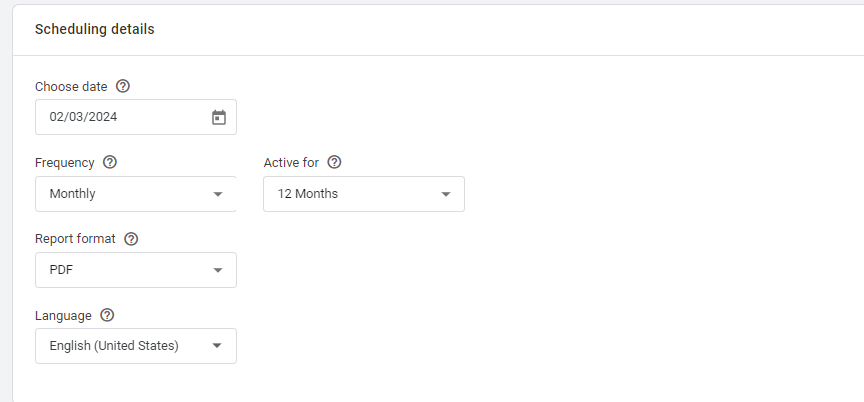
- Choose Date: Select the start date for the first email, considering that data events can take up to 72 hours to process. It’s recommended to schedule reports after this period to ensure completeness.
- Frequency: Decide the delivery frequency (daily, weekly, monthly, or quarterly).
- Active For: Choose the duration of the report’s activity, from 1 to 12 months.
- Report Format: Select either PDF or CSV format for the report.
- Language: Pick the report’s language.
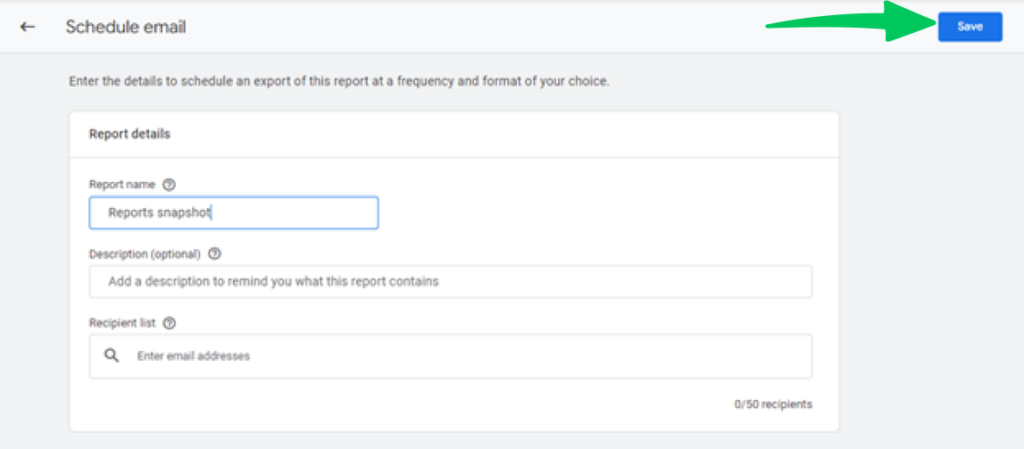
After configuring these settings, click Save to schedule the report, ensuring all fields are filled correctly.
What Happens Next?
Recipients will receive the scheduled reports via email on the selected dates. They have the option to unsubscribe; should they choose to subscribe again later, you will need to add them to a new scheduled report.
View and Manage Scheduled Reports
As an administrator, you have the capability to view and modify scheduled reports:
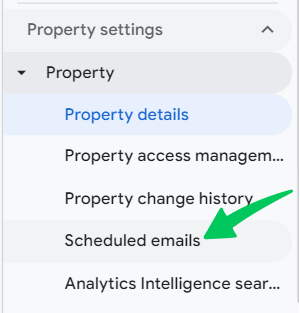
- Accessing Scheduled Reports: Go to Admin, under Property, and click on Scheduled emails.
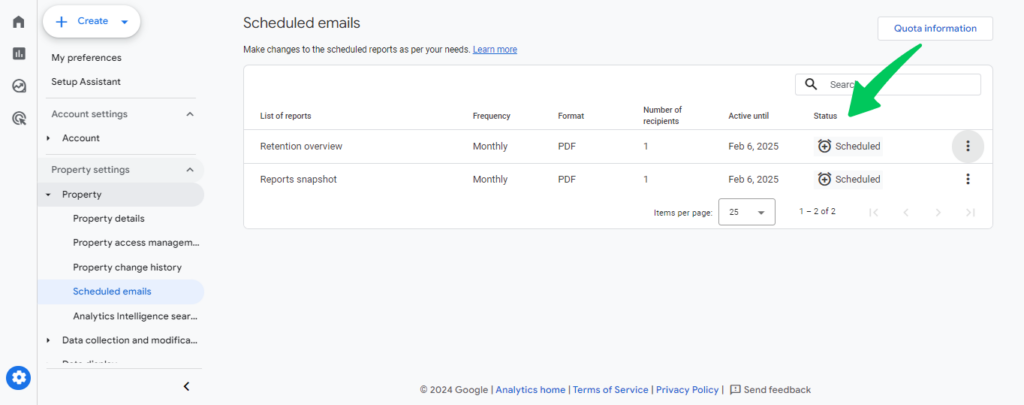
- Managing Reports: Here, you can see all scheduled reports, their status, and details. You can also edit, analyze, or delete any report as needed.
Statuses Explained
You can check the status and manage the scheduled emails by navigating to Admin >> Property >> Property Details >> Scheduled emails.
Each report in the Scheduled Emails page displays a status indicating its current condition.
- Active: Scheduled to be sent today or in the future.
- Scheduled: Set for a future date.
- Expired: The active period has ended.
- No Recipient: Lacks valid email recipients.
- Report Removed: The associated report was deleted.
- Report Invalid: Contains deleted custom dimensions, metrics, or groupings.
- Creator Invalid: Created by someone who no longer has access.
How to Change GA4 Email Reports?
Editing a scheduled email in GA4 is a straightforward process that allows you to update your report’s settings, ensuring that your analytics reports remain relevant and valuable over time. Whether you need to adjust the recipient list, change the frequency, or update the report content, GA4 provides the flexibility to modify your scheduled email reports as your analysis needs change.
Here’s a step-by-step process for editing a scheduled email in GA4:
Step 1: Access Your Scheduled Emails
To edit GA4 email reports, you need to access them by navigating to Admin >> Property >> Property Details >> Scheduled emails.
It will include a list of all your scheduled email reports within the selected property.
Step 2: Find the Report
Browse through your list of scheduled emails to find the report you wish to edit. You should look for the specific report name or check the scheduled dates to locate the correct one.
Step 3: Open Report Settings
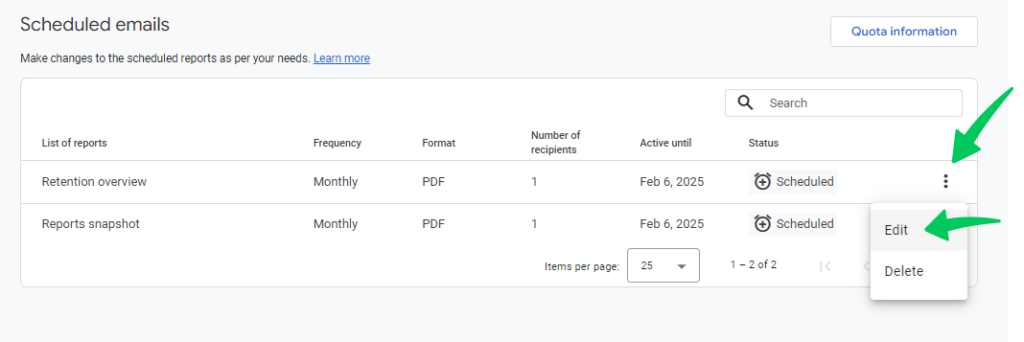
Once you’ve found the report, click on its name or the More (three dots) menu next to it, and select Edit. This will open the report’s configuration settings.
Step 4: Update Report Details
Within the editing interface, you can make various changes to your scheduled email, including the report name, description, recipient list, report format, and date.
Step 5: Save Your Changes
After making the necessary adjustments, review all the changes to ensure they meet your current reporting needs. Then, click the Save button to apply the changes.
How to Delete GA4 Email Reports?
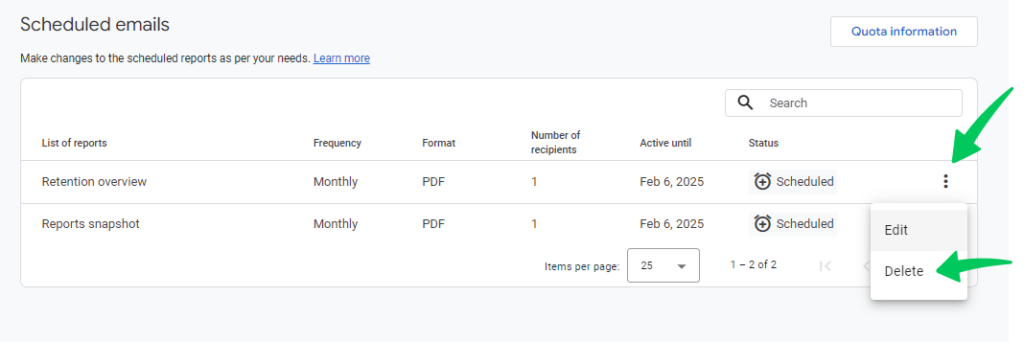
Similarly, follow the same steps as shown above until you find the desired report (Step 2). Now, you can remove a scheduled report by clicking More(three dots) >> Delete.
Automate Google Analytics Reporting on WordPress with Analytify
WordPress users, ranging from bloggers to business owners, often need a more integrated approach to access their Google Analytics data without the hassle of constant manual checks or navigating through complex analytics dashboards. This is where Analytify’s Email Notification Add-on steps in, offering you a seamless and powerful solution to automate Google Analytics reporting right within your WordPress environment. Here’s why and how this add-on stands out as a vital tool for WordPress users.
Simplified Analytics Directly to Your Inbox
The primary advantage of Analytify’s Email Notification Add-on lies in its ability to simplify Google Analytics data. It delivers key insights directly to your email, informing you about your website’s performance without logging into your Analytics account. This simplicity is invaluable for WordPress users looking for quick, actionable insights to guide their content and marketing strategies.
Customizable Reports Tailored to Your Needs
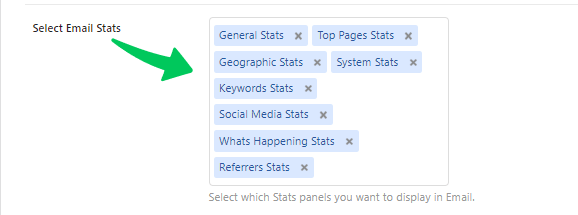
One of the standout features of the Email Notification Add-on is its high degree of customization. Users can tailor reports to focus on the metrics that matter most to them: page views, session duration, social media stats, audience demographics, and more. This customization ensures that you’re not overwhelmed with data but instead receive focused insights relevant to your goals.
Read our complete guide to Customize GA4 Email Reports For Specific Stats.
Scheduled Email Analytics for Active Decision-Making
Another crucial benefit is the ability to automate reports on a daily, weekly, or monthly basis. This consistent, automated delivery of analytics allows WordPress site owners to be proactive rather than reactive in their decision-making processes. By understanding trends, you can adjust your strategy in real-time, optimizing your site for better performance and engagement.
Read our complete guide to Set Email Reporting Schedule Using Email Notification Addon.
Enhancing Collaboration and Transparency
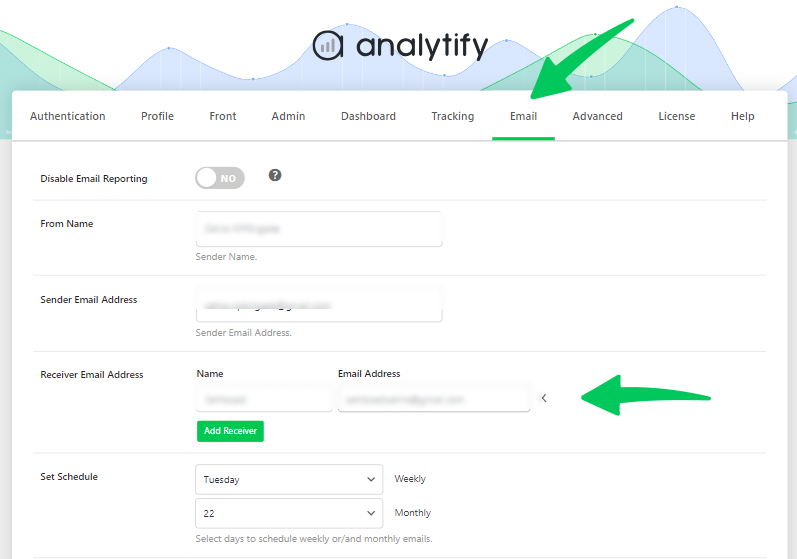
Analytify’s Email Notification Add-on enhances collaboration and transparency for teams and agencies managing WordPress sites. By setting up reports to be sent to multiple team members or clients, everyone stays on the same page regarding the site’s performance. This shared understanding facilitates more informed discussions and collaborative decision-making.
Read our guide to Set Receiver Email Address With The Email Notifications Addon.
Google Analytics Email Reports FAQs
Can I schedule Google Analytics 4 (GA4) email reports directly from the GA4 interface?
You can schedule Google Analytics 4 email reports directly from the GA4 interface by navigating to the report you wish to schedule, clicking on ‘Share this report,’ and selecting ‘Schedule email.’ However, ensure you have the necessary administrative permissions to access this feature.
How do I customize Google Analytics email reports?
Access the scheduled emails section within the GA4 admin panel to customize Google Analytics email reports. From there, you can edit the report settings, including the frequency, recipients, and the specific metrics or dimensions you want included in your report.
How many email addresses can receive GA4 scheduled email reports?
You can add up to 50 email addresses to receive GA4 scheduled email reports. This feature is handy for sharing insights with a larger team or clients to ensure everyone is up-to-date with the website’s performance.
What makes Analytify’s Email Notification Add-on beneficial for WordPress users?
Analytify’s Email Notification Add-on is beneficial for WordPress users because it simplifies the process of receiving Google Analytics insights. With this add-on, users can receive automated, customizable email reports directly in their inbox, making it easier to keep track of their site’s performance without the need for daily logins to Google Analytics.
Can I set up Analytify to send Google Analytics reports to multiple recipients?
Yes, with Analytify’s Email Notification Add-on, you can configure the reports to be sent to multiple recipients. It is ideal for teams and stakeholders who need to stay informed about the WordPress site’s analytics, fostering a collaborative approach to data-driven decision-making.
How do I get started with Analytify and its Email Notification Add-on?
To get started with Analytify and its Email Notification Add-on, first install the Analytify plugin on your WordPress site. Then, activate the Email Notifications Add-on from within the Analytify dashboard. From there, you can customize the settings to schedule and tailor your analytics reports according to your needs.
Conclusion
Google Analytics email reports and Analytify’s Email Notification Add-on offer powerful solutions for WordPress users to automate and simplify their website analytics. Integrating these tools into your analytics strategy allows you to make timely and informed decisions that drive success.
This article has helped you through the essential steps and strategies for setting up Google Analytics email reports and Analytify’s Email Notification Add-on for WordPress users. By scheduling analytics reporting, you can ensure that you and your team are always in the loop with the latest website or app performance metrics, enabling proactive adjustments and strategic planning.
We explored how to set up Google Analytics scheduled email reports, customize them to meet your specific needs, and manage them efficiently to keep your analytics strategy on track.
You may also like to read our guide on How to Access Google Analytics Without Gmail.
How will you transform your analytics strategy to unlock new insights and opportunities for your website or app? Comment your ideas in the comments below.




Trying to schedule reports to NON google account users. Did GA change so that this is now not possible? This used to be an option with scheduled reports.
I’ve also tried to add users at the property level and it will not permit an email address that is NOT associated with a Google account.
Yes, Google Analytics now requires users to have a Google account to access reports and manage permissions. Previously, it was possible to schedule reports for non-Google account users, but this feature has been restricted. If you need to share reports with users who don’t have Google accounts, you might consider exporting reports and sending them manually or using other methods to share the data.