
How To Get Google Client ID and Client Secret From Google Developers Console
Google Client ID and Client Secret are required for authentication and authorization purposes when integrating applications with Google services, such as Google APIs or OAuth-based authentication. The Client ID and Client Secret are obtained from the Google Developers Console when you create a new project and enable the corresponding APIs.
In this article, we’ll guide you through setting up Google Client ID and Client Secret for authentication and authorization when integrating applications with Google services.
Table of Contents
Get 60% OFF Analytify! Use Code BFCM60
Supercharge your analytics with Analytify this Black Friday! Enjoy a 60% discount and unlock effortless Google Analytics integration for your WordPress site. Track insights, boost performance, and make data-driven decisions. Hurry—this exclusive deal ends 2nd December!
How To Setup Google Client ID and Client Secret on the Google Developers Console
One of the most important tasks when integrating Google APIs into your application is to obtain the Google Client ID and Client Secret from the Google Developers Console.
After receiving these credentials, you can authenticate with various Google services, including Drive, Calendar, YouTube, and Analytics. Fortunately, getting a Client ID and Secret from the Developers Console is easy.
Let’s see step by step how to do it.
Step 1: Go To Google Developers Console
First, go to the Google Developers Console and log in with your Google account.
Step 2: Create A New Project
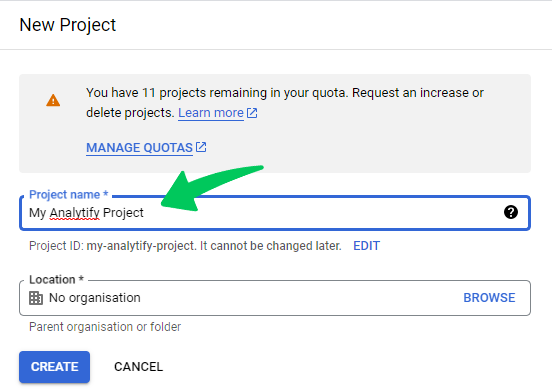
Once logged in, click the Create Project button to create a new project.
On the next page, you will be asked to enter your Project Name. This name will help you recognize your project in the console, so make sure it is meaningful.
After that, click on the Create button.
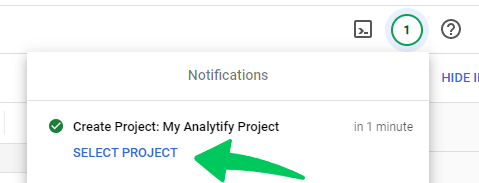
Wait a couple of seconds while your project gets created. You will see a notification when your project is ready.
Click on the Select Project link to enter the dashboard for the project you just created.
Step 3: Enable Required Google Analytics API
- Google Analytics API
- Google Analytics Reporting API
- Google Analytics Admin API
- Google Analytics Data API
- Google Search Console API
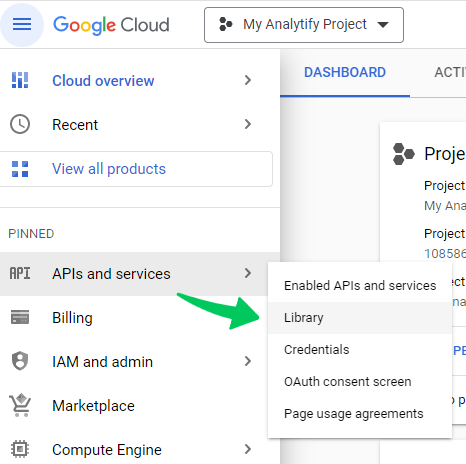
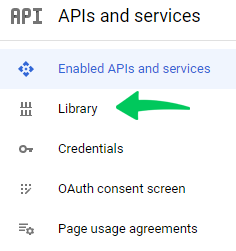
Now, you need to enable five APIs for this project to work. First, hover over APIs and Services in the navigation menu on the left and click Library.
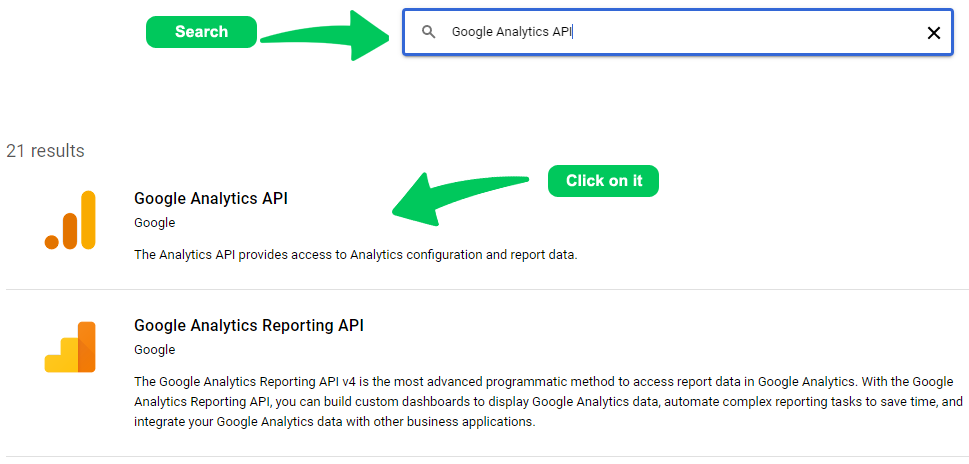
Type Google Analytics API in the search box and click on the result.
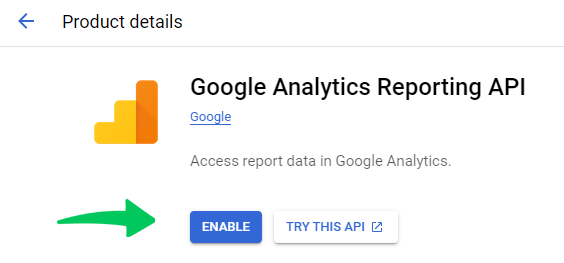
On the next page, click on Enable API button.
Repeat the same steps for “Google Analytics Reporting API.”
Click on Library on the left menu.
Type “Google Analytics Reporting API” in the search box and click on the result.
On the next page, click on Enable API button.
In addition to the two APIs mentioned above, you should also consider selecting three more APIs to enable in your Google Cloud Console:
- Google Analytics Admin API: This API is focused on administrative tasks related to Google Analytics. It allows users to manage account permissions, create and manage custom dimensions and metrics, and perform other administrative tasks.
- Google Analytics Data API: This API provides a more flexible and powerful way to access and retrieve data from Google Analytics than the Google Analytics API. It supports more advanced querying and filtering, allowing users to retrieve data from multiple views or properties simultaneously.
- Google Search Console API: This API allows users to programmatically access data from Google Search Console, which provides insights into how their website appears in Google search results. It can be used to retrieve information such as search queries, impressions, click-through rates, and more.
Step 4: Set Up the OAuth Consent Screen
Before you can generate the Client ID and Secret, you need to configure the OAuth Consent Screen in the project.
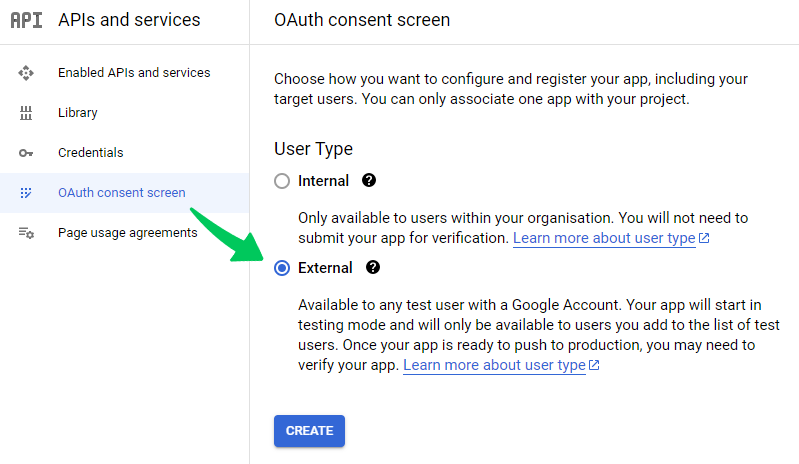
Click the “OAuth consent screen.” On the next page, set the “User Type” to “External” and click Create.
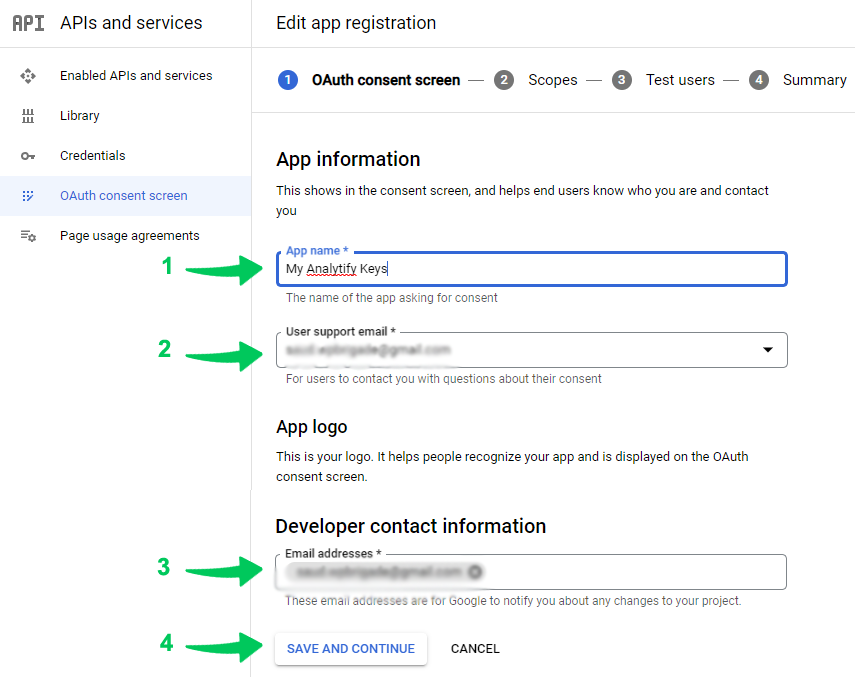
Next, enter all the required details, such as App Name and Support Email, and click Save And Continue.
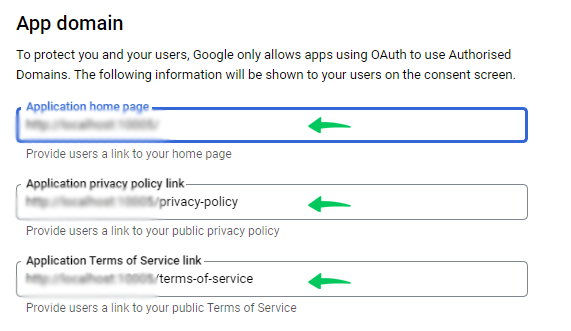
Note: The information under “App domain” is not required. If you leave it empty, your App will be “unverified,” You will see an “Unverified App” alert when you try to log in from this App. If you add the information under (The application home page, Application privacy policy link, and Application terms of server link), Google (in some time) will verify the App.
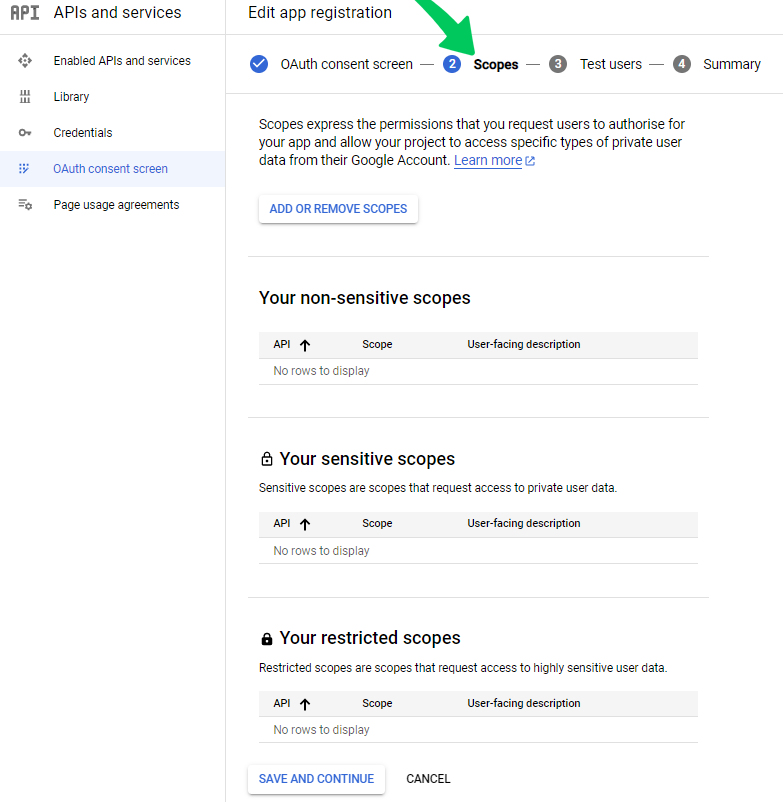
After clicking “Save and Continue,” you will be taken to the Scopes page; you don’t need to change anything here. Just click “Save and Continue.”
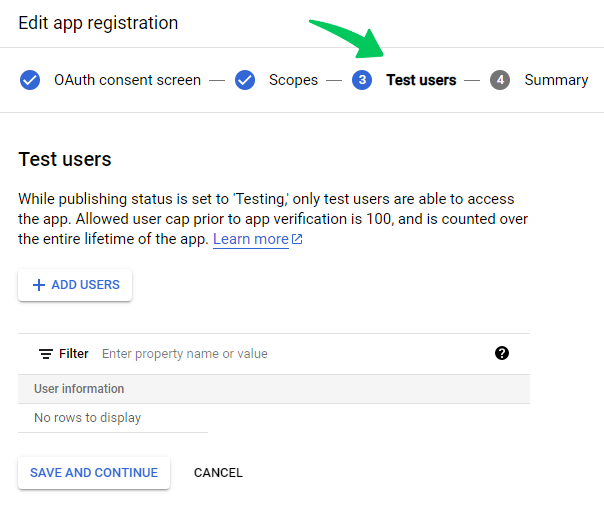
Next, you will see the “Test User” page; you don’t need to change anything here. Just click “Save and Continue.”
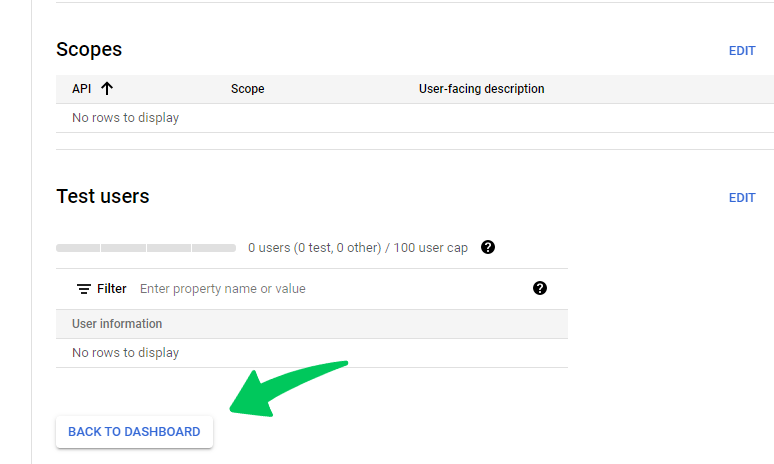
Lastly, click “Back to Dashboard” to return to the “OAuth consent screen” dashboard.
Step 5: Publish the App
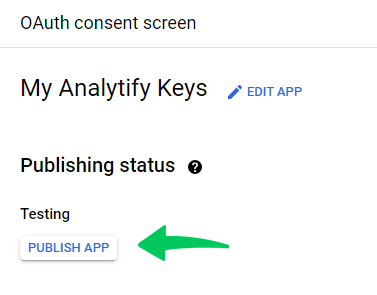
The next step is to publish your App. To do this, click on the “Publish APP” button.
A popup will ask for confirmation; click “Confirm.” Your App is now published and ready to use.
Step 6: Generate Credentials
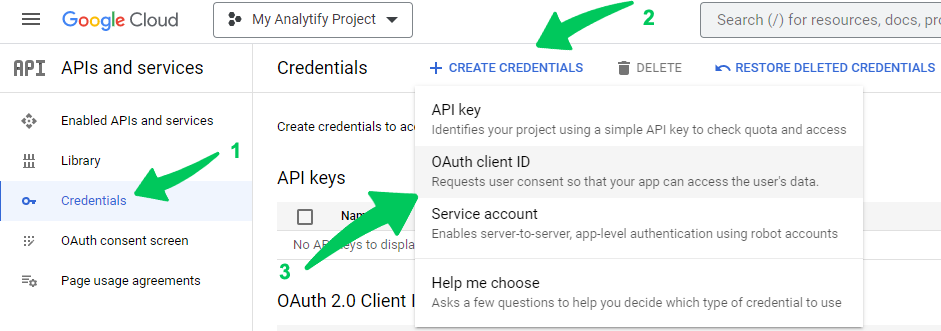
The final step is to generate the Client ID and Secret. To do this, navigate Credentials in the left navigation menu.
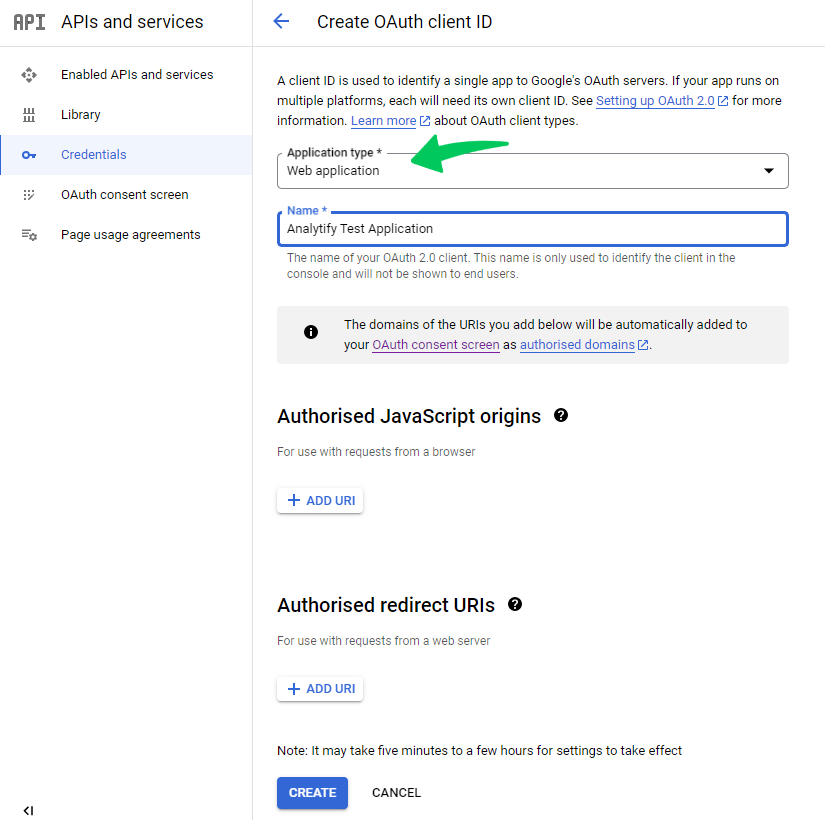
On this page, click “Create Credentials” and select “OAuth Client ID”. You will be redirected to the “Create OAuth click ID” page.
On the next page, select “Web Application” and enter your application name in the textbox.
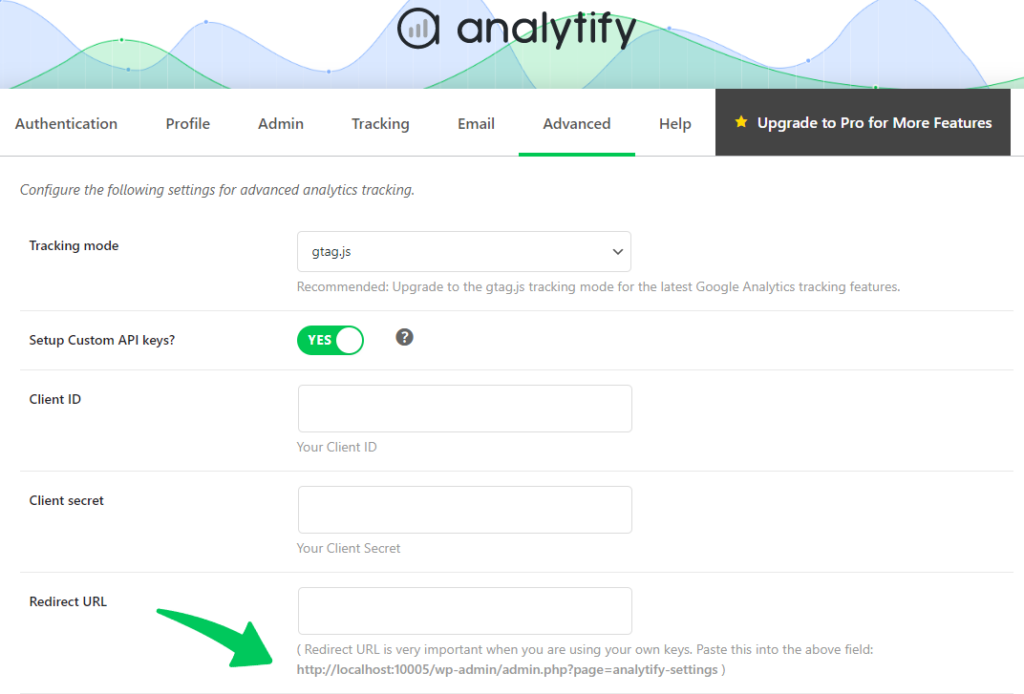
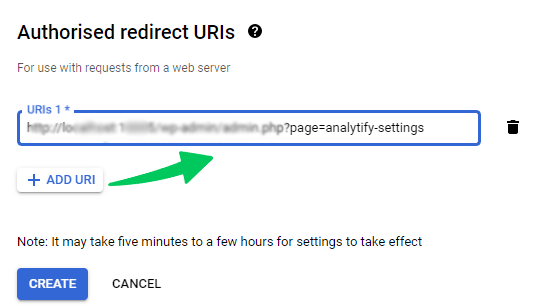
Next, on the same page, you will find the “Authorised redirect URIs” section. This is where you will paste the redirect URL, which you got from Analytify >> Setting >> Advanced (tab).
Next, paste the URL in this Authorised Redirect URLs field and click “Create.”
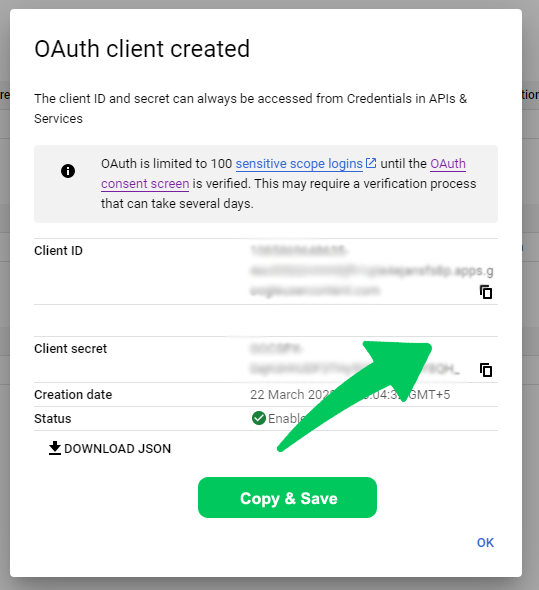
You will now see a popup window containing your Client ID and Secret. Make sure you copy this information somewhere safe and click “OK.”
And that’s it! Your Google Developers Console setup is complete. You can now use the Client ID and Secret in Analytify’s settings to connect your Google Analytics account with your WordPress website.
Let’s see how you can do that in the next step.
Step 7: Configure Analytify Settings
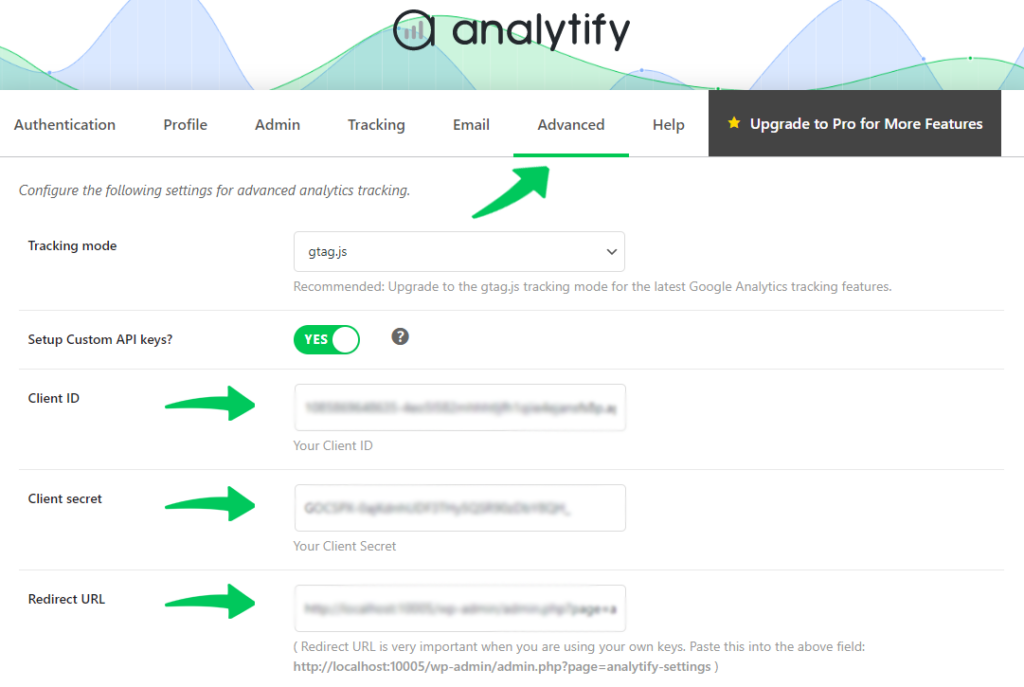
Now that you have your Client ID and Secret, it’s time to configure the Analytify settings. To do this, go to Analytify >> Settings. Next, Click on the Advanced Tab.
Next, in the “Setup Custom API Keys” section, paste your Client ID and Secret that you copied from Google Developers Console. The “Redirect URL” will be the URL you see written below. Just copy and paste from there and “Save Settings.”
Next, you need to authenticate your Google Analytics Account with Analytify.
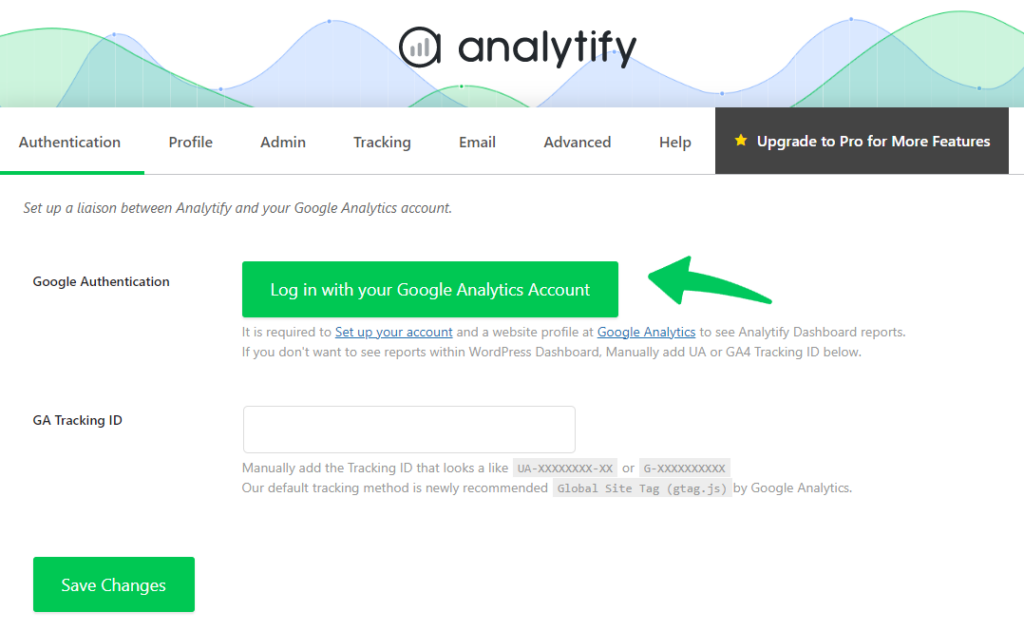
To do this, go to Analytify Settings >> Authentication and click “Log in with your Google Analytics Account.”
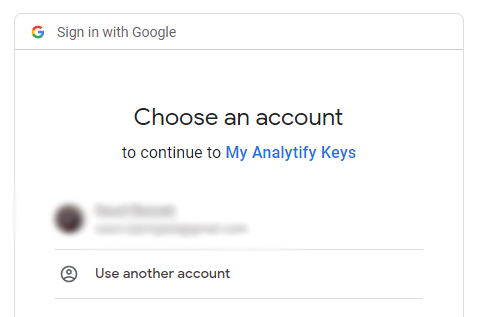
After clicking “Log in with your Google Analytics Account,” you will be redirected to the Google Accounts Authentication page; you have to select the Google Account associated with your Google Analytics account.
Get 60% OFF Analytify! Use Code BFCM60
Supercharge your analytics with Analytify this Black Friday! Enjoy a 60% discount and unlock effortless Google Analytics integration for your WordPress site. Track insights, boost performance, and make data-driven decisions. Hurry—this exclusive deal ends 2nd December!
App Verification Alert
You may get the “This app isn’t verified” alert during the authentication of your Google account. You can continue without app verification by clicking on the “Advanced” option and the “Go to *YOURDOMAINNAME* (unsafe)” link.
Although you can continue using an “Unverified App,” if you want to verify your App, don’t worry. We have covered this in the next heading.
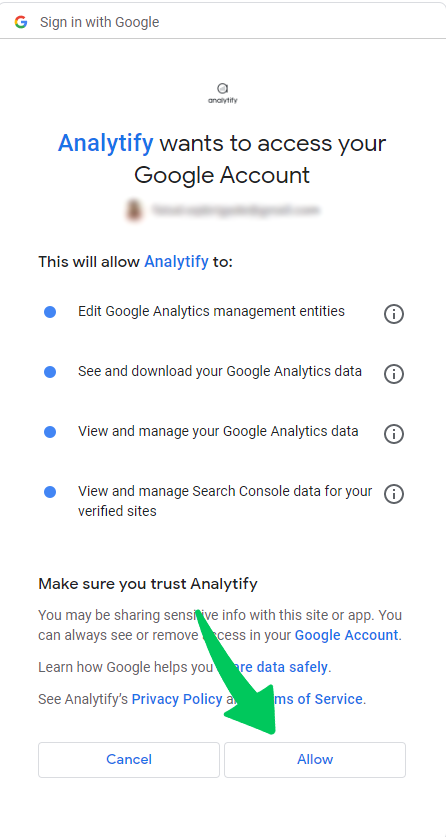
In the next step, you will be asked to Allow the permissions. You have to click on the Continue button.
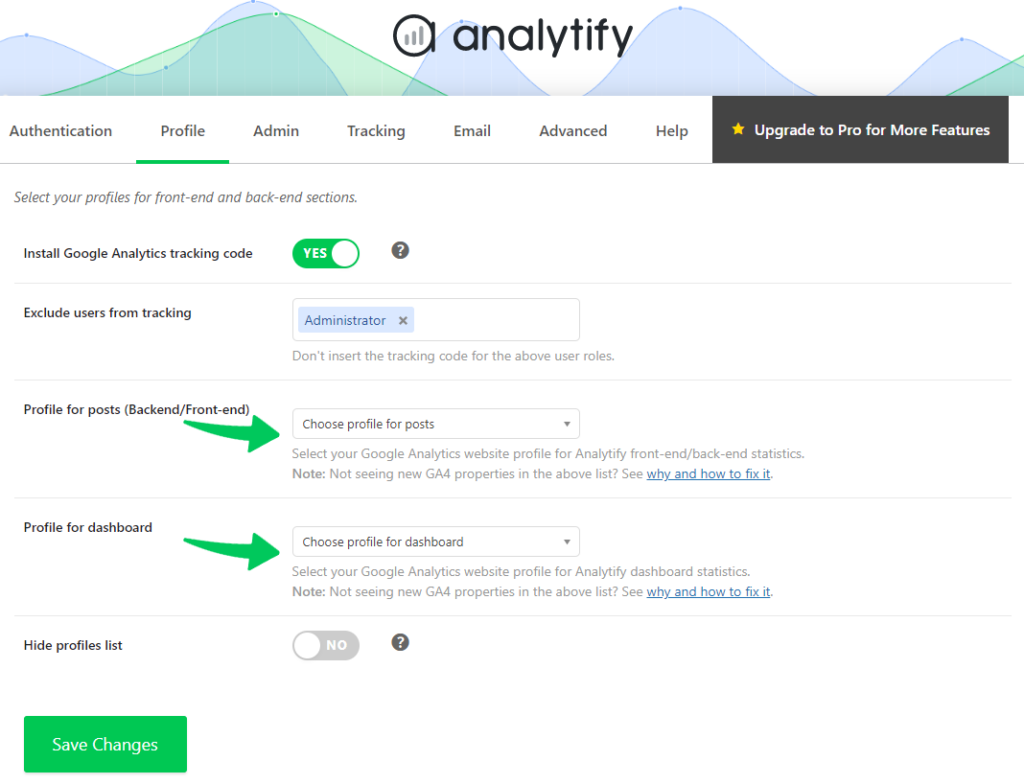
And that’s it! Your Google Analytics account is now successfully connected with Analytify. You will be redirected back to Analytify >> Profiles. You must select “Profiles for posts” and “Profile for dashboard.”
- “Profiles for posts” is the profile used for tracking users.
- “Profile for dashboard” is the profile used for showing stats on Analytify’s Dashboard.
For most people, both these options will be the same. After selection, click “Save Changes.”
Congratulations! you have successfully implemented the Google Analytics APIs key for Analytics Tracking in Analytify. You can get the Client ID and Client Secret key from Google Developers Search Console.
How To Verify The App
Once you have created the Client ID and Secret, verifying your App is important. To do this, follow the steps below:
Step 1: Open the Google Cloud Platform page. Open the dashboard of the project you just created (the project whose keys you are using in Analytify).
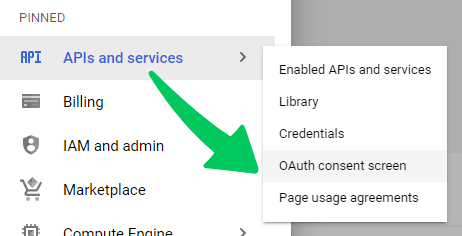
Step 2: Click on the “Hamburger” menu to open the navigation menu. Hover over “APIs & Services” and click “OAuth consent screen”.
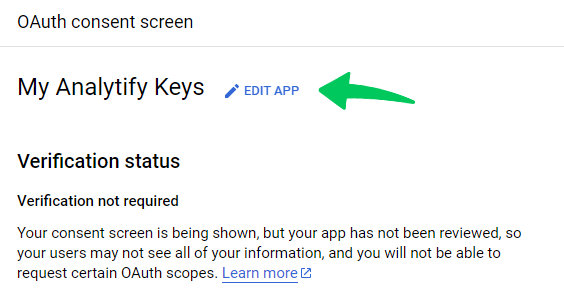
Step 3: You will be taken to the Dashboard of the App you created. Click on the “Edit App” link.
Step 4: Fill in all the fields under “App domain”.
- “Application home page” is the link to your website’s home page.
- “Application privacy policy link” is the link to the privacy policy page of your website.
- “Application terms of service link” is the link to your website’s terms of service page.
After filling in the information with the appropriate links, click “Save and Continue.”
Step 5: You will be taken to the “Scopes” page, just click “Save and Continue.” Again click “Save and Continue“ on the “Optional info” page. Lastly “Back to the Dashboard” button on the “Summary” page.
Note: After you confirm or submit the app, the Google Trust and Quality team will contact you through email to verify your property ownership through the Google search console.
Google’s trust and quality team will verify the data on your site and email you once they have verified your app.
Conclusion
That’s all! We hope after reading this article, you can easily connect your Analytify site with Google Analytics. If you have any comments feel free to ask us via the comment section below.
You can also check out our guide on How to Migrate to Google Analytics 4 (Step by Step).
Frequently Asked Questions
Why do we need a Google client id and secret key?
For the integration of Web Apps or WordPress plugins, we need a Google client id and secret key
How to get Google Client ID and Client Secret?
Through Google Developer Console you can get Google Client ID and Client Secret.






Thanks a lot, Adnan. It was really helpful. I’ve tried other steps and almost gave up till I met this. I followed the procedure step by step and it got me the result I needed.
You are welcome, Daniel 🙂
Hello ! i am trying to authenticate using this script:
from pydrive.auth import GoogleAuth
from pydrive.drive import GoogleDrive
gauth = GoogleAuth()
gauth.LoadCredentialsFile(‘client_secrets.json’)
if gauth.credentials is None:
gauth.LocalWebserverAuth()
elif gauth.access_token_expired:
gauth.Refresh()
else:
gauth.Authorize()
gauth.SaveCredentialsFile(“mycreds.txt”)
drive = GoogleDrive(gauth)
but i got this error: KeyError: ‘_module’
how can i fix it ?? thanks !
Impressive! Thanks for the article.
King regards,
Harrell Griffin
I’m getting a similar issue to Mohammad. When I try to authenticate with my own API, it connects to Google, but once I click allow it redirects me back to a 404 page on my site instead of the analytify authentication page.
Hi,
After I configure my own analytics API key in the plugin when I try to login to my google analytics account I get 403 forbidden error.
What is the problem?
Hi,
After I configure my own API key, when I try to login with google analytics account I get 403 Forbidden error.
What is the problem?
I can not understand what to insert into Authorized redirect URI
it is your firebase auth url. check in firebase-> Authentication-> SIGN-IN METHOD-> facebook login, OAuth redirect url
Where can i Get Redirect URI? I can’t find Redirect URI, plz help me..
Where can i get the redirect URI? I can’t find Redirect URI, Plz help me
Redirect URI is your plugin’s settings page.
help a lot ,thanks
Help me please. I used gdata.youtube.service to upload video on youtube channel – i have YOUTUBE_DEVELOPER_KEY
gdata sends me error now. As a solve of this problem i wanted to go for API3 but it tells me to use
CLIENT_SECRETS_FILE = “client_secrets.json”
What is it? A once more new KEY? Or I cen gen it from
YOUTUBE_DEVELOPER_KEY ?
“client_secrets.json” file actually contains the Keys. You will generate this file from the developers console.
Hi
Where do I find the google access code? Your Access Code:
Thanks Allan
In recent update to WP Analytify, You don’t need access code. Simply login with your Google account and you will be connect.
Update your WP Analytify please.
Ok, thanks. How do I update it Adnan!
Just to let you know, that when I t to get short url from inside my blog, it went error, and then I couldn’t access my pages, so had to deactivate the plugin! So hope the updated version works.
🙂
This what I get. Please advise. Thanks!
Fatal error: Uncaught exception ‘Shortify_WP_Google_Service_Exception’ with message ‘Error calling POST https://www.googleapis.com/urlshortener/v1/url: (403) Daily Limit for Unauthenticated Use Exceeded. Continued use requires signup.’ in /home3/becomey1/public_html/wp-content/plugins/wp-shortify/src/Google/Http/REST.php:79 Stack trace: #0 /home3/becomey1/public_html/wp-content/plugins/wp-shortify/src/Google/Http/REST.php(44): Shortify_WP_Google_Http_REST::decodeHttpResponse(Object(Shortify_WP_Google_Http_Request)) #1 /home3/becomey1/public_html/wp-content/plugins/wp-shortify/src/Google/Client.php(503): Shortify_WP_Google_Http_REST::execute(Object(Shortify_WP_Google_Client), Object(Shortify_WP_Google_Http_Request)) #2 /home3/becomey1/public_html/wp-content/plugins/wp-shortify/src/Google/Service/Resource.php(195): Shortify_WP_Google_Client->execute(Object(Shortify_WP_Google_Http_Request)) #3 /home3/becomey1/public_html/wp-content/plugins/wp-shortify/src/Google/Service/Urlshortener.php(136): Shortify_WP_Google_Service_Resou in /home3/becomey1/public_html/wp-content/plugins/wp-shortify/src/Google/Http/REST.php on line 79
You are talking about Shortify not WP Analytify.
Ahhh, so I am. Thanks! 🙂
Will get onto the correct product and try again!
Thanks Adnan
Hi,,
I created oauth for installed application i.e., android correctly, but when i downloaded json file in that client secret key is missing.How do i find it, is google changed their policy? Pls help me to find client secret key.
You should update this tutorial. Google has changed its layout and your instructions do not reflect the actual page.
I am getting a 401 error when requesting “Get your access code”.
Hey @Caio
Yes, I saw that and have update this tutorial. Let me know If it helps ?
I am still getting this 401 message! What am I doing wrong?
Hi,
I just installed the plugin and it looks really great. But I miss the click route people have. Where can I see on a page where people came from and what page they went to after this particular page or post? I can’t find it in the overview.
Thanks for your reply in advance.
Not working! Every time I click ‘Authenticate’, I am taken to http://ideas2live4.com/wp-admin/admin.php?page=analytify-settings
I am asked to enter my API keys BUT there is nowhere to enter those keys! I’ve been going around in circles for 30 minutes. What am I doing wrong???
Hey, you are Premium Customer right ??
You don’t need to enter Keys. Just authenticate and paste the Access code and it should work.
Check this video for Premium customers.