GTM Custom JavaScript Variable (Explained 2026)
Are you struggling to track custom interactions in Google Tag Manager (GTM)? While GTM provides built-in variables, sometimes you need more flexibility to capture specific data points or manipulate values dynamically. This is where GTM Custom JavaScript Variables come in. These user-defined functions allow you to extract data, modify event parameters, and enhance your tracking capabilities beyond GTM’s default settings.
In this article, you’ll learn what a GTM Custom JavaScript Variable is, how to create one in GTM, best practices for implementation, and how to troubleshoot common issues. Plus, we’ll explore how Analytify simplifies tracking with automated event monitoring and real-time analytics.
Let us get started!
GTM Custom JavaScript Variable (TOC):
What is a Custom JavaScript Variable in Google Tag Manager?
A Custom JavaScript Variable in Google Tag Manager (GTM) is a user-defined function written in JavaScript that allows you to create dynamic values for use in your tags, triggers, and other variables. It provides a flexible way to manipulate and extract data, perform calculations, or customize tracking behavior beyond the built-in variables in GTM.
A Custom JavaScript Variable is a self-contained function that must return a value. The function should start with function() {} and include a return statement. It executes when referenced in a tag, trigger, or another variable.
Use Cases of Custom JavaScript Variable:
Here are some practical ways to use GTM Custom JavaScript Variables :
- Extracting URL Parameters – Retrieve specific query parameters from a URL for tracking.
- Custom Event Tracking – Modify event labels dynamically based on user interactions.
- Cookie or Local Storage Retrieval – Fetch values from browser storage for advanced tracking.
- Regex-Based Modifications – Format or clean up data before sending it to Google Analytics.
- Dynamic Values for Tags – Generate dynamic UTM parameters or custom values for tracking pixels.
Example:
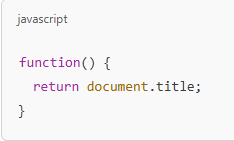
A simple Custom JavaScript Variable that returns the page title:
When used in a Google Analytics tag, this will dynamically populate the page title as a variable.
Why Use Custom JavaScript Variables in GTM?
Custom JavaScript Variables in Google Tag Manager (GTM) provide advanced flexibility for tracking and data manipulation. Here’s why they are beneficial:
- Dynamic Data Processing: Modify, format, or clean data before sending it to analytics tools, ensuring accurate reporting.
- Advanced User Interaction Tracking: Capture complex user behaviors, such as scroll depth, video engagement, or multi-step form submissions.
- Custom Trigger Conditions: Create precise triggers by defining conditions that go beyond GTM’s built-in options, improving tag firing accuracy.
- Extract Data from Website Elements: Retrieve values from page elements, such as text fields, buttons, or custom attributes, for more granular tracking.
- Enhanced URL Parameter Handling: Extract and manipulate query strings, UTM parameters, or referrer data for better campaign tracking.
- Improved Cookie and Local Storage Access: Read and utilize cookie values or local storage data to personalize user tracking and segmentation.
GTM Custom JavaScript Variables help you track and process data more effectively by offering flexibility in capturing user interactions, modifying data, and improving tag accuracy. By using them, you can enhance your analytics strategy.
How to Create a Custom JavaScript Variable in Google Tag Manager
GTM Custom JavaScript Variable is a simple process that allows you to define dynamic values for use in your tags, triggers, and other variables that aren’t readily available through built-in variables. These variables help you track user interactions more precisely, categorize data, and customize event tracking.
For example, Google Analytics 4 (GA4) doesn’t natively differentiate first-time and returning users within Google Tag Manager. This is where a Custom JavaScript Variable becomes extremely useful. Its job is to check whether a user visits the website for the first time or is a returning visitor.
By creating a variable that detects visit history, you can segment users and trigger specific tags. The variable uses localStorage to distinguish between first-time and returning visitors.
Basic Understanding of the Code
Before implementing the variable in Google Tag Manager, it’s helpful to understand how the underlying JavaScript code works. This will clarify what the variable checks for and how it determines whether a user is visiting for the first time or returning. Let’s see the logic behind the code!
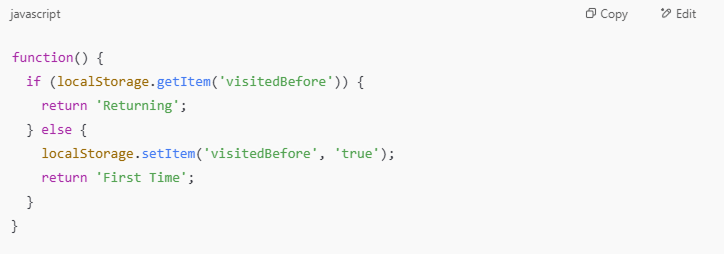
Here’s the code for reference:
1. function() {
- This declares an anonymous function (a function without a name), which GTM runs when it evaluates the variable.
Note: If you’re writing a named (defined) function, you typically define it globally (outside GTM) and then call it inside your Custom JavaScript Variable. For example:
In GTM, your Custom JS Variable would look like:
Use named functions when the same logic is reused in multiple places or for better code organization.
2. if (localStorage.getItem(‘visitedBefore’)) {
- This checks if a value is already saved in the browser’s localStorage under the key ‘visitedBefore’.
- If this value exists (i.e., not null), it means the visitor has been here before.
- So, it goes into this if block.
3. return ‘Returning’;
- If the getItem check is true (meaning the user has visited), it returns ‘Returning’.
4. else {
- If the visitor is new, meaning no ‘visitedBefore’ key exists, the code runs what’s inside this block.
5. localStorage.setItem (‘visitedBefore’, ‘true’);
- This sets the key ‘visitedBefore’ in localStorage with the value ‘true’.
- Now, the visitor is marked as someone who has visited, so the if block will detect it the next time they come back.
Note: The value ‘true’ here is just a string — it could be anything, like ‘yes’, ‘visited’, ‘1’, etc. This simply represents the presence of the key.
6. return ‘First Time’;
- After setting the key, the function returns ‘First Time’.
| Situation | getItem(key) | What Happens | Output |
| Returning visitor | ‘true’ (or any value) | Skips setting, just returns value | ‘Returning’ |
| First-time visitor | null (nothing stored) | Sets ‘visitedBefore’ = ‘true’ | ‘First Time’ |
Below is a step-by-step guide to help you implement this visitor tracking variable using GTM.
Creating a Variable to Detect First Time vs. Returning Visitor (Step by Step)
Follow these steps in GTM to create a variable setup :
Step 1: Open Google Tag Manager
- Log in to your Google Tag Manager account.
- Select the container where you want to create the variable.
Step 2: Create the Custom JavaScript Variable
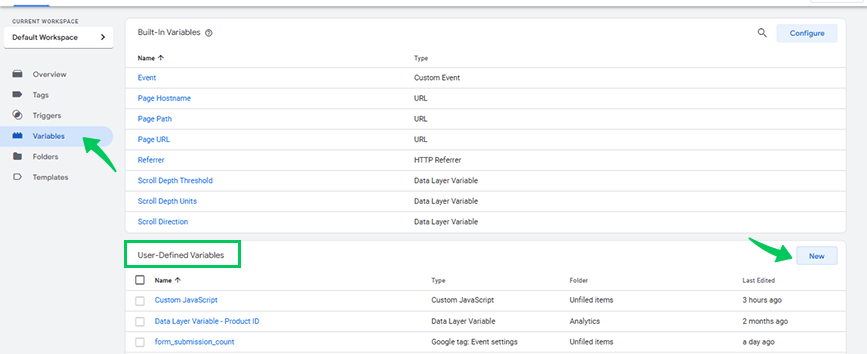
- Navigate to Variables in GTM.
- Under “User-Defined Variables,” click “New.”
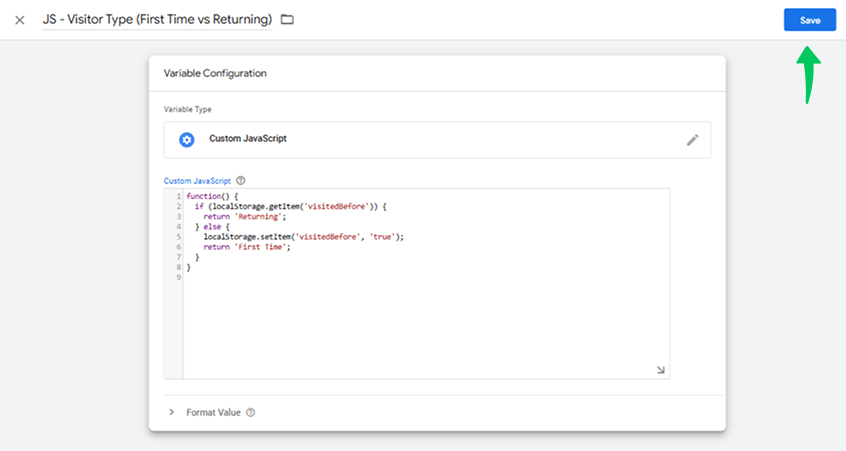
- Give your variable a descriptive name (e.g., JS – Visitor Type (First Time vs Returning)
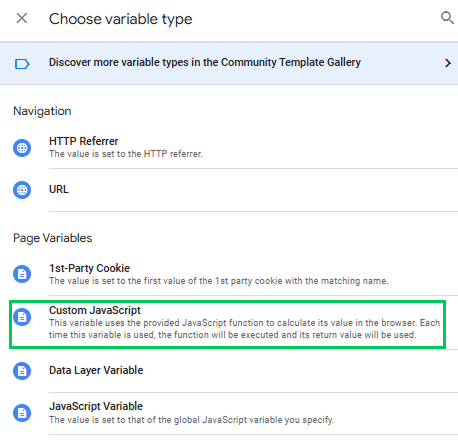
- Click on the “Variable Configuration” section to choose the variable type.
- Select Custom JavaScript as the variable type.
- Here’s the code for our example. Copy the following JavaScript code:
- In the code editor, paste the JavaScript code to retrieve the value of your desired variable.
- Click “Save” to save your custom JavaScript variable.
Step 3: Testing the Variable in GTM
Before deploying this variable, you need to verify that it’s working correctly:
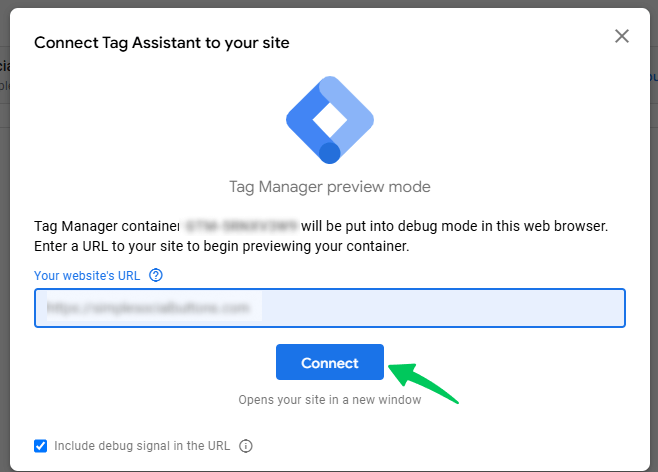
- Click “Preview” in the top right corner of GTM.
- Enter your website’s URL and click “Connect.”
- Navigate to the page where the JavaScript variable is available (e.g., the product details page).
- Look for the “Variables” tab in the Tag Assistant preview window.
- Scroll to your new variable (e.g., JS – Visitor Type (First Time vs Returning)). Verify that it’s returning the correct value.
- If the value is correctly output, it will work as expected. It should return:
- “First Time” on the first load
- “Returning” on subsequent reloads (after the localStorage is set)
Step 4: Using the Variable in GA4
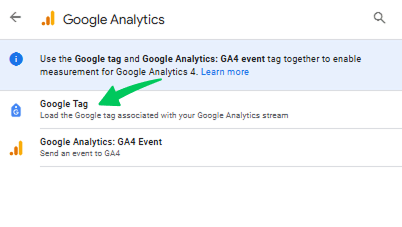
- Open your GA4 Google Tag or Event Tag in GTM.
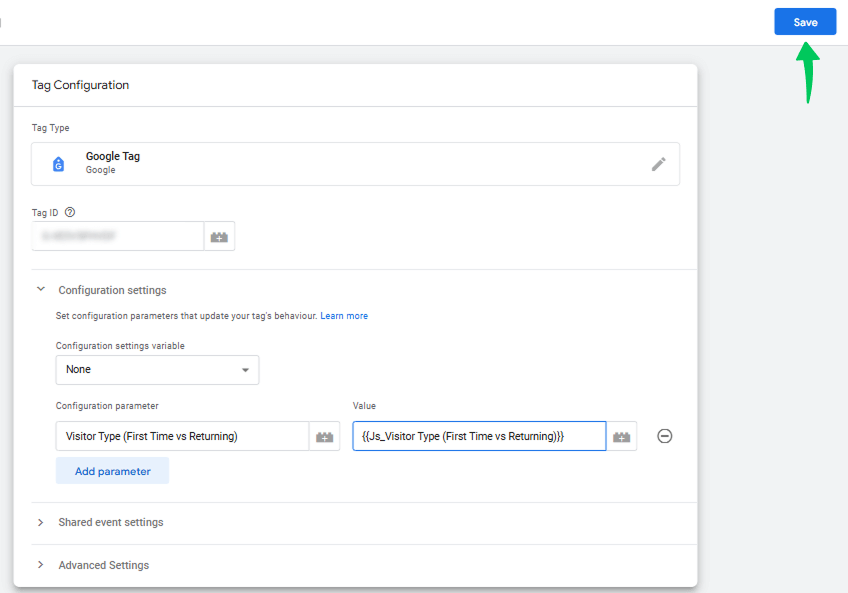
- Add a new parameter called Visitor Type (First Time vs Returning) in the tag settings.
- Set the value to {{Js_Visitor Type (First Time vs Returning)}} (your newly created variable).
- Save and publish your GTM container.
Since GA4 does not automatically recognize new event parameters, you must register them as a Custom Dimension in GA4 for them to appear in reports.
Following these steps, you can create and use custom JavaScript variables in Google Tag Manager to capture dynamic data from your website and enhance your tracking capabilities.
Best Practices for Using Custom JavaScript Variables in GTM
For the best performance and reliability when using GTM Custom JavaScript Variable, keep these best practices in mind:
- Always Return a Value: Your function should always include a return statement so GTM can process the variable correctly.
- Keep It Lightweight: Avoid overly complex code to keep your website running smoothly and maintain fast page load times and tags firing quickly.
- Handle Errors Gracefully: Use a try…catch block and set fallback values to prevent failures when JavaScript doesn’t load properly.
- Use Fallbacks for Missing Data: If the expected data isn’t available, default values ensure your tags don’t break.
- Limit DOM Manipulation: Too much interaction with the page’s structure (DOM) can slow things down. Use the data layer instead whenever possible.
- Test in Preview Mode: Check that your variable works correctly across different pages and interactions before publishing.
- Ensure Browser Compatibility: Stick to standard JavaScript functions to avoid issues and inconsistencies in different browsers.
- Check for Conflicts: Test your variable alongside other GTM scripts and website code to prevent unexpected behavior.
- Use GTM’s Built-In Features First: If GTM has a built-in variable for your needs, use it instead of custom JavaScript to keep things simple.
- Follow a Clear Naming System: Use clear, descriptive names like “JS – Extract UTM Source” or “JS – Form Submission Tracker” to easily find and manage variables later.
- Avoid External Dependencies: Relying on third-party scripts or libraries can be risky since they might not load quickly.
By following these best practices, you can enhance the reliability and accuracy of your tracking setup in GTM. Implementing a well-structured Custom JavaScript Variable ensures precise data collection, minimizes errors, and optimizes site performance for better analytics.
Common Issues with Custom JavaScript Variables in GTM & How to Fix Them
When working with Custom JavaScript Variable GTM, users often face issues where variables do not fire correctly or produce inconsistent outputs. Here are the common problems and how to fix them:
Problem 1: Custom Variables Not Firing as Expected
One of the most frequent issues with GTM Custom JavaScript Variable is that they do not trigger as expected. This can happen due to incorrect trigger settings, syntax errors in the JavaScript code, or missing dependencies.
How to Fix It:
- Check Trigger Conditions: Ensure the variable is used within a tag that fires correctly. Use GTM’s Preview Mode to see if the tag is being executed when expected.
- Verify Code Logic: If your variable depends on other data layers or external elements, ensure they are available before execution.
- Use Console Logs: Add console.log() statements within your custom JavaScript to verify its execution and output in the browser console.
Problem 2: Variable Output is Inconsistent or Undefined
Sometimes, a variable may work in one scenario but fail in another, returning an undefined or unexpected value. This often occurs due to:
- Asynchronous loading (e.g., data layer values not being available yet).
- Scope issues where the variable is not accessible in the expected execution context.
- Cross-browser compatibility problems cause different behaviors in different browsers.
How to Fix It:
- Use Google Tag Assistant and Debug Mode: Google Tag Assistant and GTM’s built-in Debug Mode help check whether the variable is available at the right time.
- Ensure Proper Data Layer Timing: If using the Data Layer, confirm that the variable is set before your script executes. You may need to use event triggers.
- Test Across Browsers: Use browser developer tools and test in Chrome, Firefox, Edge, and Safari to ensure compatibility. Some JavaScript functions behave differently across browsers.
By implementing these debugging techniques and verifying your setup with GTM’s built-in tools, you can resolve most issues with Custom JavaScript Variables and ensure they function reliably across different scenarios.
How Analytify Simplifies Custom Event Tracking in WordPress?
Join 50,000+ beginners & professionals who use Analytify to simplify their Google Analytics!
Custom JavaScript Variables in Google Tag Manager provide flexibility for tracking dynamic user interactions, but setting them up manually can be complex, especially for WordPress users. This is where Analytify simplifies the process by integrating seamlessly with GA4 and automating key tracking aspects.
Whether you want to monitor custom events, extract user data, or enhance analytics accuracy, Analytify makes it effortless. Let’s explore how it enhances the use of Custom JavaScript Variables in GTM.
- Real-Time Analytics for Custom Events
With Analytify, you can monitor real-time data on custom JavaScript events, helping you analyze user interactions instantly and optimize tracking strategies accordingly. - Custom Event Tracking Without Manual Coding
Instead of writing complex scripts, Analytify allows you to track specific user actions—such as form submissions, button clicks, and video engagements—without manually configuring JavaScript variables.
- Pre-Built Event Tracking Templates
The plugin provides ready-to-use event-tracking templates with its event-tracking add-on that reduces the need for writing custom JavaScript, making event-tracking faster and more accurate.
- Seamless UTM Parameter Tracking
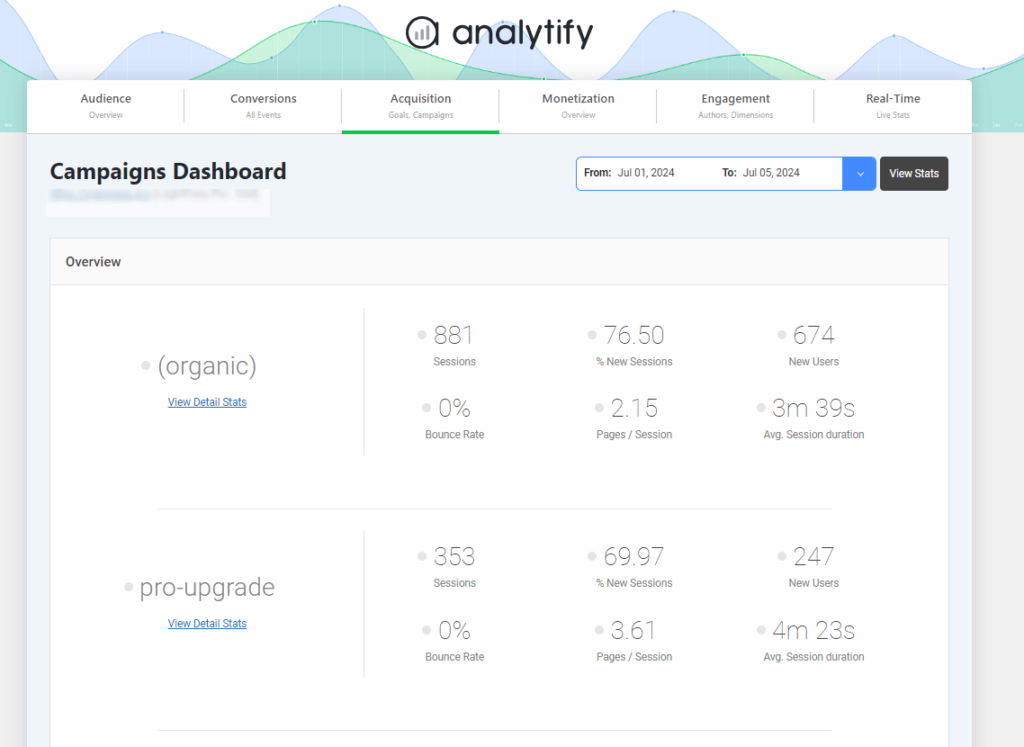
Custom JavaScript Variables can be used to refine UTM tracking in GTM, and Analytify enhances this by offering built-in campaign tracking insights.
- Automatic Integration with Enhanced eCommerce Tracking
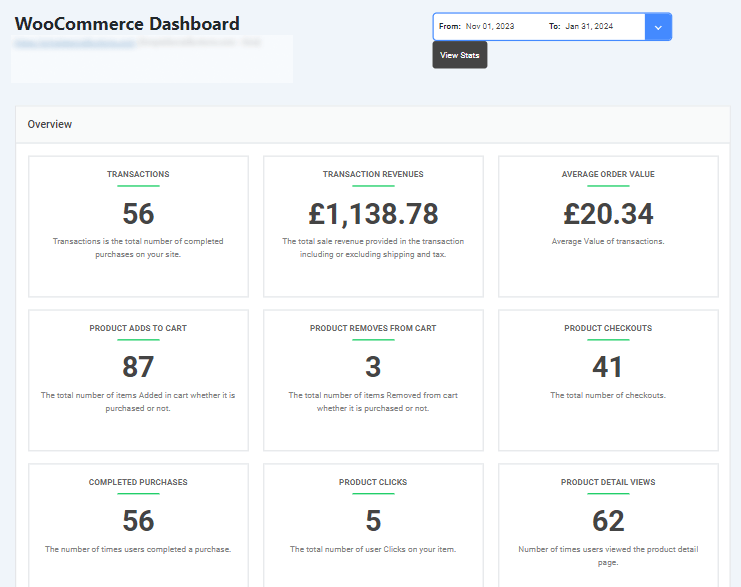
For WooCommerce users, Analytify ensures that product clicks, cart interactions, and purchases are accurately tracked using GTM, reducing the need for additional JavaScript coding.
Analytify simplifies the process by automating configurations, providing real-time insights, and making event tracking effortless for WordPress users. It enhances accuracy and efficiency.
Frequently Asked Questions About GTM Custom JavaScript Variables
1. What is a Custom JavaScript Variable in Google Tag Manager?
A Custom JavaScript Variable in GTM is a function that returns a value dynamically based on JavaScript logic, helping you customize tracking and data collection.
2. How do I create a Custom JavaScript Variable in GTM?
Go to Variables >> New >> Custom JavaScript, enter a function that returns a value, save it, and use it in your tags, triggers, or other variables.
3. How can I debug a Custom JavaScript Variable in GTM?
Use the Preview Mode in GTM and check the variable’s output under the “Variables” tab in the Debug Console.
4. What are common use cases for Custom JavaScript Variables?
Formatting data before sending it to Google Analytics.
Extracting dynamic values from the page.
Custom event tracking logic.
Conditional tracking based on user interactions.
5. Can I modify the DOM using a Custom JavaScript Variable?
It is not recommended, as GTM variables should return values only. Use a Custom HTML Tag for DOM manipulation instead.
6. Can I use external JavaScript libraries in a Custom JavaScript Variable?
No, GTM Custom JavaScript Variables do not support external script imports. Instead, you should use a Custom HTML Tag to load external libraries.
7. How Do I Add a Script to GTM?
Use a Custom HTML Tag by navigating to Tags >> New >> Custom HTML, pasting the script, setting a trigger, and publishing the changes.
Final Thoughts
Custom JavaScript Variables in Google Tag Manager (GTM) offer a flexible way to enhance tracking by dynamically extracting and modifying data. In this article, we covered their importance, how they work, and a step-by-step guide to creating them.
A practical example demonstrated how to categorize user visits based on time of day, helping to refine data collection. Testing in Preview Mode helps confirm accuracy before publishing. Best practices include keeping code lightweight, using fallback values, and verifying triggers.
Additionally, we addressed common issues, such as variables not firing correctly, and provided troubleshooting tips, such as using Google Tag Assistant and verifying trigger conditions. Analytify further simplifies tracking by automating key functionalities and offering real-time insights, making it effortless for WordPress users to manage custom data.
You can optimize your analytics strategy by utilizing Custom JavaScript Variables in GTM alongside Analytify. For further guidance, you can read: How to track JavaScript errors using analytify?
We hope this article helped you to set up GTM custom JavaScript variables. If you’ve any query, feel free to ask in the comment box.

