How to Setup GA4 Cross-Domain Tracking (Recommended)
Have you ever wondered how to accurately track user behavior and interactions across multiple domains in Google Analytics 4?
Look no further because this blog post will explore GA4 Cross Domain Tracking. For webmasters, marketers, and business owners, having a complete understanding of their online traffic is crucial for improving overall website performance.
This blog post will explain cross-domain tracking and how it works in GA4. We will also discuss why it is essential for businesses and how to set it up effectively.
GA4 Cross-Domain Tracking (TOC):
What is Cross-Domain Tracking in GA4?
Cross-domain tracking in GA4 allows you to track users, their actions, and their behaviors as they navigate multiple websites. It stitches together user interactions on separate domains, providing a more complete picture of their journey.
This is important because, by default, cookies cannot be shared between different domains. Without cross domain tracking, a user visiting two different websites would be seen by GA4 as two separate users. This can lead to inaccurate data and complicate understanding of how users interact with your website.
Cross domain tracking in GA4 passes a particular parameter in the URL from the first to the second website. This parameter lets GA4 know that the same user is visiting both websites.
Cross-domain tracking Google Analytics is essential for anyone who owns or manages multiple websites. It can give you a more accurate picture of how users interact with your websites and help you make better decisions about your marketing strategy.
Setting up cross-domain tracking in GA4 is simpler and more efficient than UA (Universal Analytics). We will discuss it in detail in further sections.
Why Do You Need GA4 Cross Domain Tracking?
When visitors visit websites across different domains (like separate websites), even if the same company owns them, Google Analytics can’t track them as the same visitor. This is because cookies don’t work between different websites.
Imagine you visit a clothing store (domainA.com), and the salesperson (Google Analytics) gives you a sticker with a unique number (cookie) to track your browsing. But this sticker only works in that store.
Now, you must visit a nearby shoe store (domainB.com) owned by the same company. Since the sticker doesn’t work here, the salesperson at the shoe store thinks you’re a new customer (separate user).
The problem? You appear as two different visitors in the reports, messing up the data. For instance, it might seem like you have more website visitors than you do. Additionally, when you move from the clothing store to the shoe store (domainA.com to domainB.com), it looks like you came from the clothing store itself (self-referral), which isn’t quite right.
The solution? Cross-domain tracking. It allows websites on different addresses (domains) to share information about visitors, so you don’t appear as two separate people in their reports. This gives you a more accurate understanding of how visitors interact with your websites.
We can understand clearly with the same example. If you visit the clothing store first, they will give you a little card (cookie) with a unique code. This code helps them track you as you browse the different clothing sections (pages). Now, when you move to the shoe store, they can see the code from the clothing store on your card. They can now recognize that you’re the same customer (visitor) who visited the clothing store earlier. This way, both stores get a complete picture of your shopping journey.
When Do You Need Google Analytics 4 Cross Domain Tracking?
You need cross-domain tracking in GA4 when your visitor session extends across two or more domains, and you want Google Analytics to treat this session as a single session.
Here are some scenarios when you would need cross-domain measurement:
- Your checkout process occurs on a different domain.
- Your goal conversions or ecommerce transactions take place on a different domain.
Imagine you visit a clothing website and add some items to your cart. But when you go to checkout, it takes you to a different website address (different domain). This can happen because some stores use separate domains for their shopping carts.
Usually, Google Analytics wouldn’t know these are connected visits. You may see your browsing on the main site as one visit and checkout on the other as a separate visit. This wouldn’t give you a complete picture of your customer journey.
That’s where cross-domain tracking comes in. It tells Google Analytics to connect these visits even if they happen on different websites. This way, you can see the full story– even if it happened across various domains.
When Do You Not Need GA4 Cross Domain Tracking?
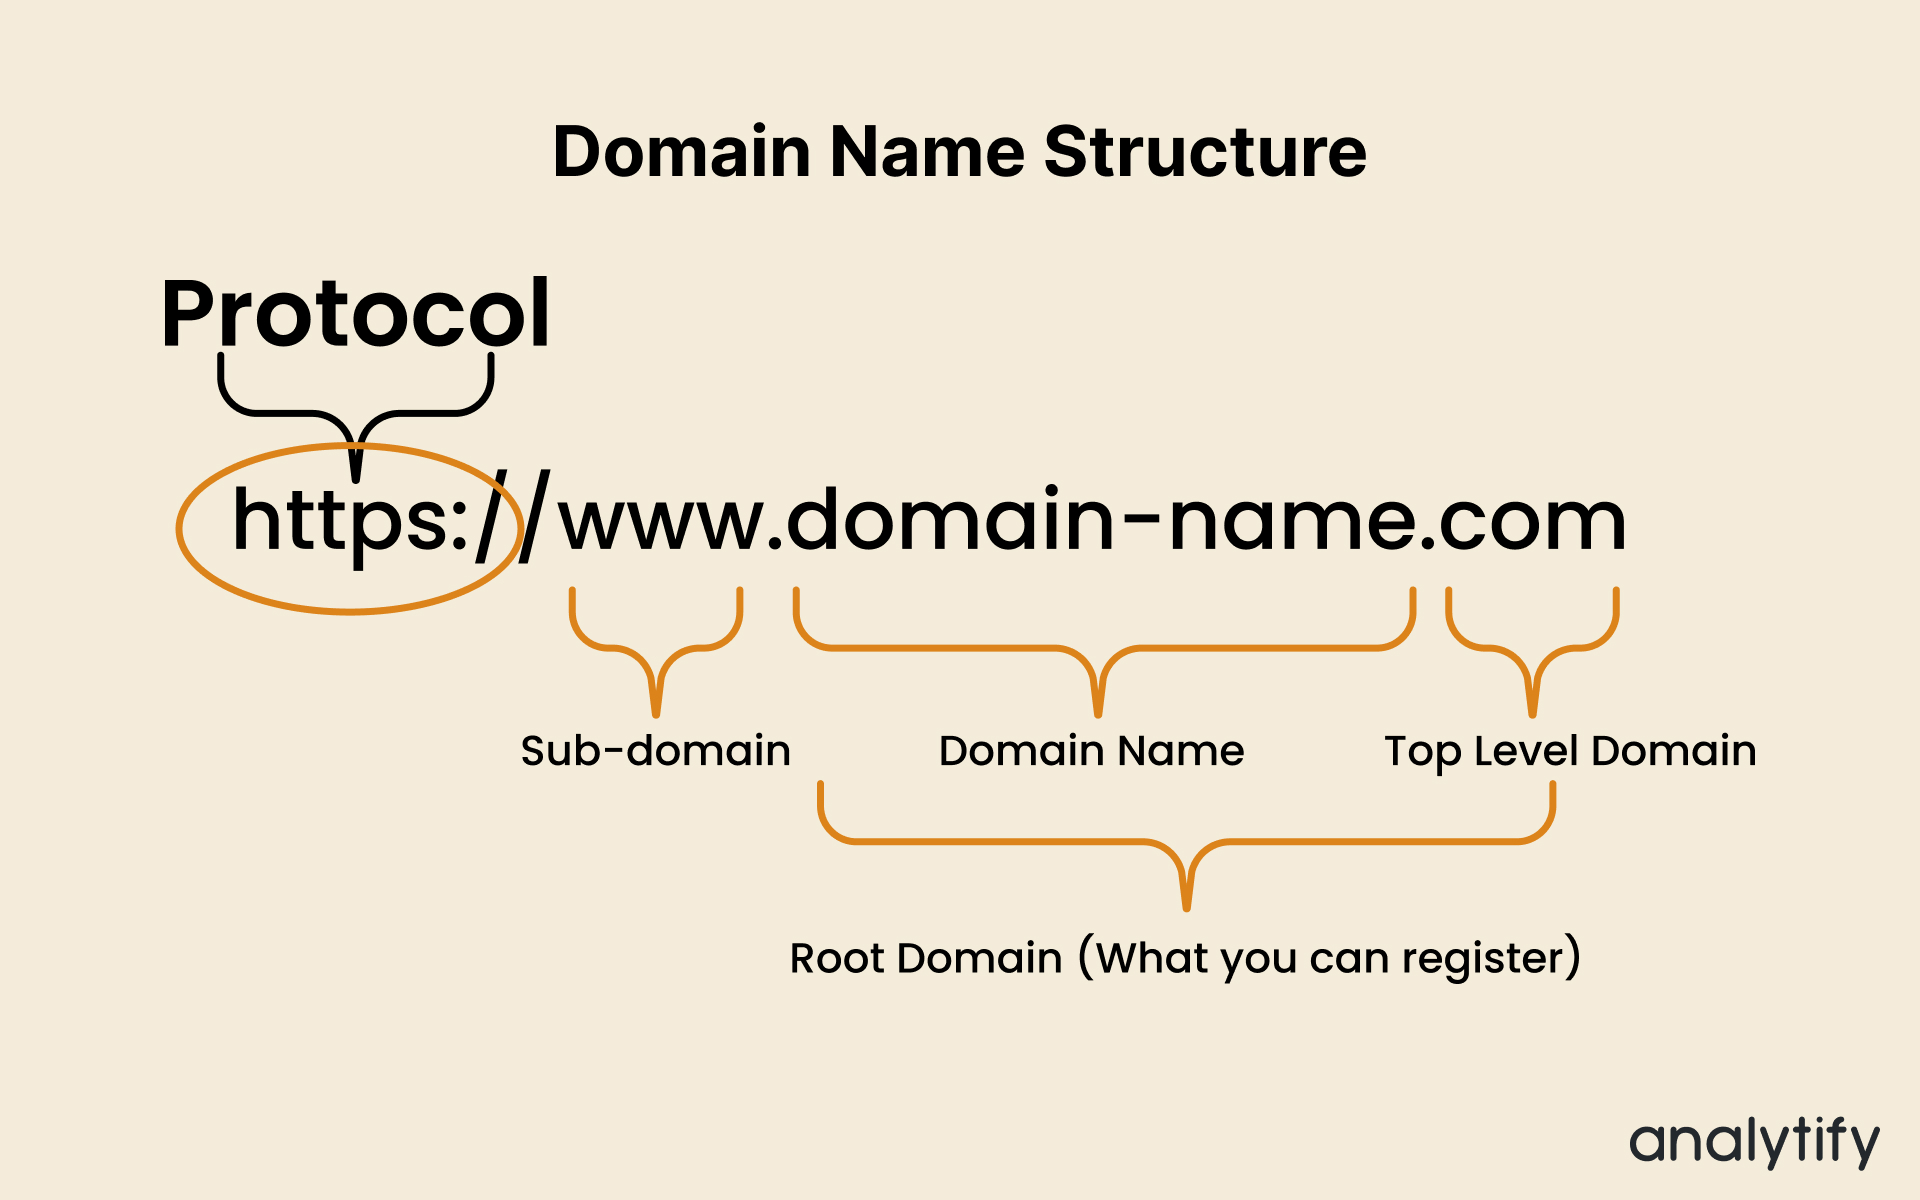
By default, Google Analytics 4 automatically tracks subdomains of the same root domain. You don’t need to set up complex cross domain tracking for traffic between subdomains. GA4 treats these subdomains as part of the same website for tracking purposes, giving you peace of mind about the system’s capabilities.
GA4 treats these subdomains as part of the same website for tracking purposes.
For example, if your website:
Root domain: analytify.com
Subdomains: blog.analytify.com
In this scenario, if a user visits the main website ( root domain ), analytify.com then clicks on a link to an article.
This link takes the reader to the subdomain blog.analytify.com. Thus, GA4 knows that this reader arrived from the main website because, in the URL, it has a root domain.
How to Set Up Cross-Domain Tracking in GA4?
Google Analytics Cross domain tracking allows you to understand user journeys seamlessly across your websites, even if they have different domains. This guide will cover all available methods, including the recommended approach and some less common options:
Cross Domain Tracking Method #1
This method is the simplest but not really recommended. According to this method, all websites you want to track must use the same GA4 property. This ensures GA4 recognizes user sessions across domains as belonging to the same user.
Let’s understand with an example:
Website No 1: www.muplugins.com
Website No 2: www.simplesocialbuttons.com
These are two different websites with separate GA4 properties. To follow this method, you have to reinstall the GA4 tracking for any one of the domains. After this, both domains use the same measurement ID.
However, this method is not recommended because users want to keep separate GA4 properties for both domains.
Cross Domain Tracking Method #2 (Recommended)
This method is recommended, but it is lengthy. After collecting data from both properties (property of WWW.muplugins.com & property of www.simplesocialbuttons.com), you must create a new third GA4 property for cross domain tracking.
Here are the steps to set up cross domain tracking in GA4 by this method:
- Create a new GA4 property, and name this property .For example we named it cross-domain tracking (muplugins+SSP).

- Create a new web data stream in your new GA4 property.
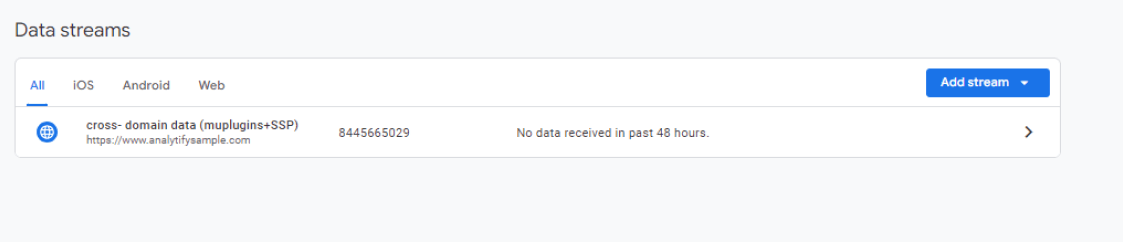
- Note the measurement ID of this newly created web stream; it will be required later.

- Navigate to the GTM container meant for simplesocialbuttons.com website.
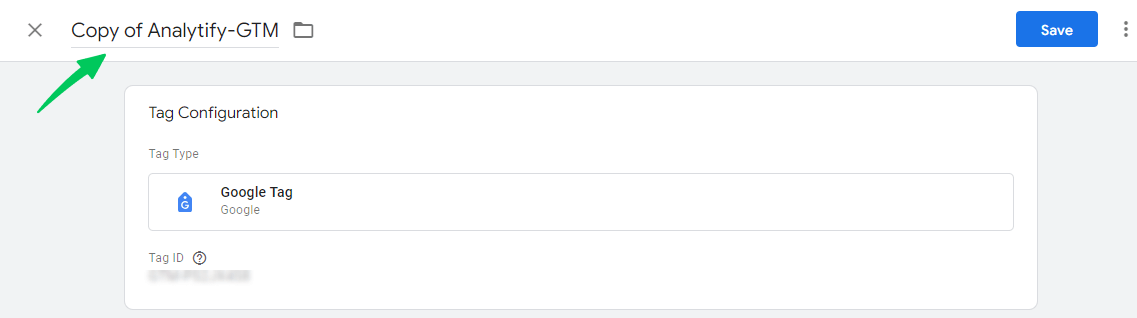
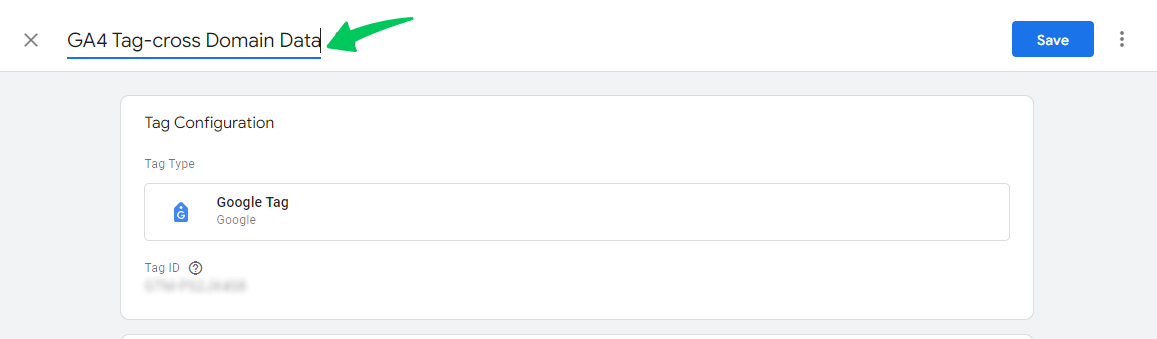
- Prepare a copy of your GA4 configuration tag and rename this tag like GA4 tag-cross domain data.
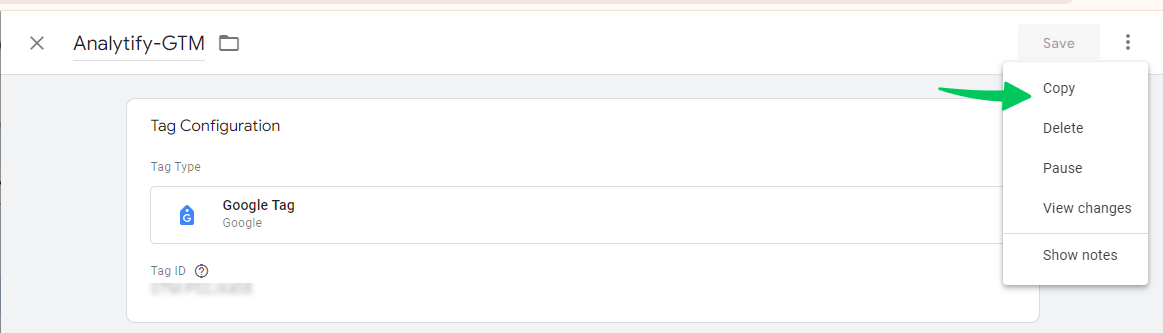
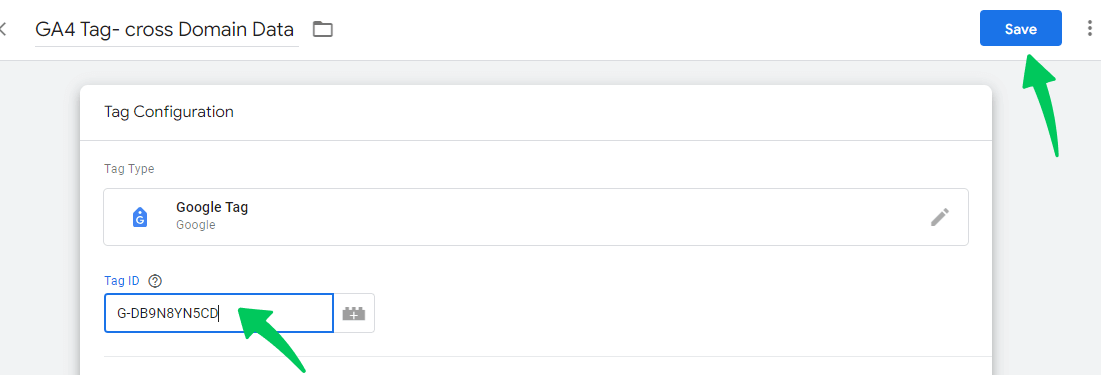
- Now, replace the tag ID with the measurement ID of your new data stream, as noted earlier. Then click on the save button. This new configuration tag transfers the data from GA4 of simplesocialbuttons.com to the new GA4 property.
- Preview and publish the new GTM container.
- Navigate to the GTM container meant for muplugins.com. Now, repeat the same steps for the muplugins.com that we have done for simplesocialbuttons.com.
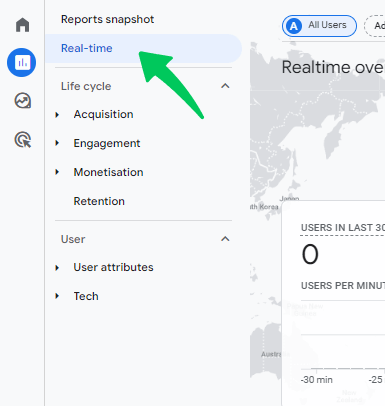
- Now open your new GA4 property and check the real-time report to see whether it receives data.
- Navigate to the Admin section of the newly created GA4 property.

- Click on the “Data Streams” tab.
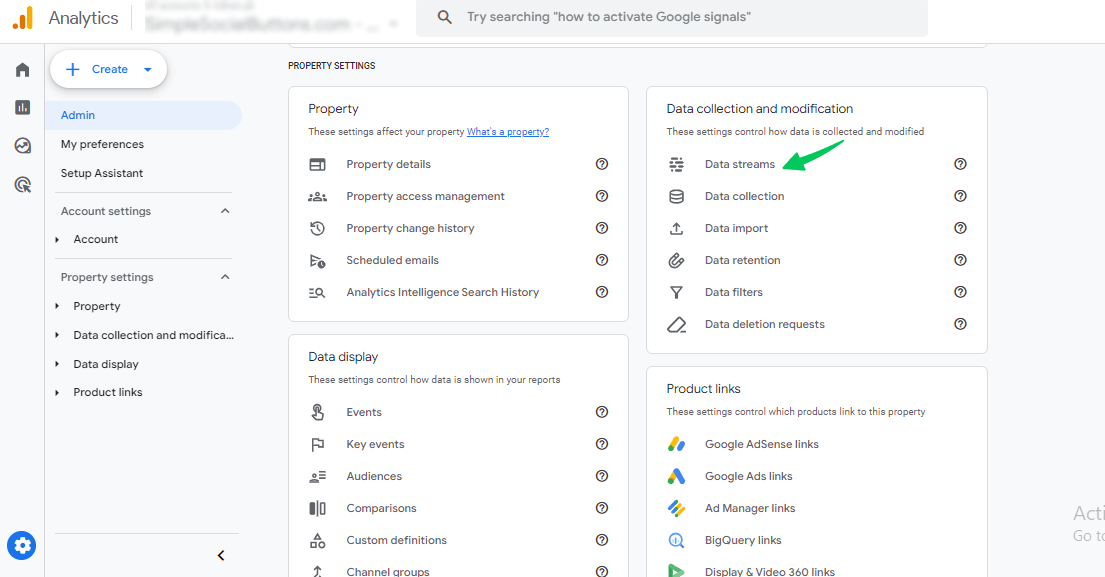
- Click on the new web data stream.

- Scroll down and click on the tab ‘ Configure tag settings.’
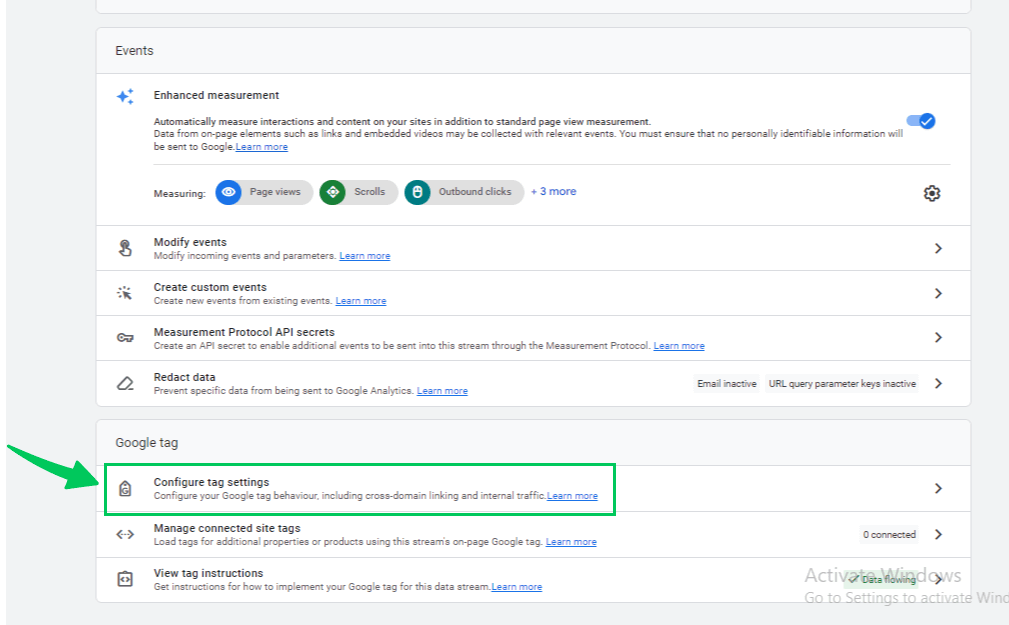
- Then, click on the ‘Configure your domains” option.
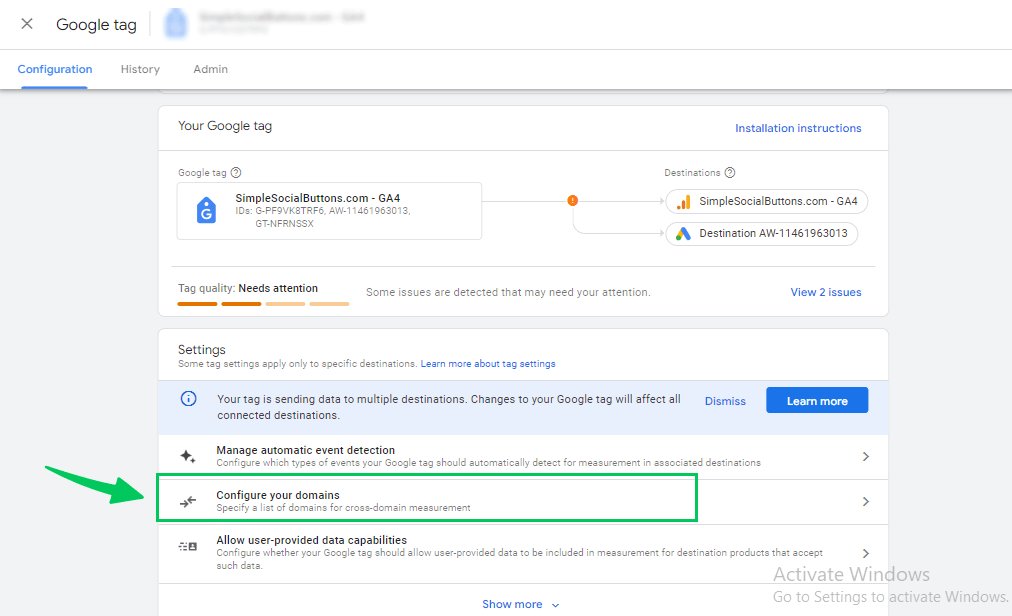
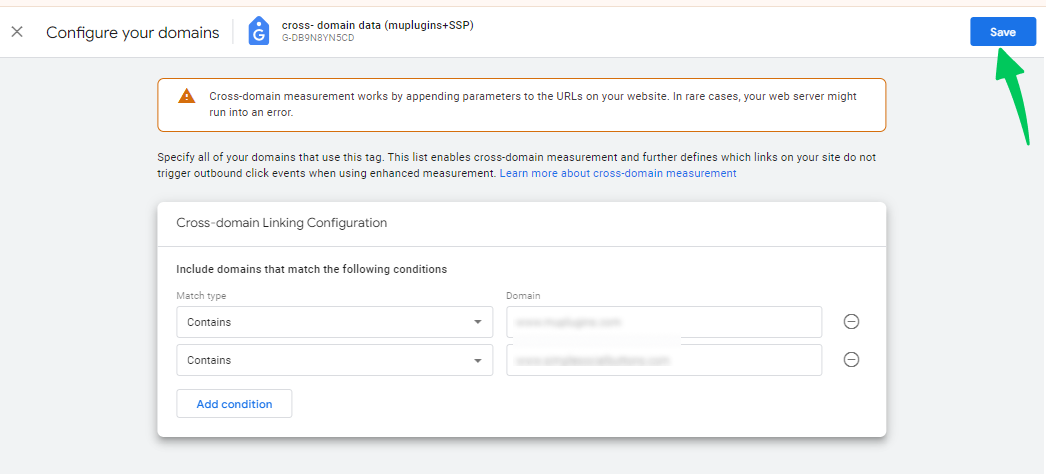
- Click on the “Add condition” tab. Then, Add the two domains involved in your cross domain tracking setup and save your changes.
Debugging Google Analytics Cross Domain Tracking
Debugging Google Analytics 4 cross domain tracking is crucial because it ensures you see the complete picture of user behavior across your websites. Without proper monitoring, you’ll miss valuable insights like user flow between domains, conversion attribution, and the impact of marketing efforts.
Debugging helps you identify and fix tracking issues, giving you the data you need to make decisions for a successful multi-domain strategy. We can do this using two methods:
- GL Parameter
Now, let’s check if cross-domain tracking is working. Open your main website in a private or incognito window. Make sure to turn off any adblockers, and don’t log in as an admin or editor.
Go to a page with a link to one of the sites you’ve made for cross domain tracking. Click the link and look at the URL in the browser’s address bar. If cross-domain tracking is working, you’ll see a “gl” parameter in the URL.

The _gl= parameter tells GA4 that this visitor is the same person visiting your different websites. This lets you see their entire journey across both sites, not just isolated visits.
If you don’t see the “_gl” parameter, check these things:
- There aren’t any redirect rules that remove query parameters.
- Check if the JavaScript code is adding event listeners to your links.
- Google Analytics DebugView
To use the Google Analytics DebugView without inconvenience, you can install the Google Analytics Debugger Chrome extension and enable it. Read our complete guide on How to Enable GA4 DebugView.
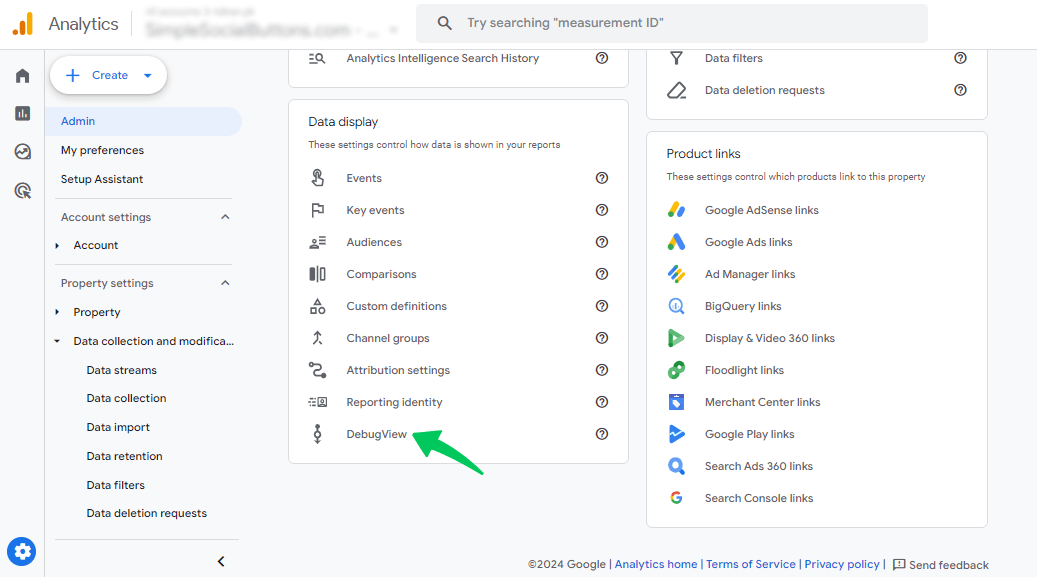
Once enabled , go to the “Admin” section at the bottom left of your Google Analytics account.
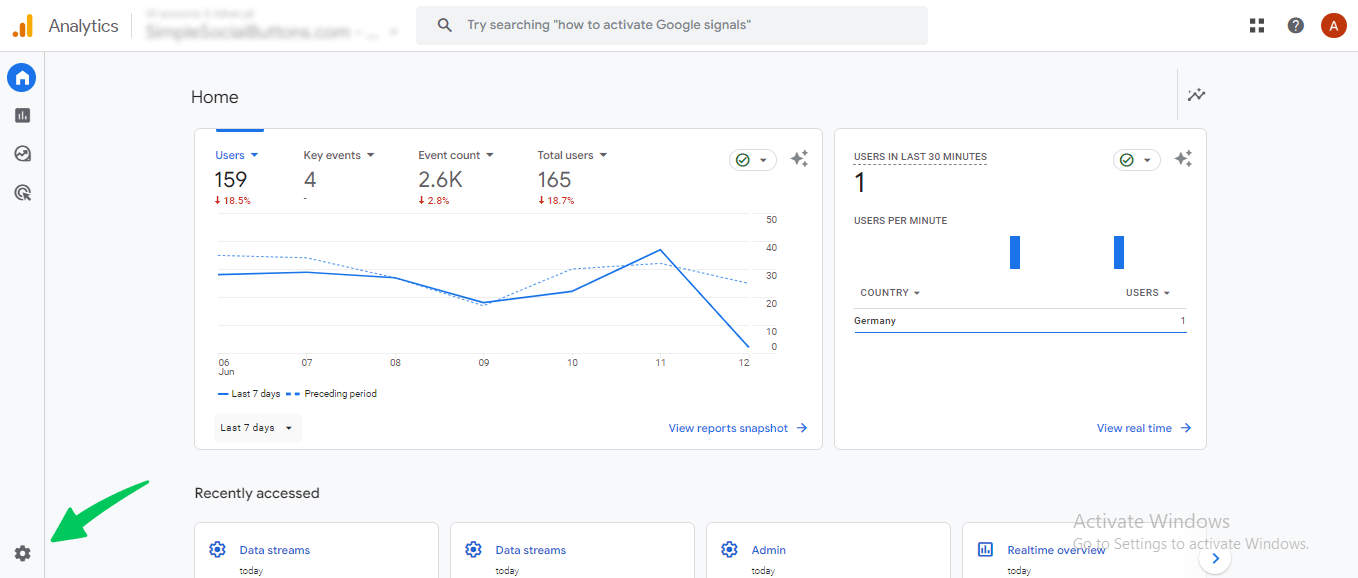
Click the “DebugView” option under the Property column.
Open up DebugView and make sure everything is working.
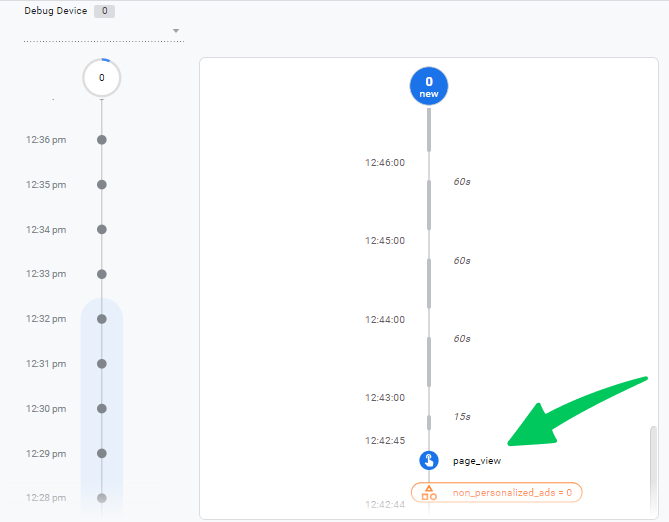
If you’re not getting any event data through, there might be a problem with your setup. Check our detailed blog to see how you can fix your GA4 DebugView.
Track GA4 User Journey with Analytify
Suppose you manage your website through WordPress and use Google Analytics 4. In that case, you’ve got a fantastic tool to simplify your analytics experience: Analytify is designed specifically for WordPress and focuses on providing simplified analytics reporting within the WordPress dashboard.
Join 50,000+ Beginners & Professionals who use Analytify to Simplify their Google Analytics!
Analytify can still be a valuable tool for WordPress users who want to understand website traffic, even if they have a complex website setup with subdomains or multiple domains. Here’s how:
- Analytify integrates seamlessly with your WordPress website. No coding is required! Simply install the Analytify plugin and start tracking your website traffic with ease. Analytify can simplify your reporting and enhance your understanding of website traffic.
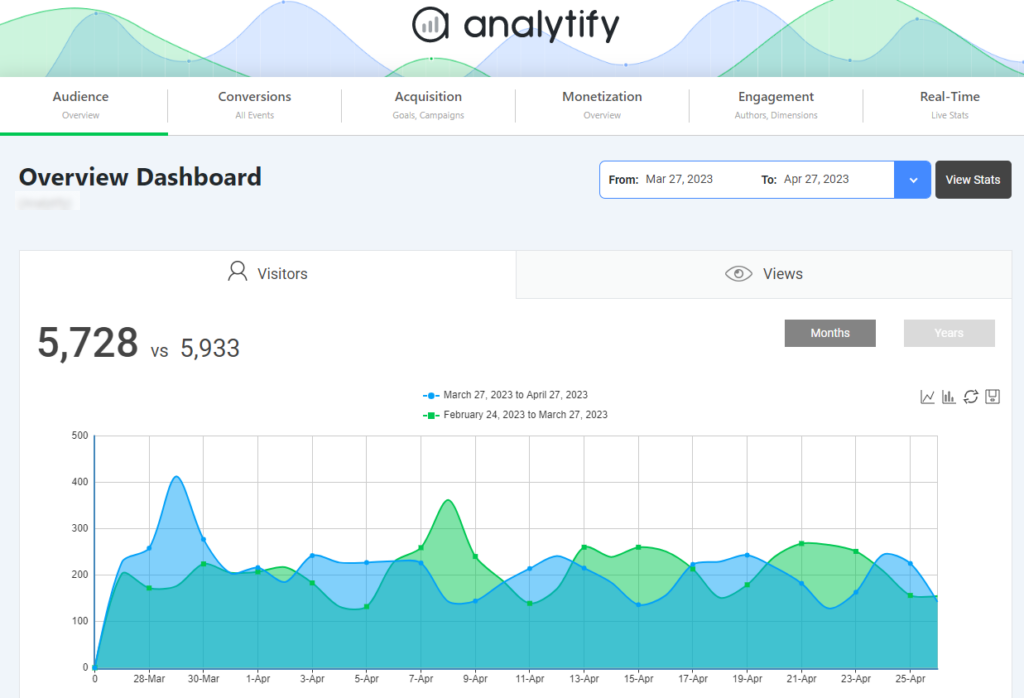
- Get real-time insights: Get real-time insights into your website traffic without leaving your WordPress dashboard. Analytify provides live updates on user activity, allowing you to monitor trends.
- Essential Metrics at Your Fingertips: Track key website performance indicators (KPIs) that matter most. Analytify covers metrics like page views, sessions, user demographics, traffic sources (organic, social media, referrals), and more.
- Conversion Tracking Made Easy: See what actions users take on your website! Analytify integrates seamlessly with e-commerce platforms for effortless conversion tracking.
- Event Tracking: Track specific user interactions on your website, such as button clicks, video views, or form submissions. Understand how users engage with your content and identify areas for improvement.
If you’re a WordPress user seeking a more straightforward solution for website analytics, Analytify is the best option for you. Its user-friendly interface, essential features, and seamless integration with WordPress make it a valuable tool for understanding your website’s performance without the complexities of GA4.
GA4 Cross-Domain Tracking FAQs
1. What is Cross Domain Tracking?
Cross-domain tracking allows GA4 to track user journeys across multiple websites you own (different domains). Without it, user activity appears separate for each domain.
2. What is the difference between Cross Domain Tracking in UA and GA4?
Here’s the main difference:
UA (Universal Analytics): Used cookies and configuration through code or Google Tag Manager. Setting it up could be complex.
GA4: This approach is more straightforward. It is based on user IDs and configuration within the GA4 interface—no more code edits.
So, GA4 is considered more acceptable because it relies less on cookies, which are becoming less reliable due to privacy concerns.
3. Can Google Analytics track GA4 multiple domains?
Yes! Google Analytics 4 (GA4) can track users across multiple domains, but you must set up “cross-domain tracking” to work seamlessly. This connects user data and treats them as the same person even if they visit your different websites.
4. How do I set up Google Analytics Cross Domain tracking?
You have to follow the following steps:
1. Use the same GA4 property for all your domains.
2. Go to the Admin settings in GA4.
3. Under “Data Streams,” select the stream and configure tag settings.
4. Click “Configure your domains” and add all your website domains.
5. Does GA4 automatically track subdomains?
Yes, GA4 automatically tracks subdomains by default as long as two key conditions are met:
1. Same GA4 Measurement ID
2. Proper Configuration:
All subdomains and main domains must use the same GA4 property and measurement ID. With these conditions fulfilled, GA4 will seamlessly track user activity across your main domain and all its subdomains.
6. Can GA4 track across domains with different GA4 properties?
No. GA4 relies on a single property to track user journeys across domains. Using separate properties isolates data, making it appear that users visit each domain independently.
Combining your GA4 properties is recommended for accurate cross-domain tracking in the long run.
Cross-Domain Tracking in GA4: Final Words
We explored the power of Google Analytics 4 cross domain tracking in.
Let’s recap quickly: You need cross-domain tracking in GA4 when a visitor goes from one of your websites to another (with a different web address), and you want Google Analytics to track them as the same person on both sites.
You can understand user journeys from the initial touchpoint to conversion by bridging data from multiple websites. With proper configuration, GA4 seamlessly tracks user activity across your domains. Now, you have enough knowledge to get a holistic view of user behavior across your domains.
Explore our dedicated article on GA4 subdomain tracking for an extra boost in your analytics journey. Discover advanced strategies to ensure seamless data collection across all your subdomains.
Share your thoughts and experiences in the comments below.