How to Setup Google Analytics 4 (Easy Guide 2026)
Do you want a definitive guide on how to set up Google Analytics 4?
Google Analytics is like having a behind-the-scenes pass to your website. It shows you how people find your site, what they do while they’re there, and even where they drop off. With this information, you can make smarter decisions to improve your website and give your audience exactly what they want.
But here’s the thing: Setting it up can feel intimidating at first. But it’s much simpler than it seems!
In this guide, we will explain how to set up Google Analytics step by step. Whether you’re setting up a Google Analytics account for the first time or wondering how to connect Google Analytics to your website, we’ve got you covered.
You’ll know everything from how to create an account to where to install the Google Analytics code. Plus, we’ll show you how Analytify can simplify the setup process.
Let’s get started!
How to Setup Google Analytics (TOC)
Prerequisites to Setup Google Analytics
Before the GA4 setup process, let’s make sure you have everything you need to get started.
- A Google Account
If you already have a Gmail account, you’re good to go! If not, creating one takes just a few minutes. - Access to Your Website
You’ll need the ability to edit your website’s backend or CMS (like WordPress, Shopify, or Wix) to add the tracking code. - Analytify Plugin
If you’re using WordPress, Analytify can simplify how you manage and view your Google Analytics data. Instead of navigating Google Analytics’ dashboard, Analytify brings all the essential data straight to your WordPress admin panel. It’s a time-saver and a stress-buster!
Step-by-Step Guide to Setup Google Analytics
Google Analytics setup for a website
Follow these steps carefully, and you’ll be tracking your website traffic in no time.
Step 1: Create a Google Analytics Account
The first thing you need is a Google Analytics account. Don’t worry, it’s free and quick to set up.
- Go to the Google Analytics Website
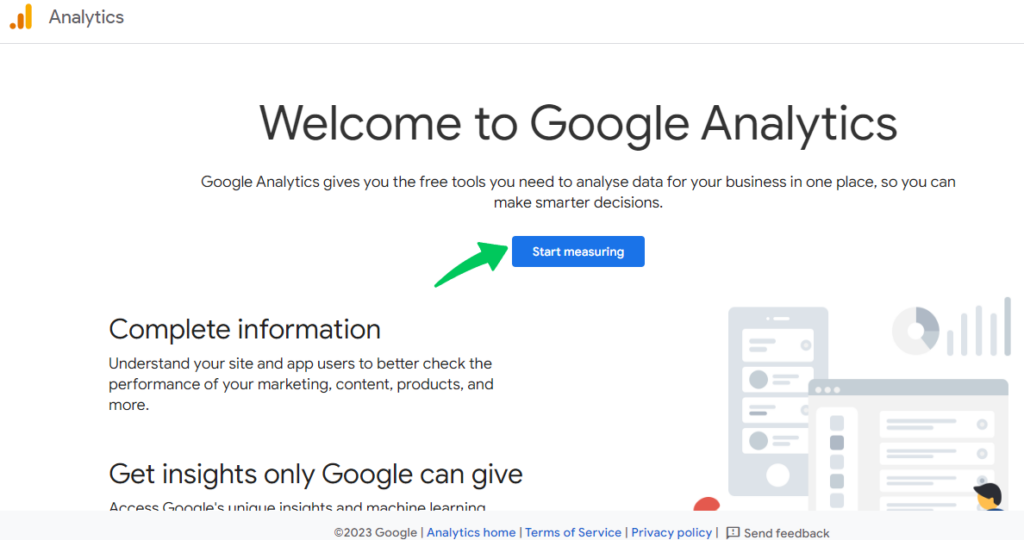
Head over to the Google Analytics homepage and click on the “Start measuring” button.
- Sign in with your Google Account
Use your existing Google or Gmail account. If you don’t have one, you’ll need to create one first.
Step 2: Add Your Website Details
Once you’re signed in, it’s time to set up your account and property.
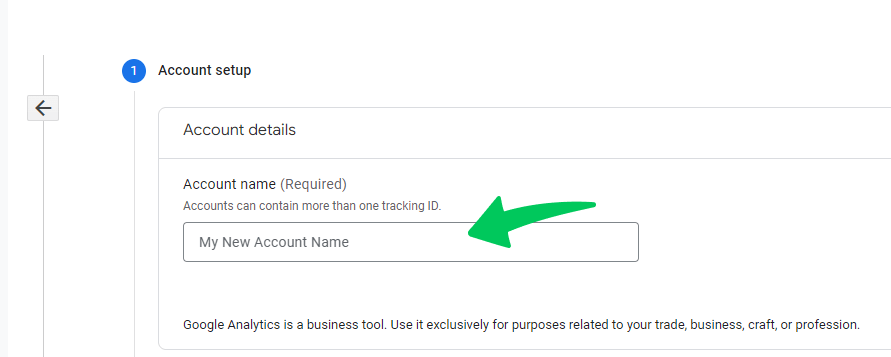
- Account Name
Enter an account name that makes sense for your website. This is usually the name of your business or site.
- Property Setup
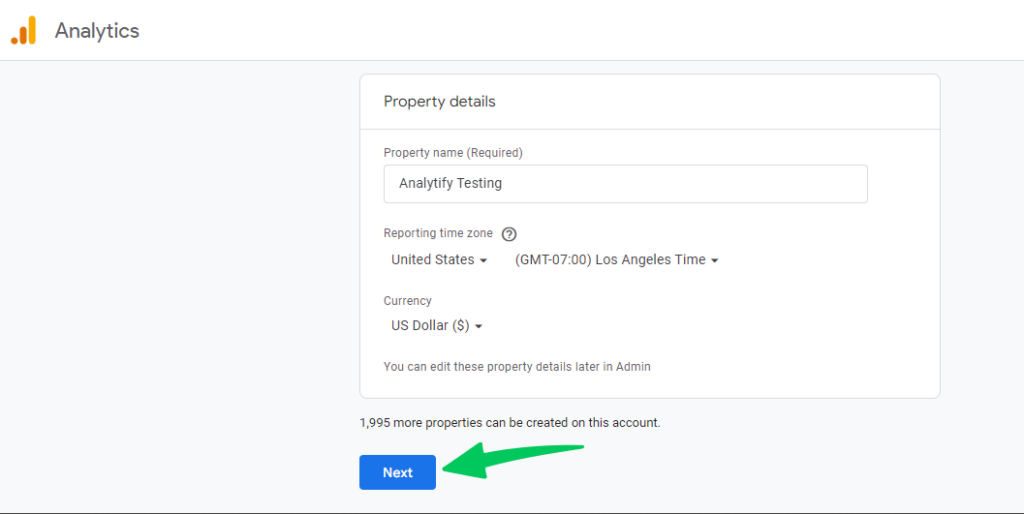
- Add your property name (again, typically your site name).
- Choose your time zone and currency. These settings are important to ensure your reports are accurate.
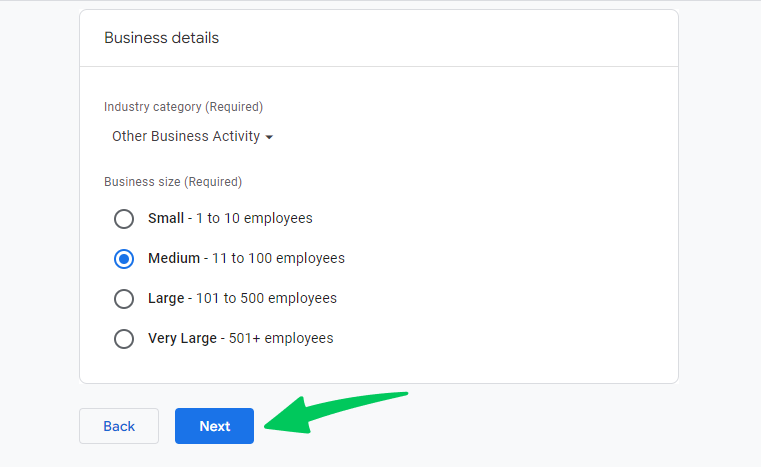
- Then, add business details.
Google will ask about your industry, business size, and goals (like increasing sales or getting more leads). Fill this out and click Next.
- Accept Terms of Service
Finally, you need to agree to Google’s terms to complete this step.
Step 3: Get Your Tracking Code
Now that your account is ready, it’s time to grab the tracking code.
- Go to the Admin section of your GA4 account.
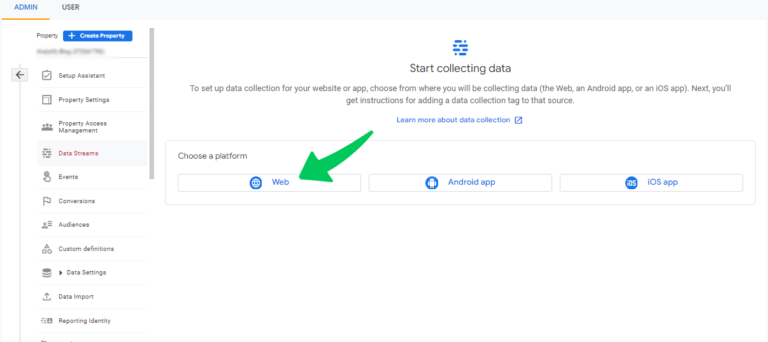
- Under Data Streams, select Web and enter your website’s URL.
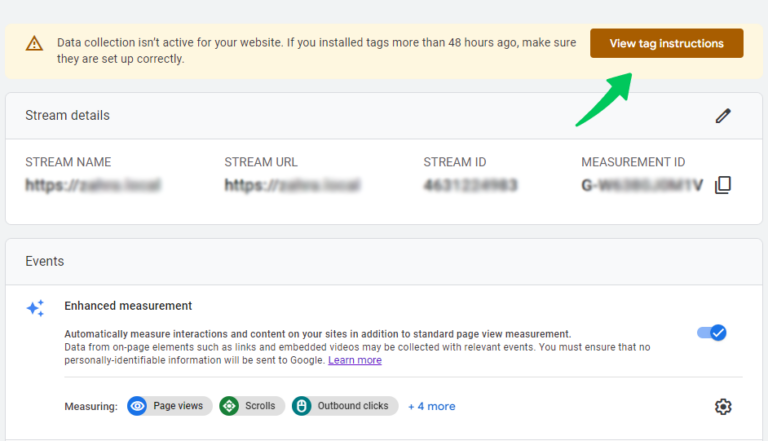
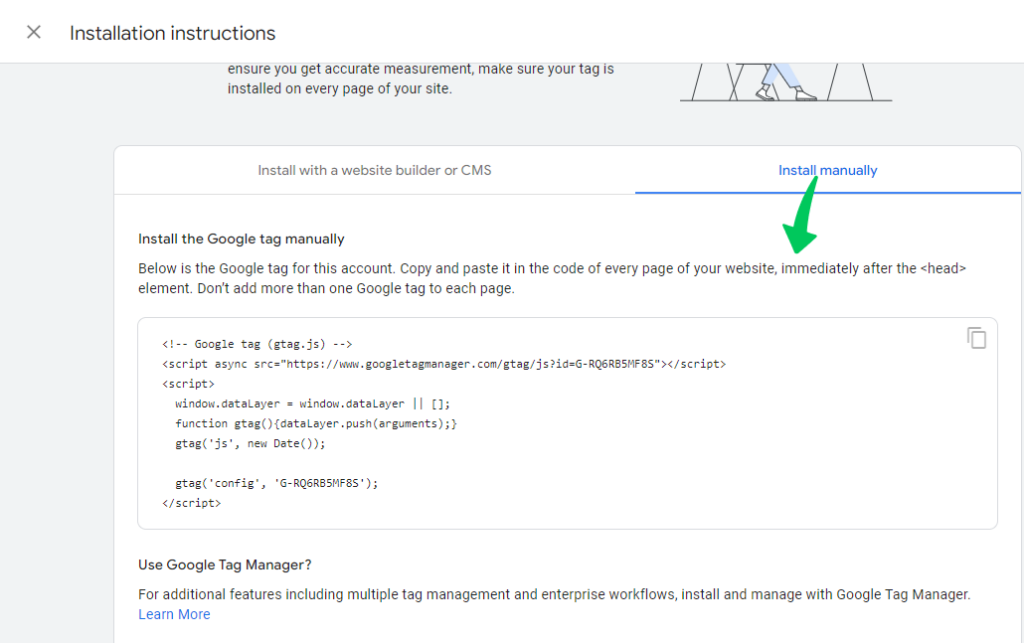
- Google will generate a Measurement ID and a tracking code (the global site tag or gtag.js).
Click on View tag instructions as shown below:
- Copy the tracking code. You’ll need it to connect Google Analytics to your website.
That’s how to put Google Analytics on the website.
Next, we’ll explore the different ways to put Google Analytics on your website, whether you’re using WordPress, Shopify, or any other platform.
After successfully setting up your GA4 account, the next crucial step is ensuring your website is properly linked for accurate tracking. If you’re unsure how to do this, follow our step-by-step guide on how to add your domain on Google Analytics to complete the process and avoid data gaps in your reports.
Methods to Add Google Analytics to Your Website
Now that you’ve set up your Google Analytics account and grabbed your tracking code, it’s time to connect it to your website. There are multiple ways to do this, depending on the platform you’re using. Let’s explore the options.
Option 1: Using Analytify Plugin for WordPress
If your website runs on WordPress, using Analytify is the easiest and most efficient way to set up Google Analytics. No need to mess with the code. Analytify does the heavy lifting for you.
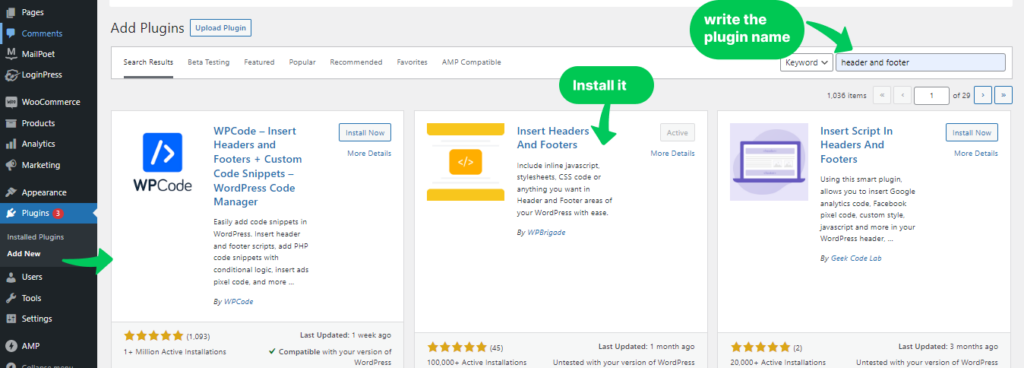
- Install and Activate Analytify
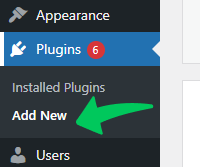
- Go to your WordPress dashboard, head to Plugins >> Add New.
And search for Analytify.
- Click Install Now, then Activate the plugin.
- Connect Analytify to Google Analytics
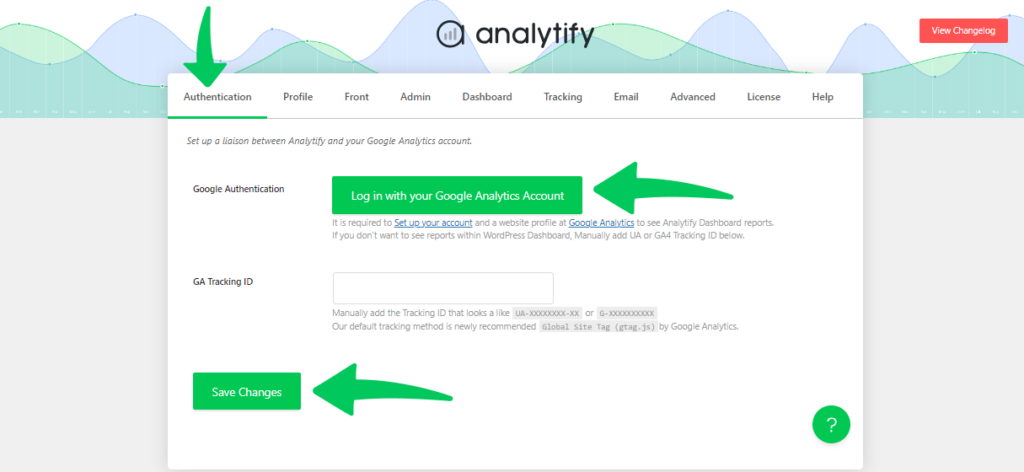
- Open the Analytify settings in your dashboard.
- Log in with your Google account.
Choose the Google Analytics property you created earlier.
- Access Your Data
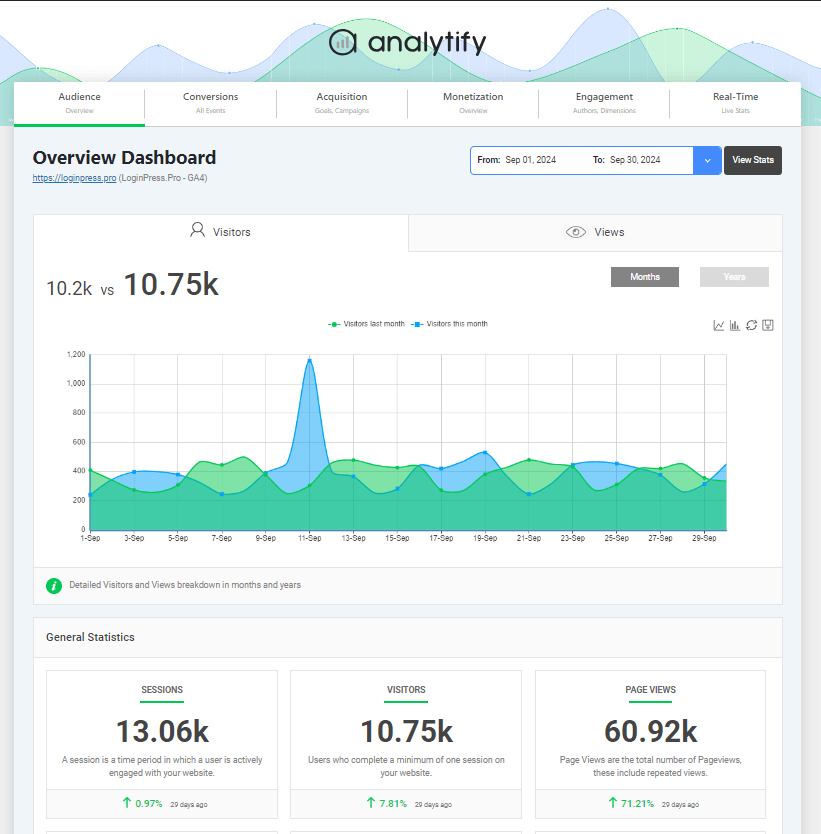
Analytify automatically pulls in your analytics data and displays it in a user-friendly dashboard right inside WordPress. Without leaving your site, you’ll get insights into pageviews, bounce rates, and even advanced metrics like eCommerce performance.
Option 2: Adding the Tracking Code Manually
If you’re comfortable editing your website, you can add the tracking code manually. This works for platforms like WordPress, Shopify, Wix, and others.
- Copy the Global Site Tag (gtag.js)
From your GA4 account, copy the tracking code provided under Web Stream Details.
Copy the below code:
Don’t worry if you’re wondering where to install Google Analytics code. Here is a simple way.
- Insert the Code
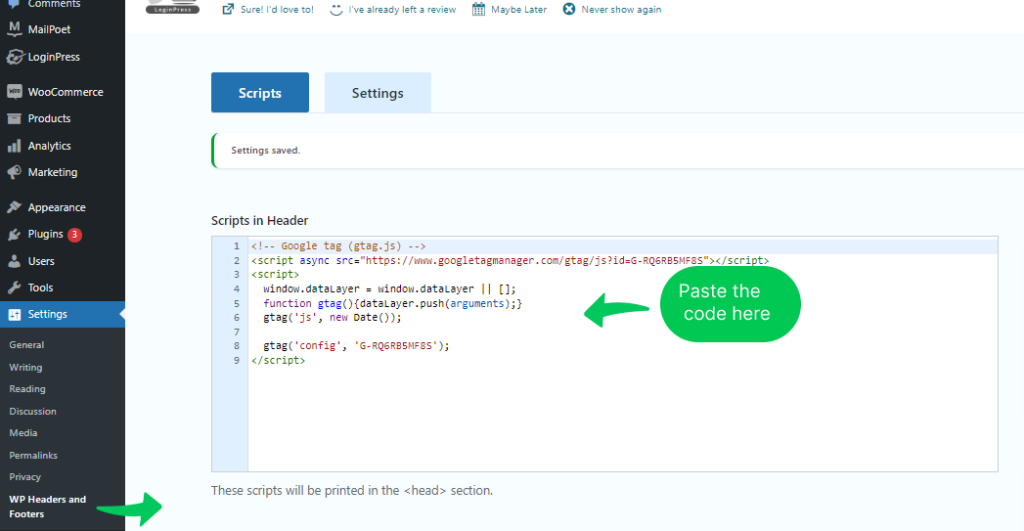
- For WordPress: Use a plugin like Insert Headers and Footers plugin to paste the code into the header section.
Next, under the Tools, navigate to Settings>>WP Headers and Footers and paste the entire code into the header section.
- Alternatively, edit your theme’s header.php file and place the code before the closing <head> tag.
- For Shopify or Wix: Use the website builder’s settings to add the tracking code in the site-wide header section.
- Save and Test
Save your changes and check that the code appears in your website’s source code. - Check Realtime Report
Make sure that the code and your Google Analytics account setup are working properly.
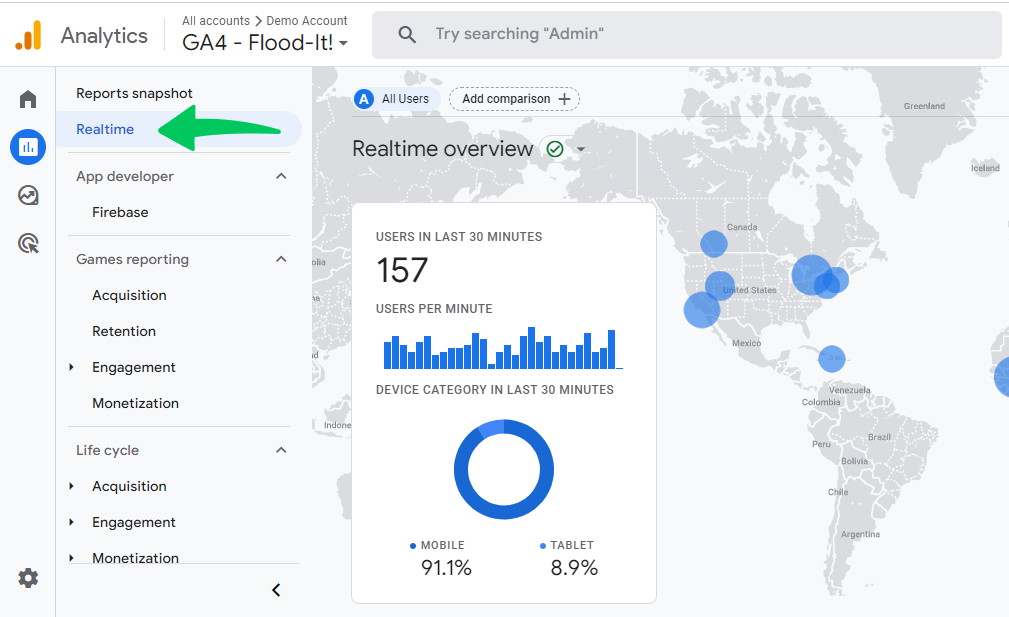
You can check the Realtime report in GA4.
For users managing multiple websites or projects, adding new properties is a common need—streamline your setup process by following our detailed tutorial on how to add a new Google Analytics property, which walks you through each step with clear instructions and tips.
Option 3: Setting Up Google Analytics with Google Tag Manager
For advanced users or those managing multiple tracking tools, Google Tag Manager (GTM) is a great option.
- Set Up a Google Tag Manager Account
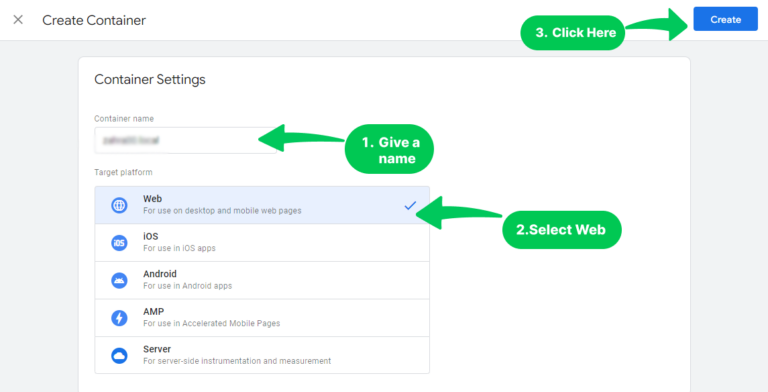
Go to the GTM website and create a new account. GTM will ask you to create a new container.
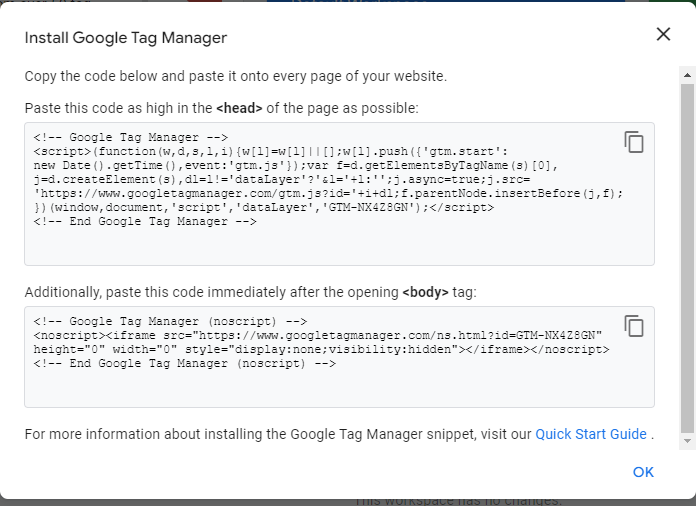
- After creating the container, GTM will provide you with two code snippets to add to your website.
- Create a New Tag for GA4
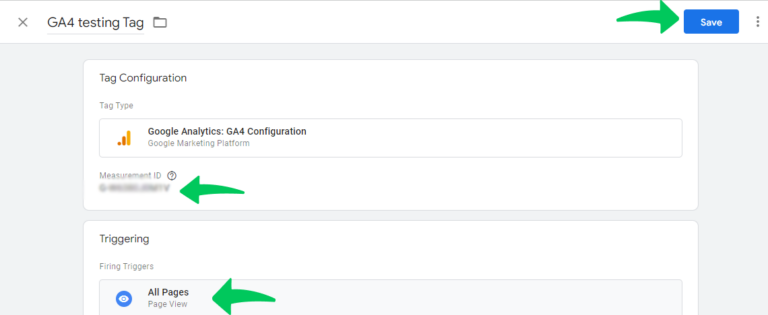
Inside GTM, create a new tag,
- Then, select Google Analytics: GA4 Configuration.
- Enter your Measurement ID and configure the tag to fire on all pages.
Save all changes.
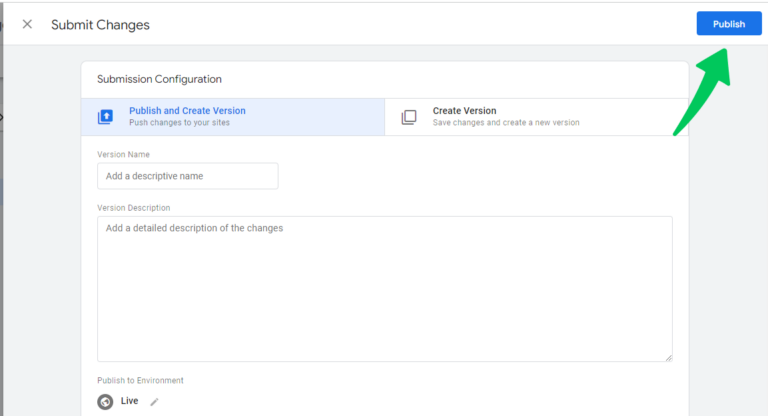
- Publish Your Container
Publish your changes in GTM, and your GA4 tracking will be live.
Each of these methods works well, but if you want a no-fuss solution with added benefits like detailed dashboards and simplified reporting, Analytify is the way to go. It’s designed to save time and help you focus on what matters most to grow your website.
Verifying Google Analytics is Working
Once you’ve connected Google Analytics to your website, the next step is to make sure everything is working properly. Don’t skip this step. It’s necessary to ensure your data is being tracked accurately. Here’s how you can check.
Step 1: Wait for Data to Start Flowing
Google Analytics may take 15 minutes to 48 hours to start receiving data from your website. Be patient and give it some time to update.
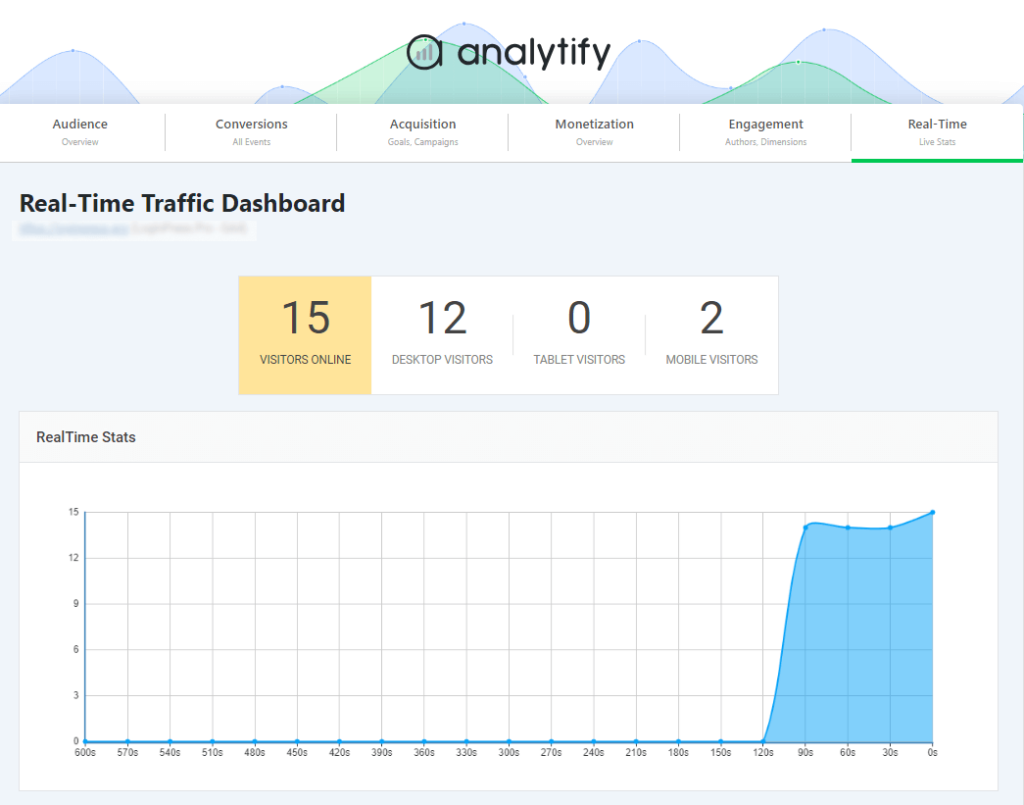
Step 2: Check the Real-Time Report
- Log in to your Google Analytics account and open the property you just set up.
- Go to the Reports >> Real-Time section.
- Open your website in a separate browser tab and browse around for a few minutes.
- In the Real-Time report, you should see your activity reflected as live traffic. If it appears, congrats, your Google Analytics setup is working!
Step 3: Verify Data Streams in GA4
- Head over to the Admin section in your GA4 account.
- Under Data Streams, select the web stream you created earlier.
- Check the status. It should say, “Receiving traffic in the past 48 hours.”
Step 4: Troubleshooting Tips
If you don’t see any data flowing in, here are some common fixes:
- Double-check that you’ve added the tracking code to the correct section of your website (the header for most platforms).
- Clear your browser’s cache and test again.
- Ensure you’re looking at the correct property in your Google Analytics account.
- Use Google’s Tag Assistant Chrome extension to verify if the tracking code is firing properly.
Read our guide on How to Check if GA4 is Working (2024).
Bonus: How Analytify Simplifies Verification
If you’re using Analytify, you don’t need to switch back and forth between WordPress and Google Analytics. Analytify gives you a live data feed right in your WordPress dashboard, so you can confirm that your analytics setup is working without any extra hassle.
Join 50,000+ beginners & professionals who use Analytify to simplify their Google Analytics!
Once you’ve confirmed that Google Analytics is tracking your website, you’re all set to see the insights.
Analytify seamlessly integrates Google Analytics with WordPress, giving you all the essential insights in your WordPress dashboard.
- User-Friendly Dashboard
Analytify presents your analytics data in a clean and easy-to-understand way. You don’t have to wade through endless menus in Google Analytics—it’s all right there in WordPress. - Detailed Reports Made Simple
Get access to reports like:- Real-time traffic: See who’s on your site right now.
3. Page-level stats: Understand which pages perform best.
4. eCommerce insights: Track sales, conversions, and revenue effortlessly.
5. Enhanced Features for Advanced Tracking
Analytify offers one-click tracking for advanced metrics, including:
- Campaign performance.
- Form submissions.
- Outbound link clicks.
- Social media traffic.
6. Save Time and Money
With Analytify, you can set up advanced tracking without hiring a developer or digging through Google Analytics settings. It’s all automated and beginner-friendly.
GA4 Setup FAQs
1. How do I set up a Google Analytics account?
To set up a Google Analytics account, visit the Google Analytics website, sign in with your Google account, and follow the steps to create a new property. We’ve outlined the full process earlier in this guide.
2. Where do I install the Google Analytics code?
You need to add the tracking code to the header section of your website. This ensures it’s loaded on every page. If you’re using WordPress, plugins like Analytify make this process easy without touching any code.
3. How do I verify if Google Analytics is working?
You can check the Real-Time report in your Google Analytics dashboard or use tools like Google’s Tag Assistant Chrome extension to confirm that your tracking code is firing correctly.
4. What makes Analytify better than using Google Analytics directly?
Analytify simplifies the complex Google Analytics interface by presenting all essential data right in your WordPress dashboard. It’s beginner-friendly, easy to set up, and offers tailored reports for traffic, eCommerce, campaigns, and more.
5. Can I use Analytify with non-WordPress platforms?
Analytify is built specifically for WordPress websites. If your site isn’t on WordPress, you’ll need to use Google Analytics directly or explore other tools compatible with your platform.
6. Do I need coding knowledge to set up Google Analytics?
Nope! With plugins like Analytify or tools like Google Tag Manager, you can set up Google Analytics without touching a single line of code.
Final Thoughts: Google Analytics Setup
Setting up Google Analytics doesn’t have to be a headache. With just a few steps, you can start tracking your website’s performance and making smarter decisions based on real data. Whether you’re looking to set up a Google Analytics account for the first time, wondering how to put Google Analytics on your website, or figuring out where to install the code, this guide has got you covered.
We hope this guide has helped you learn how to connect Google Analytics to your website, whether it’s through Analytify, manual code installation, or Google Tag Manager.
Furthermore, you may also like to read: How to Fix Google Analytics Not Working (2024).
If you’ve got any questions or tips, feel free to share them in the comments. We’d love to hear from you!









Cant log in get the following error:
Authorization Error
Error 400: redirect_uri_mismatch
You can’t sign in to this app because it doesn’t comply with Google’s OAuth 2.0 policy.
If you’re the app developer, register the redirect URI in the Google Cloud Console.
Learn more
Request Details
The content in this section has been provided by the app developer. This content has not been reviewed or verified by Google.
If you’re the app developer, make sure that these request details comply with Google policies.
redirect_uri: “domainurl”/wp-admin/admin.php?page=analytify-settings
did google analytics start collecting, measuring, or tracking your website? Does GA start to collect only upon set-up?
Yes, It only starts tracking upon setting up.
Hi again,
Also I sent a test email; the plug in confirmed that email was sent but I didn’t received any email.
kindly email your issue at support@analytify.io
Hi,
I created an analytic account and it confirmed that it gave access to the plugin. However, I got an error message ‘No Website is registered with your Email at Google Analytics.
Please setup your site first, Check out this guide here to setup it properly’.
Please kindly advise what I am to do.
Thank you
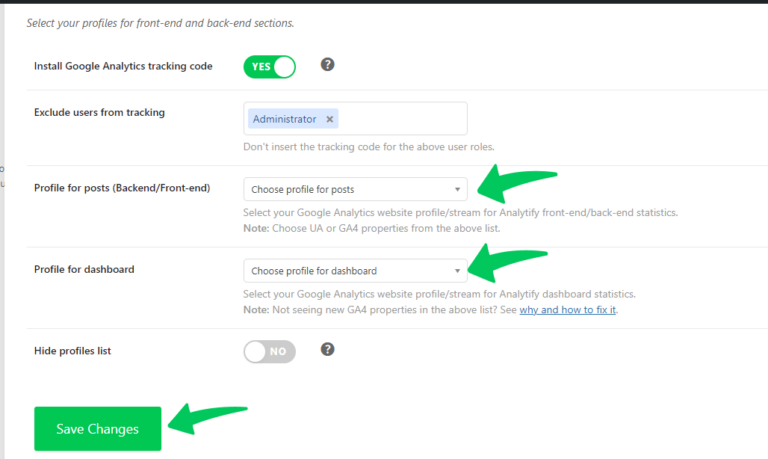
On authentifying/logging into analytify in wordpress dashboard, account is accepted, but ‘save changes’ can’t be done because ‘profiles’ aren’t selected in
‘Select your profiles for front-end and back-end sections’.
‘Profile for posts (Backend/Front-end)’
‘Profile for dashboard’
But these profile fields display no drop-down options. What to put for profiles in these fields?
Yes. Same problem except I had no idea how to describe it. Please update your documentation. Your very first thing to do “make a Google Analytics account” does not work anymore. You can’t ONLY make a non-Google Analytics 4 Tracking ID. I’ve been spending an insane amount of time and no where close to setting up my account. At this rate, I won’t have it set up in 14 days…
I have set this up recently and the only UA option (non-Google Analytics 4) still works.
The same issue appeared on my site even though I had Properties in my Google Analytics account. The guys in the support provided me the following resolution and it worked.
“This error is usually connected to old API keys, for which follow the quota error resolution:
1. Open the Analytify settings page.
2. Logout from the authentication tab.
3. Now deactivate and then activate the Analytify plugin.
4. Open the Analytify settings page and Authenticate.”
Thanks Dave, this worked for me!
sir what profile of google analytics
Hi,
I don’t have and don’t want the old Googly Analytics.
I have only one Google Analytics 4 Account, Property and Data Stream.
Of cause, I have the the Stream ID G-1XXXXXXXXX.
I connected the Analitify with right Google successfully but Plugin don’t find my Analytics profiles.
I tryed more times to logout and again to login but anyway Analytify don’t find my profiles.
Google Analytics is just moved to Google Analytics 4 and with that, it has removed the by default backward compatibility of UA code for new users.
We have written a detailed guide on how to turn on the Google Analytics UA code compatibility to use it with Analytify.
Please check our guide here: http://analytify.io/doc/how-to-integrate-analytify-with-google-analytics-4-ga4/
Please update, i cannot see my new property in google analytics list. GA4 update ???
Google Analytics is just moved to Google Analytics 4 and with that, it has removed the by default backward compatibility of UA code for new users.
We have written a detailed guide on how to turn on the Google Analytics UA code compatibility to use it with Analytify.
Please check our guide here: http://analytify.io/doc/how-to-integrate-analytify-with-google-analytics-4-ga4/
After installation of plugin Analytify i completed the authentication process sucessfully .
But when i move t profile column , in profile for posts (Backend/front end ) option I don’t have the option to choose my site under the drop downs. They’re blank. I don’t know what to do next for it to connect on my site.
sir what to add in profile to post and profile to deshboard
Hi Taimoor!
Selecting a Profile for Posts means, the profile that you want to use for tracking your website. and Selecting a Profile for Dashboard means the Analytics of Profile that you want to display inside your WordPress Dashboard.
To learn further checkout these Docs.
http://analytify.io/doc/select-profile-for-showing-analytics-in-wordpress-dashboard/
http://analytify.io/doc/select-profile-for-tracking-posts-backend-front-end/
I have my tracking id and tracking code, but do not know where to plug it in. Please Help me Sir…
Where do I find my licence key,
Hi Sarah,
You can find the Licence keys by going to http://analytify.io/your-account/ and after getting login with your details. go to the Licence tab you will find your license key there.
Hi
Are AMP pages counted?
It’s going to be end of mine day, except before finish I am reading
this great post to improve my know-how.
I had the same issue. Did you figure out how to fix it?
Thankx
Thanks it works for me now
I have my tracking id and tracking code, but dont know where to plug it in.
I cannot login into the analytics account why???
After installation of plugin it gives an error of setup google analytics account. I have already signup with google analytics but still it showing the same error. can you help me in this regard.
Same issue as everyone else above with “no website” even though it is in fact registered…any fix?
Answered my own question…including here in case it helps anyone else as this seems to be a common issue and isn’t covered in this help guide.
Simply setting up your website in Google Analytics isn’t enough. You also need to enable the Analytics API.
Step 1: Log into your developer console “https://console.developers.google.com/”. You should be redirected to the API dashboard “https://console.developers.google.com/apis/dashboard”.
Step 2: Click the “Enable APIS and Services” button just below the header at the top of the page.
Step 3: Search and select the “Analytics API” in the “API Library” page that opens.
Step 4: Select the enable button on the next page.
Step 5: Return to the Analytify dashboard in wordpress, log out of the google authentication and then log back into reauthenticate.
And viola, you should be in business!!
Super helpful! This solved my issue. Thanks a bunch!
Wow thank you very much, it worked
Thanks a lot man. It worked .
You are welcome, Saad.
Google Analytics is all set up with the email above and the website MealsByMom.com.
The profile page still says:
No Website is registered with your Email at Google Analytics. Please setup your site first, Check out this guide here to setup it properly.
I’ve checked the Google Analytics site and everything is setup
Same problem this my installation attempt. 12/24/18. Everything checks out on Google Console but Analytify plugin does not recognize matching gmail account. I have logged out and back in then waited several minutes as plugin message indicates. I was also logged out of plugin before creating API key.
I had the same issue. Did you figure out how to fix it?
Thanks to the analytify team, this problem was due to access restrictions in Iran.
Thanks
I went through all the steps, but it’s not showing up as an option in anilitify under dashboard. It’s saying I need to authenticate it, which I did, but I don’t have the option to choose my site under the drop downs. They’re blank. I don’t know what to do next for it to connect on my site. I don’t see a log in anywhere… in fact where there is one it says do I want to log out… I’m really confused.
Somehow you missed a step in setting up your site at Google analytics. I would recommend to go through the steps again mentioned above, logout from Analytify plugin and Authenticate again. If the problem persists, please contact us at http://analytify.io/support/ and submit your Google Analytics user/pass along with diagnostic logs from Analytify plugin.
Our support team will resolve this issue for you!
Cheers!
I had the same issue. Did you figure out how to fix it?
We need our site to have google analytical for visitors data tracking
hello
goodday, i was able to update my analytic account but its still not showing on my analytify dashboard. am still getting this issue : No Website is registered with your Email at Google Analytics. Please setup your site first, Check out this guide here to setup it properly. please how can i solve this?
After updating your account at Google analytics, you should log out from Analytify and Authenticate it again.
If you are still not able to solve it, Please submit a support ticket at http://analytify.io/support/
Cheers
Adnan
Same problem this my installation attempt. 12/24/18. Everything checks out on Google Console but Analytify plugin does not recognize matching gmail account. I have logged out and back in then waited several minutes as plugin message indicates. I was also logged out of plugin before creating API key.