How to Create Google Analytics 4 Alerts (Custom Insights)
Keeping a pulse on your website’s performance is crucial for any business owner or marketer. However, the vast amount of data available in Google Analytics can be overwhelming. Finding the needed information from countless metrics and reports can be time-consuming and confusing.
This is where Google Analytics Alerts come in handy. They provide a solution for proactive monitoring, notifying you of significant changes or issues without constantly checking your analytics.
This blog post will guide you in creating effective GA4 custom alerts. We’ll explore why alerts are essential and how they differ from the previous version (Universal Analytics). We will also provide step-by-step instructions for setting and managing Google Analytics 4 alerts in 2024.
Let’s dive right in and unlock the full potential of GA4 alerts for your website!
Google Analytics Alerts (TOC):
What are Google Analytics Alerts?
Google Analytics Alerts are notifications you receive about your website in response to significant changes within a specific time frame.
Here are some fundamental changes that require setting up Google Analytics Alerts:
- Traffic Spikes or Drops
- Bounce Rate Changes
- Conversion Rate Fluctuations
- Page Load Speed Variations
- Goal Completions
Google Analytics Alerts are a handy feature that helps you track essential changes on your website without constantly checking your analytics dashboard. Think of them as your personal watchdog for your site’s traffic. When something significant happens, Google Analytics Alerts will send you a notification.
Custom Alerts in UA and GA4
In Universal Analytics (UA), these Alerts are called Custom Alerts, and in Google Analytics 4 (GA4), they are called Custom Insights. Both serve the same purpose to notify you about significant website traffic and performance changes. There are key differences in how they operate and what they offer:
| Features | Universal Analytics (UA) | Google Analytics 4 (GA4) |
| Terminology | Custom Alerts | Custom Insights |
| Alert Basis | Metrics-based (e.g., sessions, bounce rate) | Primarily focuses on Event-based (specific events, user interactions) but also tracks metrics derived from these events |
| Notification Timing | Daily, Weekly, Monthly | As soon as 1 hour later |
| Thresholds | Static (predefined, fixed values set manually to trigger alerts ) | Dynamic (automatically adjusted based on historical data and trends), AI-powered anomaly detection |
| Setup Complexity | A little more complex | Easier to set up |
| Data Source | Looks mostly at past data | Uses past & current data |
| Automation Level | Basic, manual setup | Advanced, AI-powered |
| Data Availability | Data is readily available | It might need some extra setup |
This table highlights the differences between custom alerts in Universal Analytics and Google Analytics 4. Presenting how GA4 offers a more advanced, dynamic, and automated approach to monitoring website performance.
Why Set up GA4 Custom Alerts?
Creating custom alerts Google Analytics is crucial for effective website monitoring and management. Here are the main reasons why it’s essential and the benefits it provides:
- Stay Informed, Stay Ahead: Custom alerts notify you about significant changes, allowing you to take immediate action instead of discovering issues too late.
- Save Time: Instead of manually checking various metrics and reports, custom alerts automate the process, saving you time and effort.
- Reveal hidden opportunities: Alerts can help you quickly identify and capitalize on positive trends, such as traffic spikes or improved conversion rates.
- Early detection of errors: This alerts you about problems such as broken links ( 404 errors), traffic drops, increased bounce rates, or reduced conversions, enabling you to address them before they grow.
- Enhance User Experience: By monitoring critical metrics like page load speed and user engagement, you can ensure your site provides a smooth and satisfying user experience.
- Optimized Marketing Campaigns: Notifications about changes in traffic sources or user behavior can help you adjust your marketing strategies for better results.
- Maintain Site Health: Regular monitoring through alerts helps keep your website in optimal condition. Ensuring it performs well and supports your business goals.
How to Create Google Analytics Custom Alerts in GA4?
Now that you know the power of GA4 custom alerts, let’s explore how to set them up.
Follow this guide. These steps will show you how to create GA4 custom alerts and gain valuable insights!
Step 1: Accessing Custom Insights
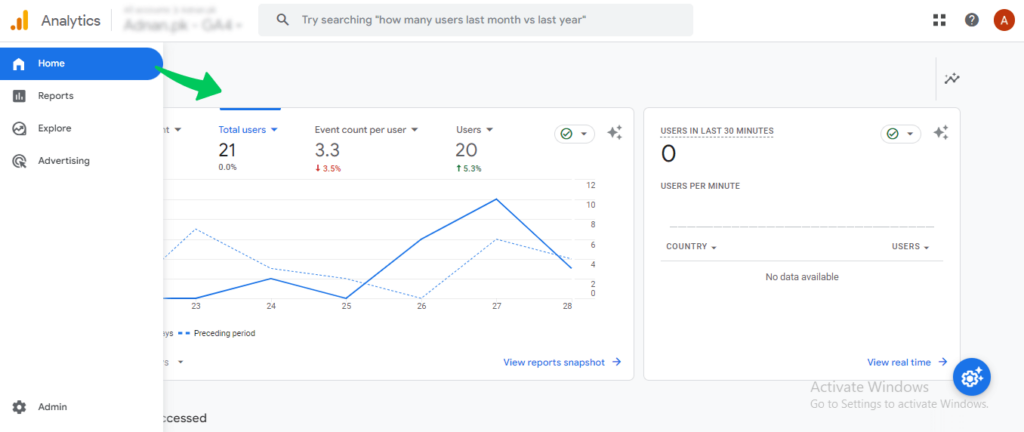
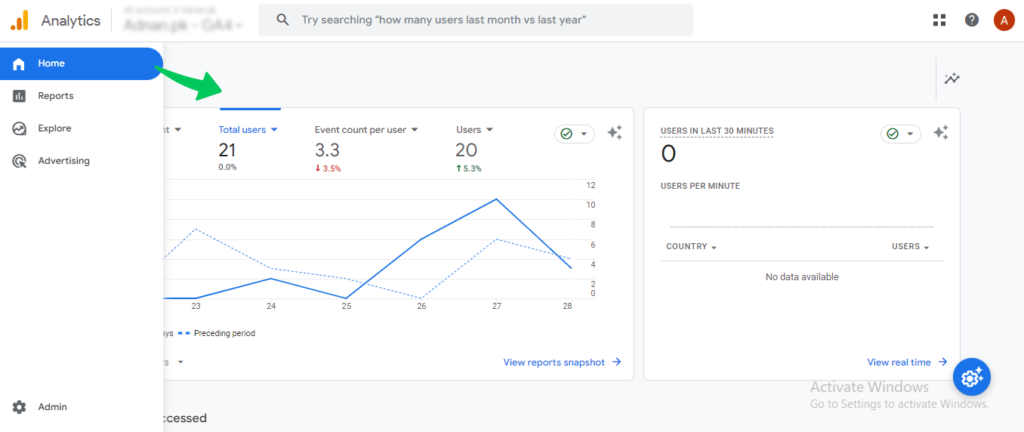
- Log in to your Google Analytics 4 account.
- Click on the “Home “ tab.
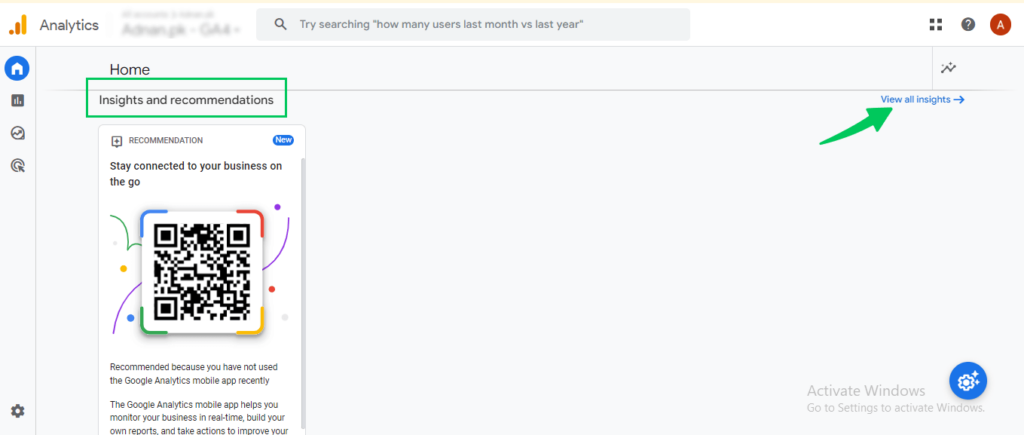
- Scroll down the home page until you see the Insights & recommendations section.
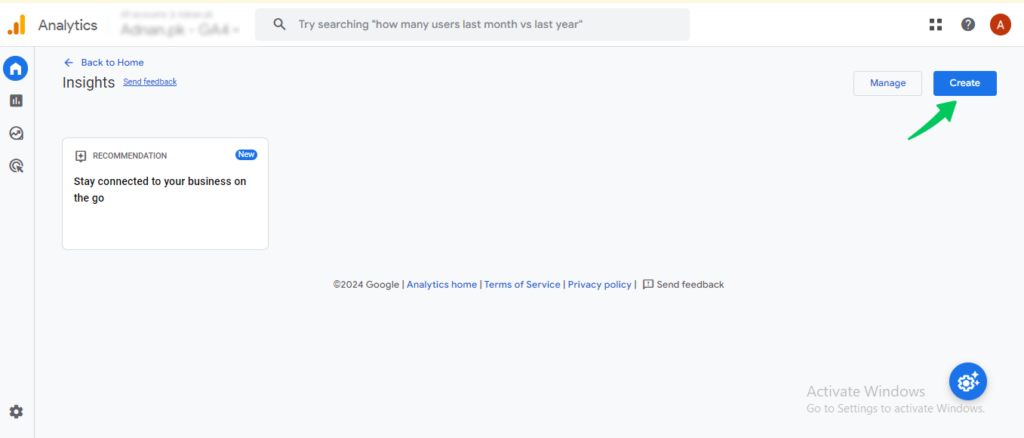
- Click on View all insights.
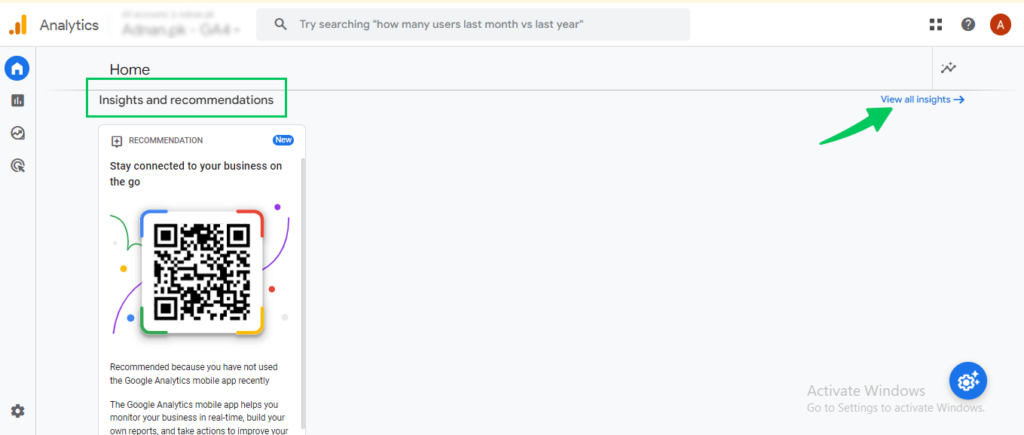
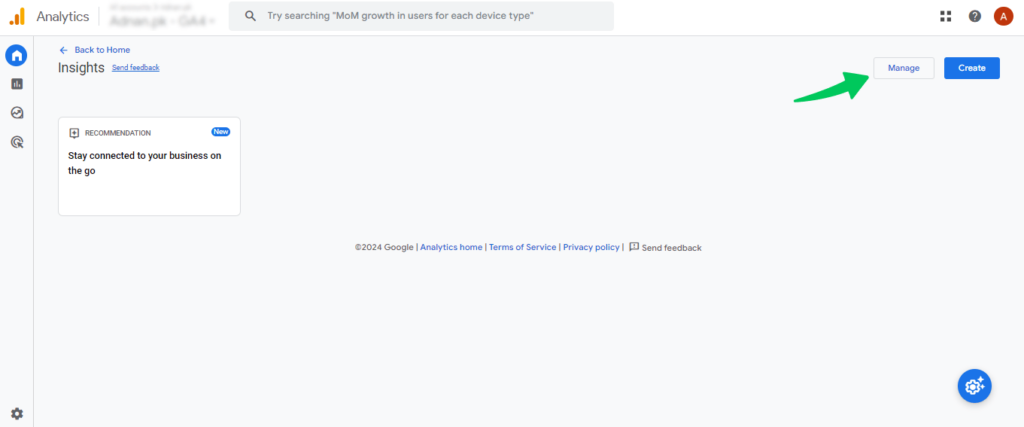
- Here, you will get two options. Choose the “Create” tab.
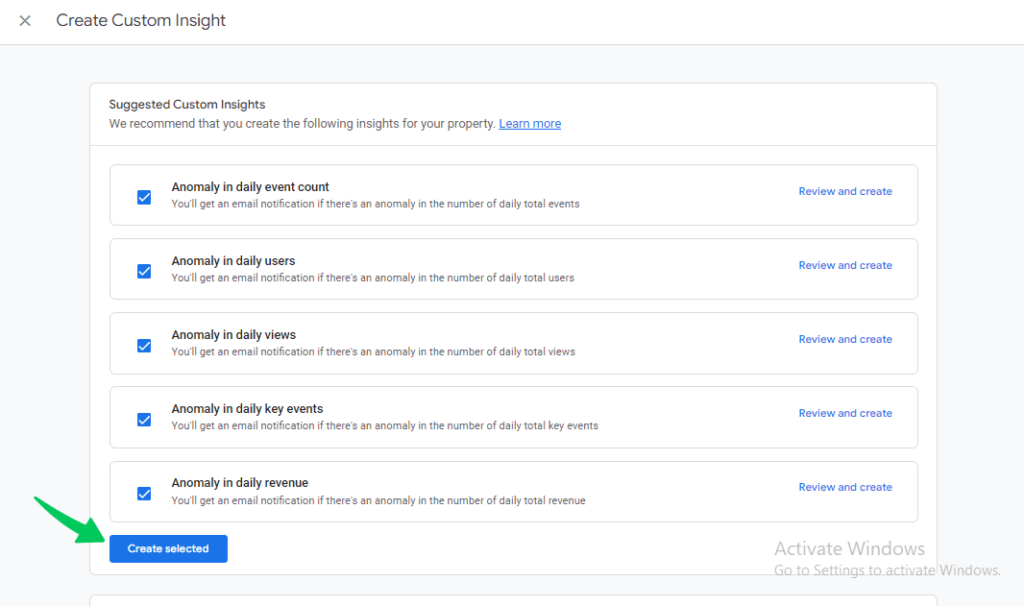
Step 2: Choose Suggested Insights
See suggested insights. These suggested insights will populate some default alerts to get you started. By clicking “Review and Create,” you can check their default settings and make desirable changes. Select which alert you want. Click on the blue button that says “Create selected.”
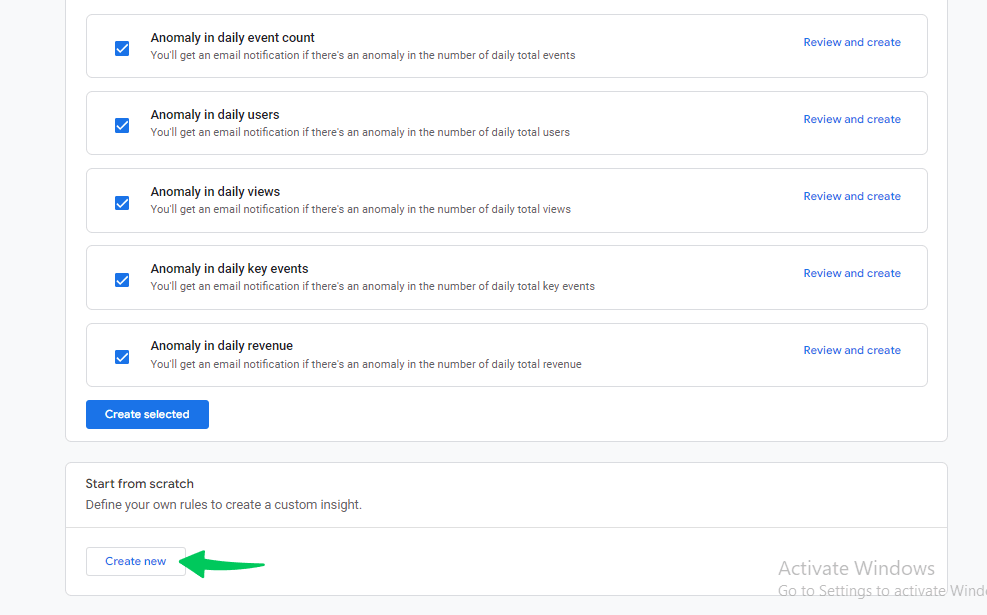
Step 3: Creating a New Alert
- You’ll see the option to Start from scratch. This step allows you to create a new custom alert based on your needs.
- Click the blue button that says “Create Now”.
Step 4: Configuring Your Alert
This step is where the magic happens! Here’s what you need to set up:
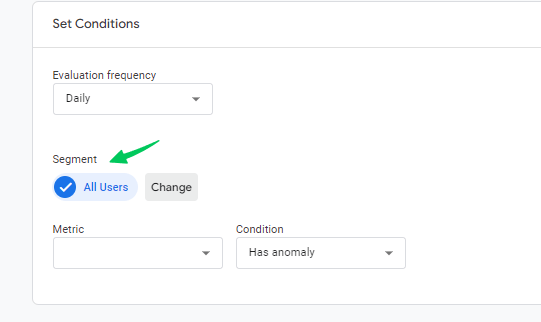
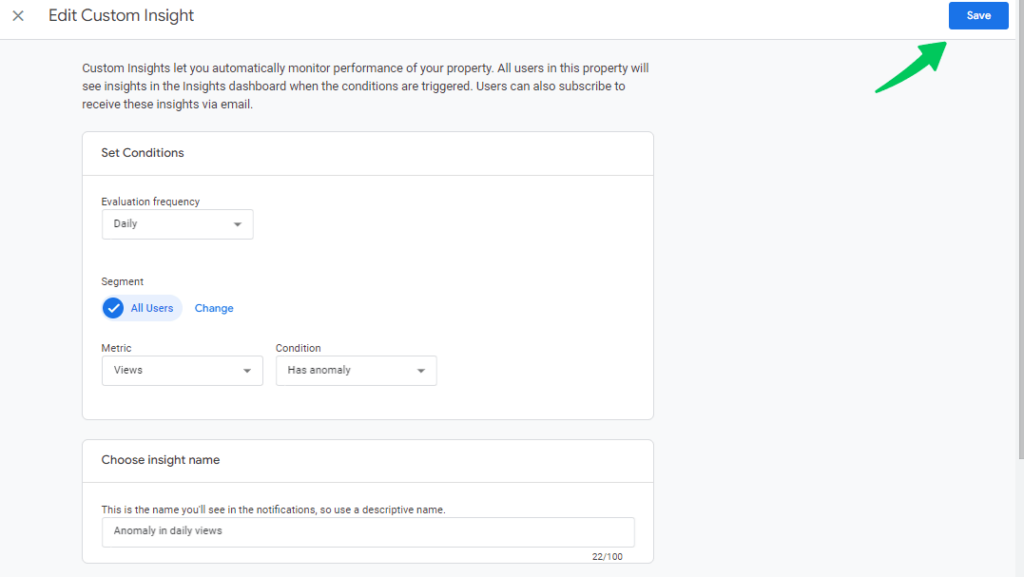
Set Conditions: This is the heart of your alert. Here’s what you’ll tell your GA4 watchdog to keep an eye on:
- Evaluation frequency: It determines how often Google Analytics checks to see if the condition was met and notifies you if it was(e.g., weekly, monthly).
- Segment: allows you to specify which users Google Analytics should consider when monitoring.
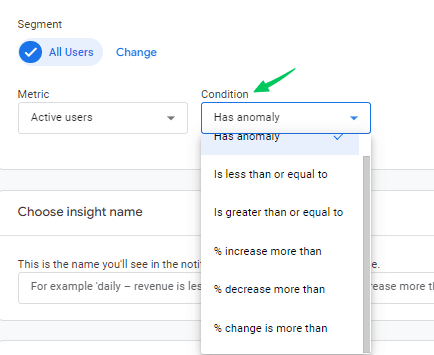
- Metric: Select the metric you want to track (e.g., Users, Sessions, Bounce Rate).
- Condition: Choose how you want the metric to change (e.g., Has anomaly).
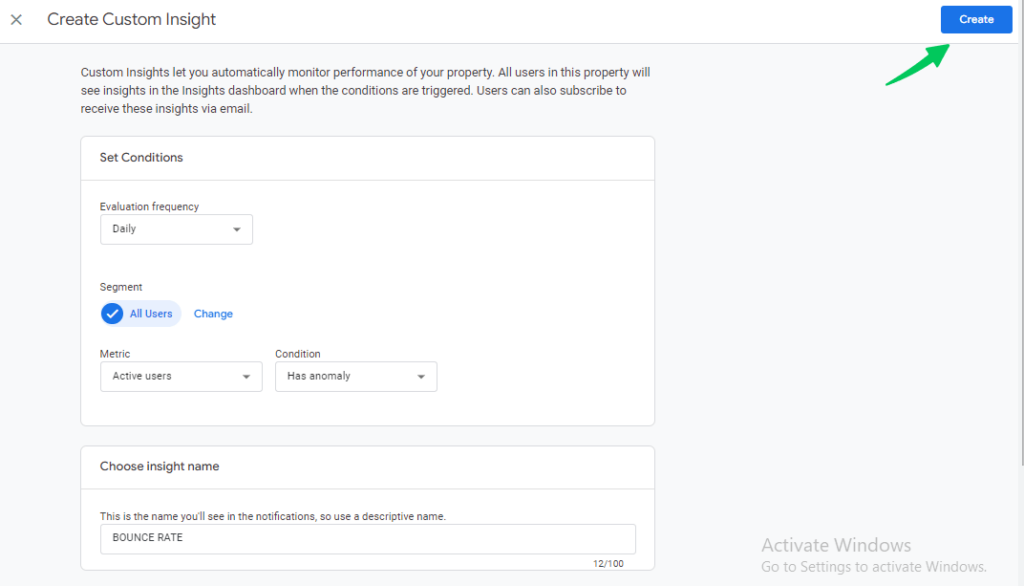
Alert Name: Choose a clear and descriptive name that reflects what the alert is monitoring (e.g., “Organic Traffic Spike”).
Manage notifications: You must enter the email address to which you want to receive notifications.
Step 5: Save your Newly Created GA4 Alert
Once you’ve configured everything:
- Click the blue Create button to save your new custom alert.
Congratulations! You’ve successfully created a GA4 Custom Alert.
How to Manage Your Google Analytics Alerts?
Since you’ve created your GA4 custom alerts, managing them effectively is essential. This section will guide you through editing and deleting your alerts to ensure they remain relevant and informative.
Access your existing Custom Alerts
- Log in to your Google Analytics 4 account.
- Click on the “Home “ tab.
- Scroll down the home page until you see the Insights & recommendations section.
- Click on View all insights.
- Then click on the “Manage” tab.
Edit Your Alerts
- Locate the specific custom alert you want to modify
- Click on the three vertical dots next to the alert name.
- Select Edit from the dropdown menu.
- A window will pop up, allowing you to edit all the original configuration options you set during creation (e.g., alert name, metric, conditions).
- Make your changes and click Save to update your custom alert.
Deleting your Alerts
- Locate the alert you want to remove.
- Click on the three vertical dots next to the alert name.
- Select Delete from the dropdown menu.

- A confirmation message will appear. Click Delete again to confirm.
- The deleted alert will be permanently removed.
Review your custom alerts regularly and make adjustments as needed. Delete no longer relevant alerts or create new ones to keep up with your evolving SEO needs.
Analytify Dashboard Reporting vs. Google Analytics Alerts
Google Analytics 4 (GA4) Custom Alerts offer powerful website monitoring. But what if there was a more straightforward way for WordPress users to stay informed about crucial website metrics?
This is where Analytify shines! Analytify is the best Google Analytics plugin for WordPress, eliminating the need to set up Google Analytics alerts separately.
Join 50,000+ Beginners & Professionals who use Analytify to Simplify their Google Analytics!
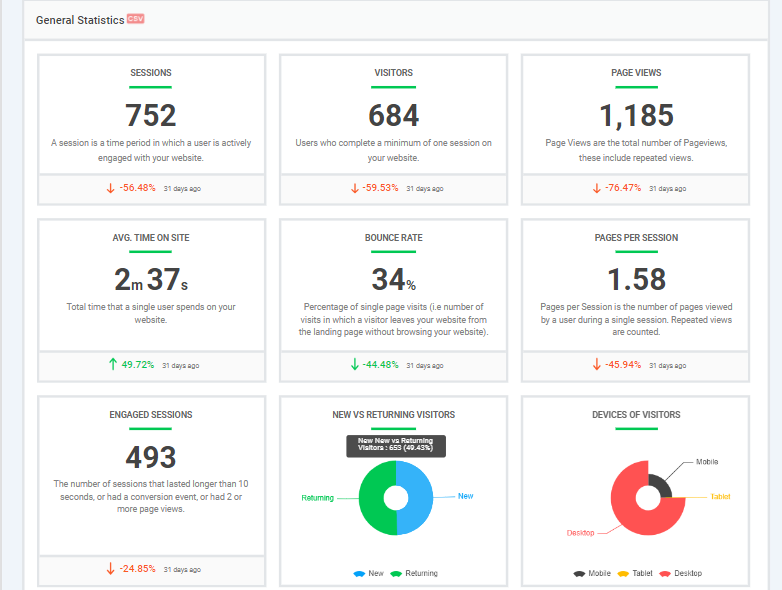
Analytify keeps you updated with the latest website activity; view critical data like sessions, users, bounce rate, top pages, and traffic sources directly within your WordPress dashboard. Its dashboard presents website data in clear graphs and charts, making it easy to understand.
Gain valuable insights from Analytify’s reports to improve your website’s performance and achieve your marketing goals.
Here’s a glimpse of Analytify’s dashboard showcasing some of the key metrics you can monitor:
If you’re a WordPress user seeking a straightforward way to monitor your website’s health and performance, Analytify offers a compelling alternative to GA4 Custom Alerts. With Email Notifications Addon (available in Analytify PRO), you can set up automated reports delivered straight to your inbox.
Top 10 GA4 Custom Alerts
Keep an eye on your website’s health, which is crucial for SEO success. GA4 Custom Alerts are your secret weapon, notifying you about critical changes in traffic and user behavior. Here are 10 top alerts to consider, along with their ideal configuration:
1. Increase in Page Loading Time Alert (Maintain Speed):
- Metric: Average Page Load Time
- Condition: Increase by
- Value: 2 seconds or more
- Comparison: Compared to the previous week
The “Page Loading Time Increase Alert” is your website’s speed monitor. It will notify you when there is a significant slowdown in its loading speed.
2. Traffic Spike Alert:
- Metric: Users or Sessions
- Condition: Increase by
- Value: 25% or more
- Comparison: Compared to the previous week
This alert notifies you when your website experiences a significant increase in visitors. It could be due to a successful marketing campaign, a trending news article, or a seasonal spike. Investigate the cause to take advantage of the increased traffic and optimize your website for engagement.
3.404 Error Increase Alert (Fix Broken Links):
- Metric: Users with Event Name (page_not_found)
- Condition: Increase by
- Value: 10% or more
- Comparison: Compared to the previous week
Monitor broken links that might frustrate visitors. The “404 Error Increase Alert” ensures your website maintains a healthy number of working links and provides a smooth browsing experience for your visitors.
4. Traffic Drop Alert:
- Metric: Users or Sessions
- Condition: Decrease by
- Value: 20% or more
- Comparison: Compared to the previous week
A sudden drop in traffic can signal a website issue (e.g., technical glitch, broken page), a change in search engine ranking, or a shift in user behavior. This alert helps you identify and address potential problems before they significantly impact your website’s performance.
5. New User Acquisition Alert
- Metric: Users (New Users segment)
- Condition: Increase by
- Value: 10% or more
- Comparison: Compared to the previous week
Stay informed about your website’s ability to attract new visitors. This alert can help you assess the effectiveness of your marketing campaigns and identify strategies to attract a wider audience.
6. Bounce Rate Spike Alert:
- Metric: Bounce Rate
- Condition: Increase by
- Value: 10% or more
- Comparison: Compared to the previous week
Bounce rate measures the percentage of visitors who leave your website after viewing only one page. A significant increase might indicate confusing navigation, irrelevant content, or slow loading times.
7. Engagement Time Changes
- Metric: Average Engagement Time
- Condition: Increase by or Decrease by
- Value: 10% or more
- Comparison: Compared to the previous week
This alert lets you know if visitors spend more or less time browsing your website. An increase suggests engaging content, while a decrease might indicate a need to improve content relevance or website navigation.
8. Custom Event Change Alert (Track Specific Actions):
- Metric: Event Count (Choose your custom event)
- Condition: Increase by or Decrease by
- Value: Set a relevant threshold based on your event
- Comparison: Compared to the previous week
Monitor user behavior related to specific actions on your site (e.g., button clicks, video views).
9. Goal Completion Drop Alert (Addressing Conversion Issues):
- Metric: Goal Completions (e.g., purchases, signups)
- Condition: Decrease by
- Value: 15% or more
- Comparison: Compared to the previous week
This alert notifies you when your website’s conversions (desired actions) decrease. This drop could be due to product offerings, pricing strategy, or changes in the checkout process. Investigate the cause and optimize your conversion to recover lost sales or leads.
10. Social Traffic Fluctuations
- Metric: Users by Traffic Source (Social)
- Condition: Increase by or Decrease by
- Value: 15% or more
- Comparison: Compared to the previous week
This alert lets you understand how social media campaigns impact your website traffic. Identify social platforms driving traffic and tailor your content strategy to maintain or improve performance.
GA4 Alerts FAQs
What do Google Analytics Custom Alerts tell you?
Custom Alerts focus on your website traffic data within Google Analytics 4 (GA4). Based on your conditions, they alert you about significant changes in website performance. These GA4 alerts help identify traffic fluctuations, engagement changes, and technical issues.
How to set up Google alerts?
Here’s how to set up custom alerts (called Custom Insights) in GA4:
Sign in to your Google Analytics account.
Reach the Home page, Scroll down, and look for the “Insights & recommendations” section. Click on “View all insights.” Choose “Create “ to define your alert.
Now, you can configure your alert by adding Alert Name, Conditions, Frequency, and Email.
Once you’ve set everything up, click “Create” to activate your custom alert.
How will I receive custom alerts in Google Analytics?
You’ll receive Google Analytics custom alerts via email to the address you specify when creating the alert. Make sure to check your spam folder in case the notification lands there.
Does GA4 have custom Alerts?
Yes, GA4 has custom alerts. They’re called Custom Insights in GA4. These alerts function similarly to traditional custom alerts, notifying you about significant changes in your website data based on pre-defined conditions.
How do I modify Google Analytics (GA4) Alerts?
Here’s how to modify custom alerts (called Custom Insights) in GA4:
Sign in to your Google Analytics account.
Reach the Home page, Scroll down, and look for the “Insights & recommendations” section. Click on “View all insights.” Choose the “Manage “ tab.
Locate the custom alert you want to modify. Click on the three dots next to the alert name. A menu will appear with options like “Edit” and “Delete.” Choose “Edit” to modify the alert configuration.
Once you’ve finished editing, click “Save” to apply the changes to your custom alert.
Are Google Analytics Alerts immediate?
GA4 Alerts can be set to deliver notifications in various frequencies, but they aren’t instantaneous. They informed you within a reasonable timeframe depending on your chosen delivery frequency, like once a day once a week. etc.
How much does Google Analytics Alerts cost?
Google Analytics Alerts is a free service within GA4. There are no charges associated with using it. You can create and manage as many alerts as you need, making it a great option for anyone who wants to stay informed about specific topics on the web.
Final Thoughts
Staying on top of website traffic and user behavior is crucial for success. Google Analytics 4 (GA4) Custom Alerts equip you with a powerful tool to monitor critical changes and optimize your website accordingly. We’ve explored the benefits of GA4 alerts, walked you through the setup process, and even provided information on managing GA4 custom alerts. Now it’s your turn to take action!
For those seeking a more straightforward solution, remember that Analytify offers a user-friendly WordPress dashboard with readily available metrics.
Do you have any questions about GA4 Custom Alerts or website traffic monitoring in general? Leave a comment below, and let’s chat!

