Understanding GA4 Access Levels (Google Analytics Permissions)
Are you struggling to understand GA4 access levels?
In Google Analytics 4 (GA4), managing access levels is essential for maintaining control over who can view, edit, and manage data within an account. Access levels, also called user permissions, determine the specific actions a user can perform within GA4. Setting appropriate permissions helps organizations protect sensitive data, collaborate effectively, and ensure only authorized users make critical changes.
In this article, we’ll explore the different GA4 access levels, explain why they’re important, and provide tips on using them effectively.
GA4 Access Levels (TOC):
What are GA4 Access Levels?
GA4 access levels are structured permissions within Google Analytics 4 that define what actions users can take and what data they can access. Access levels allow account administrators to assign specific roles to users, ensuring that each person has the appropriate level of control for their responsibilities.
These roles vary from viewing-only access to full administrative privileges, making it easy to collaborate securely within a shared analytics environment.
Google Analytics 4 operates on two levels of access:
- Account Level: This is the highest level of access in GA4. Permissions granted at the account level apply to all properties within that account. If your organization oversees multiple websites or apps, giving account-level access to a user will allow them to see and manage data across all properties linked to that account.
- Property Level: A property is typically a website or app, and permissions assigned at the property level restrict a user’s access to only that specific property. This setup is ideal for team members who need insights into specific sites or apps but don’t require access to the broader account data.
By controlling these access levels, administrators can grant permissions tailored to each user’s role, helping balance data accessibility with data security. This structure is particularly beneficial for organizations working with multiple teams, external partners, or consultants, as it allows administrators to grant data access without risking unauthorized changes to necessary settings or data loss.
For WordPress users, Analytify includes a feature for managing analytics visibility for specific user roles within the WordPress admin area.
Why Do We Need Access Levels in Google Analytics 4?
GA4 access levels are essential for ensuring data security and enhancing the efficiency of your analytics environment. By assigning permissions that align with each team member’s role, you create a safe and streamlined workspace in Google Analytics 4, where sensitive data is protected, and only authorized users can make changes. Here are some key reasons why GA4 access levels are so important:
- Data Security
Not every team member needs full access to your Google Analytics data. Assigning access levels lets you limit access to sensitive information, reducing the risk of accidental or unauthorized changes. With controlled permissions, you can be confident that only trusted users have the ability to manage critical settings or view sensitive metrics. - Streamlined Collaboration
Different departments often require distinct data insights from GA4. For instance, marketing teams may need access to audience data to evaluate campaign performance, while executives may only need high-level summaries. With defined access levels, each team can access the insights they need without wading through irrelevant data or settings. - Role-Based Accountability
GA4 access levels align user permissions with their job roles, ensuring each person can only perform actions within their designated scope. For example, analysts can view and interpret data but cannot modify settings, while administrators have full control to manage accounts and properties. This clear structure enhances accountability, as users are restricted to actions that fit their roles, reducing the chance of misconfiguration. - Efficient Permission Management
GA4’s structured access levels simplify managing permissions, especially in organizations with multiple users or properties. Whether onboarding new team members or adjusting access for external consultants, you can quickly assign permissions at the account or property level, saving time and maintaining accuracy.
Setting up Google Analytics access levels not only fosters a secure analytics environment but also promotes effective collaboration. By carefully assigning Google Analytics account permissions, you ensure your team can work with the data they need while safeguarding your analytics setup from unauthorized changes.
Next, let’s explore the specific user permissions in Google Analytics and how they support this structure.
Google Analytics Permissions Levels
GA4 provides 5 main user roles, each with a specific set of permissions tailored to different responsibilities.
Here’s a breakdown of GA4 user roles:
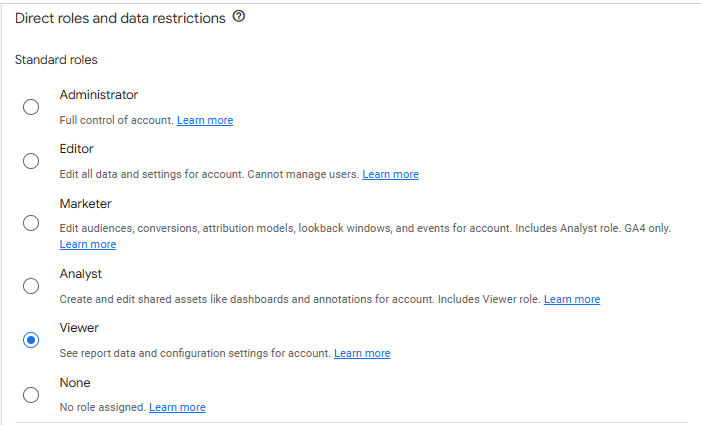
- Administrator
Administrators, who have GA4 admin level access, have the highest level of access in GA4. They can manage all account settings, properties, and users, including adding and removing users, assigning roles, and setting data restrictions. Administrator access should be reserved for trusted users who require full control over your GA4 setup, as they can make sweeping changes impacting all data and settings. - Editor
Editors have nearly full control over the data and settings within a property or account but cannot manage users. They can configure advanced settings, such as enhanced measurement and linking external services (like Google Ads or Search Console). Editors are typically advanced users or technical team members who need to set up and maintain tracking configurations without overseeing user access. - Marketer
The Marketer role is designed for users needing detailed analytics without altering core account or property settings. Marketers can manage audiences, conversions, and custom events, allowing them to measure campaign effectiveness and fine-tune marketing strategies. However, they cannot modify high-level settings or manage other users, keeping their access focused on campaign-related metrics. - Analyst
Analysts can work with available data by creating reports and analyzing metrics. They can create and manage personal assets (e.g., custom reports) and collaborate on shared assets. This role is ideal for team members responsible for interpreting data without needing access to modify tracking configurations or settings. Analysts focus on interpreting trends and making data-driven recommendations, staying within the bounds of view-only data access. - Viewer
Viewers have the most limited access, allowing them to see reports and basic metrics without the ability to make changes. They can still filter and segment data within reports but cannot alter settings or share data assets. The Viewer role is suitable for stakeholders or clients who need to stay informed but do not require the capability to make any changes within GA4.
Each role provides a specific level of control, helping administrators create a secure, role-based access environment in GA4. Next, we’ll explore data restriction options that further refine these permissions.
How to Add and Manage Users in GA4
Setting up and managing users in GA4 is straightforward. Administrators can add new users, assign roles, and adjust permissions as needed. This flexibility ensures that only the right people have access to the data and tools necessary for their roles, helping to protect the integrity of your Google Analytics environment.
Step-by-Step Guide to Adding a User in GA4
To add a new user to GA4, follow these steps:
- Log in to GA4
Sign into your Google Analytics account and navigate to the property or account you want to manage. - Go to the Admin Section
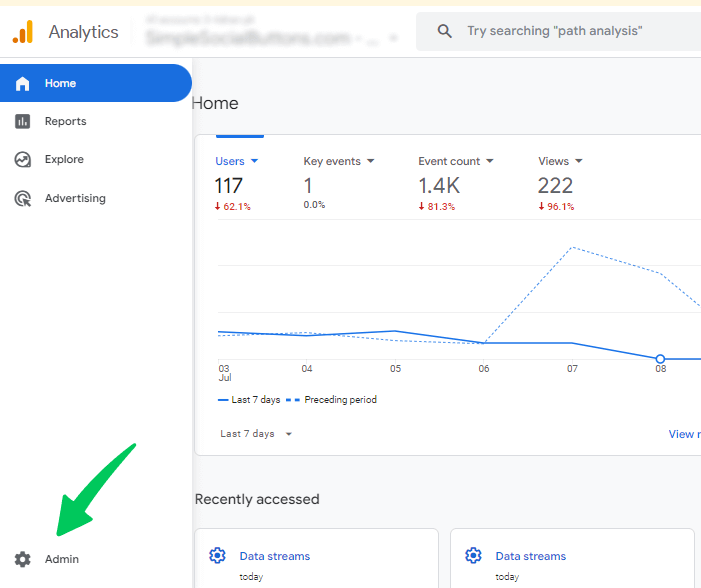
In the bottom-left corner of the GA4 dashboard, click on the Admin gear icon.
- Open Access Management Settings
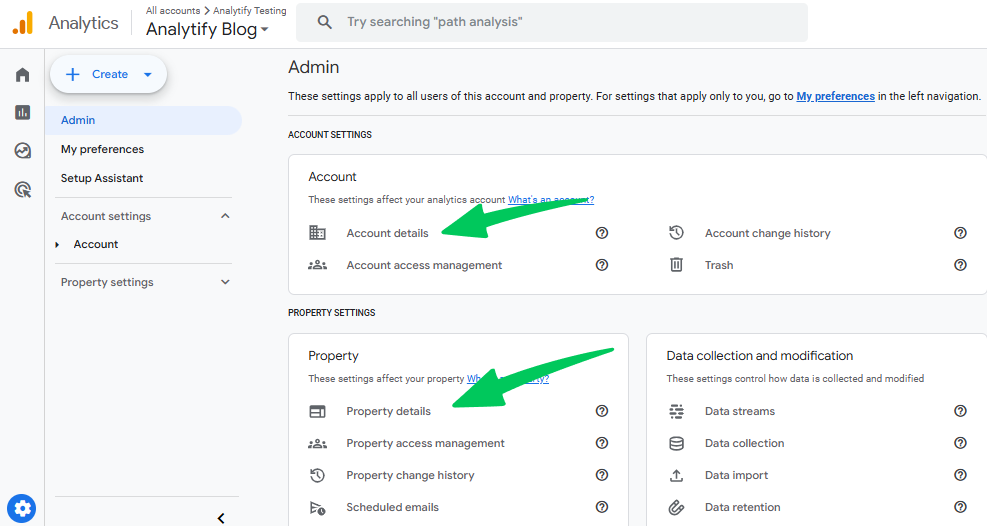
Select Account Access Management if you’re adding a user at the account level (with access to all properties). If you want the user to have access only to a specific property, select Property Access Management.
- Click the “+” Button
In the Access Management page, click on the blue “+” button in the top-right corner, and choose Add Users.
- Enter the User’s Email
Input the email address associated with the new user’s Google account. If adding multiple users with the same permissions, separate each email with a comma.
- Select the User’s Role
Choose the appropriate user role (Administrator, Editor, Marketer, Analyst, or Viewer) based on the level of access the user needs.
- Apply Data Restrictions (Optional)
If needed, check the boxes to No Revenue Metrics or No Cost Metrics to limit access to sensitive data.
- Notify the User
Check the option to Notify new users by email to ensure they receive an email invitation with access details. - Save Changes
Click Add to finalize the user’s access. The new user will receive an email with instructions on how to access your GA4 account or property.
Editing and Removing Users
To edit or remove a user:
- Go to Admin >> User Management within the Account or Property.
- Find the user in the list, click their name, and modify their permissions or apply data restrictions as needed.
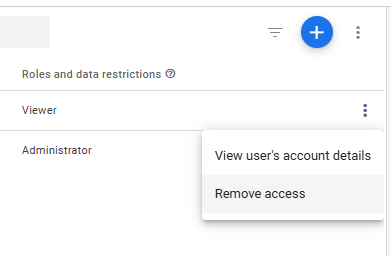
- To remove a user, click the Remove option.
This setup enables administrators to maintain a flexible, secure, and well-organized access structure in GA4. Regularly reviewing and updating user permissions can also help ensure that roles and access levels remain accurate as team responsibilities change.
Data Restriction Settings in GA4
In addition to user roles, GA4 offers data restriction settings that allow administrators to limit access to sensitive financial metrics. These restrictions can be applied to specific user roles at the property level, adding another layer of control over who can view revenue or cost data. Data restriction settings are particularly useful for organizations that want to maintain transparency while keeping financial information private.
Types of Data Restrictions
GA4 offers two main types of data restrictions:
- Revenue Metrics Restriction
This setting hides revenue-related metrics from specific users. For example, you might grant marketers access to campaign data but restrict their view of revenue figures, ensuring that sensitive information remains confidential. - Cost Metrics Restriction
This restriction hides cost data, such as ad spend or operational expenses, from users. It’s an effective way to limit the visibility of cost-related data to only those with a financial or administrative need.
Applying Data Restrictions
Data restrictions can be set when adding or editing a user’s access. To apply these restrictions:
- Navigate to the Admin section of your GA4 account.
- Select either Account Access Management or Property Access Management, depending on where you want to set the restriction.
- Add or edit the user and assign the appropriate role.
- Enable No Revenue Metrics or No Cost Metrics as needed.

These restrictions ensure that users can access the data they need to perform their roles effectively while protecting sensitive financial information. Only administrators and users with unrestricted access can modify these settings.
By leveraging data restriction settings, organizations can create a tailored and secure analytics environment where users have precisely the information they need—nothing more, nothing less. Now, let’s look at how to add and manage users in GA4 to apply these permissions effectively.
Google Analytics Missing Permissions
A frequent issue users encounter in GA4 is the “missing permissions” error, which can prevent them from accessing certain data or performing specific tasks. This issue often arises from incorrect or insufficient permissions assigned to a user, and it can be resolved by adjusting user access settings. Here’s a quick guide to common scenarios and how to fix them.
Common Causes of Missing Permissions
- Insufficient Access Level
Sometimes, a user may lack the necessary role for a task, such as attempting to edit settings without Editor permissions. Ensuring that each user has the appropriate role (e.g., Administrator for account-level management) often resolves this issue. - Data Restriction Settings
If a user can’t view certain financial data, such as revenue or cost metrics, it might be due to data restrictions applied during setup. Administrators can adjust these restrictions if the user’s role requires access to these metrics. - Incorrect Account or Property Access
GA4 operates with account and property levels, and access may be restricted to a specific level. If users encounter missing permissions in a particular property, check if they need account-level access to perform their tasks across multiple properties. - Unlinked Google Account
For users to access GA4, their email must be linked to a Google account. If permissions seem correct but access issues persist, verify that the user’s email address is Google-linked.
How to Resolve Missing Permissions
- Review and Update User Roles
Start by verifying the user’s assigned role. If they need higher access, navigate to Admin >> User Management and modify their role as necessary. - Check Data Restriction Settings
Ensure that no unintended data restrictions (such as hiding revenue metrics) are preventing users from seeing essential information. - Verify Access Level and Location
Confirm that users have the correct level of access (Account or Property) and that permissions are applied at the correct hierarchy within GA4. - Troubleshoot with Email Notifications
If users continue to experience issues, send a notification to remind them to log in with the correct email account associated with their permissions.
Following these troubleshooting steps helps resolve the most common issues related to missing permissions in GA4, allowing users to access the data and tools they need to perform their roles effectively.
Next, let’s see how Analytify can make managing GA4 access in WordPress even simpler.
Managing GA4 Access in WordPress with Analytify
For WordPress users, Analytify provides an efficient solution to view and manage GA4 access levels directly from the WordPress dashboard. With Analytify, you can easily control who has access to specific analytics reports and settings, allowing team members to view GA4 insights without needing to log into Google Analytics separately.
Join 50,000+ beginners & professionals who use Analytify to simplify their Google Analytics!
Here’s how Analytify can simplify managing GA4 access in WordPress:
Analytics Access for WordPress Roles with Analytify
Analytify’s user-friendly interface lets you assign analytics permissions to different WordPress roles, such as Administrators, Editors, and Authors. This is especially useful for site owners who want to control which team members can access data or make configuration changes.
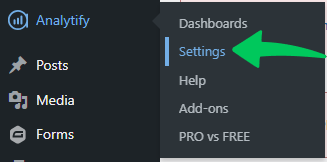
- Navigate to Analytify Settings
In your WordPress dashboard, go to Analytify >> Settings.
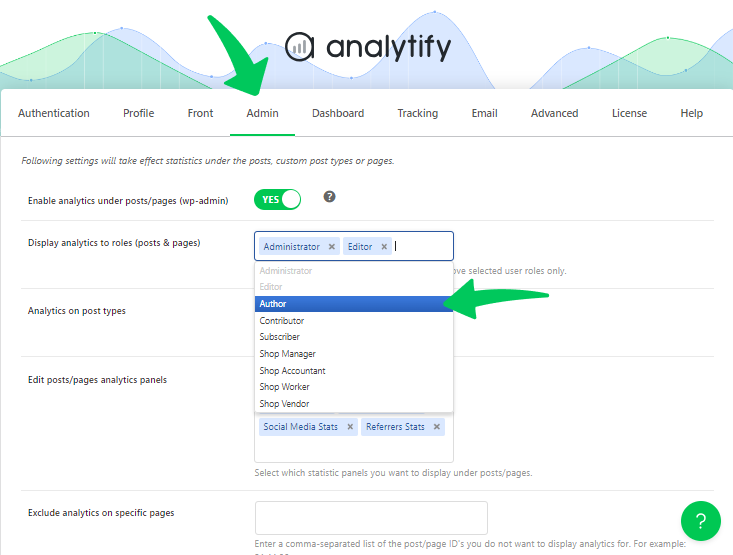
- Set Up Analytics Visibility for User Roles
In the settings, navigate to the Admin tab.
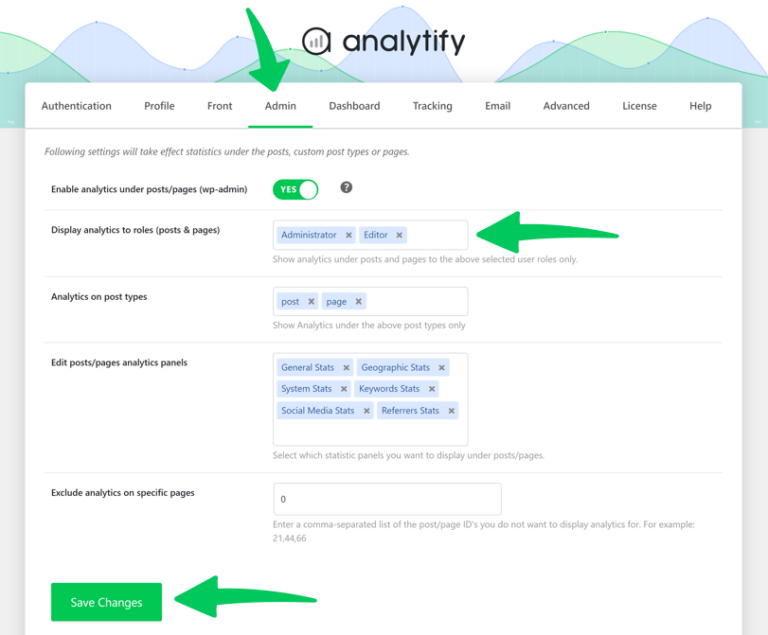
Find the option titled Display analytics to roles (posts & pages). This setting allows you to control which user roles can view analytics data.
- Select User Roles
Click the selection box within this setting.
Choose specific user roles you want to have access, such as ‘Administrator’ or ‘Editor.’ You can exclude roles like ‘Author’ if they don’t need access to the analytics data.
After selecting the appropriate roles, save your changes.
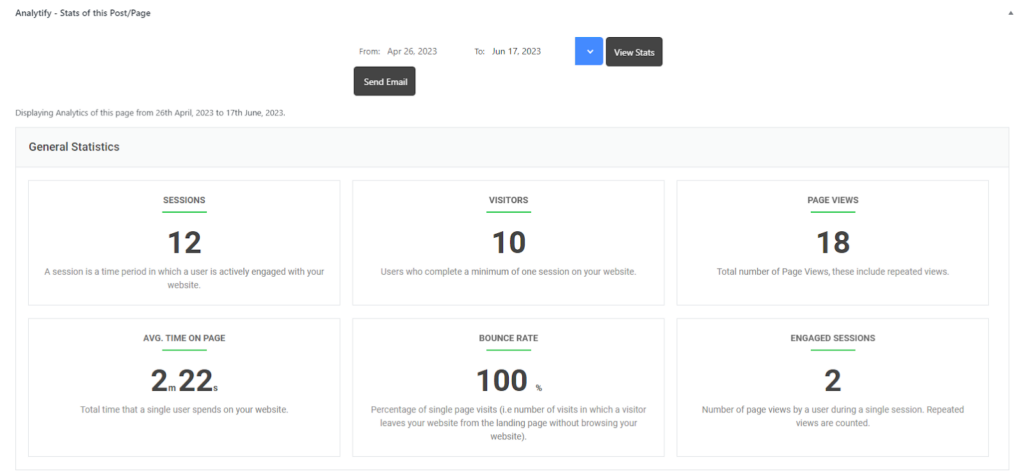
This will help the users to see stats under the post/page as per their user permission:
Benefits of Using Analytify for GA4 Access Management
- Enhanced Security: By managing access within WordPress, you can limit access to GA4 data without granting full permissions in Google Analytics.
- Easy Collaboration: Team members can view and analyze data within WordPress, simplifying workflows and keeping everyone aligned without additional logins.
- Customizable Access: Analytify allows you to assign specific permissions based on WordPress roles so users see only the data relevant to their responsibilities.
With Analytify’s seamless integration, managing GA4 permissions in WordPress becomes a hassle-free experience. This keeps your data secure and ensures your team has easy access to insights. This approach enhances collaboration, making it easier for marketers, editors, and other stakeholders to work with GA4 data right from your WordPress site.
GA4 Access Levels (FAQ)
What are the user roles in Google Analytics?
GA4 offers five roles: Administrator, Editor, Marketer, Analyst, and Viewer. Each role has specific permissions, from full control to view-only access, allowing for tailored user management.
What are the user permissions?
Permissions in GA4 determine what actions users can take, such as viewing data, editing settings, or managing users. These permissions vary by role, ensuring users have access suited to their responsibilities.
What are direct permissions in GA4?
Direct permissions are specific access levels assigned to users at the account or property level. They allow administrators to control what each user can do within GA4.
How do I grant someone access to GA4?
To grant access in GA4, go to Admin >> Access Management, add the user’s email, assign a role, and save changes. The user will then receive an email to join.
What are the levels of access in GA4?
GA4 has two primary levels of access: Account Level and Property Level. Account-level access applies permissions across all properties within an account, making it ideal for users who need a broad scope of access. Property-level access restricts permissions to a specific property (e.g., a website or app), giving users focused access to only the data and settings of that particular property.
What is user-level data in GA4?
User-level data in GA4 refers to data associated with individual users, tracking their behavior across sessions. This data helps you understand user engagement patterns, preferences, and actions on your site or app, providing valuable insights for optimizing user experience and marketing efforts.
Final Thoughts: GA4 Access Levels
GA4 access levels balance data accessibility with security, empowering you to assign the right permissions for different roles and responsibilities. Whether you manage permissions in GA4 directly or through WordPress with Analytify, understanding these access levels helps you foster collaboration while keeping your data safe. Regularly reviewing and updating access permissions as your team and analytics needs evolve ensures your GA4 environment remains efficient, secure, and tailored to your organization’s goals.
We hope this article helped you understand the GA4 Access Level.
You may also like to read How to Enable and Disable the Analytics at Front-End?
Now, we’d love to hear from you. How can setting specific access levels in GA4 help your team make better data-driven decisions while keeping sensitive information secure? Share your thoughts in the comments below.

