Have you ever found yourself scrolling through a captivating blog with seamless blend of text, images, and personality? Do you also want to add a new WordPress blog post?
We’ll show you how to add a new post in WordPress with simple steps.
WordPress is the cornerstone of digital expression, powering over 40% of all websites on the internet. WordPress is a user-friendly platform that empowers anyone, from tech newbies to seasoned web developers, to create stunning and engaging blogs.
WordPress offers the flexibility and tools to bring your blog to life, whether you’re a travel enthusiast, a technical writer, an eCommerce business, or a DIY whiz with projects to share.
In this comprehensive guide, we’ll explain how to post a blog on WordPress.
How to Post WordPress Blog (TOC):
To start your blogging journey, you need to set up a WordPress site, if you haven’t already. Read our complete guide on How To Build a WordPress Website.
WordPress Basics
Now that your WordPress site is up, it’s time to get familiar with its basics before your new WordPress blog post.
Dashboard Overview
Upon logging into WordPress, you’re greeted by the dashboard—a control center brimming with tools and options. Think of it as your command station for everything from creating content to customizing your site’s appearance. Here’s a quick rundown of what you’ll find:

- Posts: This is the heart of your blog, where you’ll craft and manage your articles.
- Media: This is the digital library for images, videos, and documents.
- Pages: Pages are for static content like your “About” or “Contact” pages.
- Comments: Where you engage with your readers’ feedback.
- Appearance: Appearance is the stylist of your site, allowing you to change themes, customize layouts, and add widgets.
- Plugins: Plugins are the magic wands of WordPress, extending the functionality of your site with added features.
Posts vs. Pages
Posts are your blog entries. It’s a dynamic content piece that updates regularly.
Pages are static and don’t change often, reserved for timeless information like your about us page or contact details.
Using the WordPress Editor
The WordPress Editor is where your ideas transform into posts. Mastering this tool is key to your blogging success, whether you’re using the Gutenberg Editor (the new block-based editor) or the Classic Editor.
- Gutenberg Editor: Imagine building your post with Lego blocks, each piece representing a different element (text, images, videos, etc.). It’s intuitive and gives you flexibility and control over the layout.
Gutenberg the block editor looks like this:

- Classic Editor: Would you prefer a traditional writing environment? The Classic Editor offers a straightforward, word-processor-like interface.
A classic editor looks like this:

How to Post a Blog on WordPress (Step-by-Step)
Embarking on the journey of how to post a blog post on WordPress can be a thrilling venture. It is where your unique insights, stories, and expertise get a platform to shine. Ready to transform your ideas into a live blog post?
Let’s walk through the process.
Imagine you’ve just returned from a breathtaking mountain hike and are brimming with experiences and photos you want to share. This adventure is the perfect subject for your next blog post, “A Day Among the Peaks: My Mountain Hiking Adventure.”
Let’s break down how to post a blogpost on WordPress, step by step.
Step 1: Planning Your Content
The first step in creating a post in WordPress involves brainstorming and planning.
- Know Your Audience: You must know your audience. Tailoring your message to them is key.
- Choose a Captivating Topic: Select something that resonates with your readers and fits your niche.
- Outline Your Post: Create a clear structure to keep you focused and ensure your post is easy to follow.
Step 2: Writing Your Post
To add a new post in WordPress, navigate to your WordPress dashboard, find the Posts menu, and click Add New.
You’ll be greeted by a clean canvas of the Gutenberg editor.

You’ll see a pre-created block of Add Title.
Here, you’ll write the title of your blog post. This title is your first hook to grab readers’ attention, so make it catchy.
If you’ve done keyword research related to your audiences and topic, add the focus keyword to your title.
Consider the screenshot below as an example of writing an engaging title.

Next click the “+” icon on the page editor to choose the next block.
We’ll choose the paragraph block to write the body of the blog.

Building with Blocks:
Here are some key block types you’ll likely use for your blog post:
- Paragraph Block: This is for writing the main body of your content. To create new paragraphs, simply start typing away.
- Heading Blocks: Use these to structure your post with clear headings (H1 for your main title, H2 for subheadings, etc.).
- List Blocks: Bullet points or numbered lists can be a great way to present information clearly and concisely.
- Image Block: Click the “+” icon and select “Image” to upload an eye-catching image to enhance your post.

- Quote Block: Highlight an important quote or statistic with a dedicated quote block.

Step 3: Organize Your Content
Utilize headings and subheadings to structure your post, making it easier for readers to digest.
- Be Conversational: A friendly tone can make your content more relatable and engaging.
- End With a Call to Action: Prompt your readers to engage further with your content or explore other areas of your site.
Step 4: Add Media
In how to add a blogpost in WordPress, incorporating media plays a pivotal role.
- Add Images: Visuals can enhance your post’s appeal and help illustrate your points more effectively.
- Embed Videos and Audio: Multimedia elements can provide a richer experience for your audience.
- Add Featured Image: You must also upload the blog’s featured image, which is the cover photo of your post.

With these steps, you’ve mastered adding a post to a page on WordPress and, more broadly, creating compelling content that engages and informs. However, adding a post on WordPress is just the beginning. The real magic lies in using this platform to connect with and grow your audience.
In the next section, we’ll discuss how to enhance your posts with SEO tips and customization techniques to ensure your content reaches your desired audience and leaves a lasting impact.
Step 4: Optimizing for Search Engines (SEO) to Grow Your Blog
So, you’ve created an amazing blog post that is both informative and engaging. But how do you ensure the world gets to experience your brilliance? Here’s where Search Engine Optimization (SEO) comes in!
In a nutshell, SEO is the practice of making your blog post more discoverable by search engines like Google. The higher your blog post ranks in search results for relevant keywords, the more likely people will find your content.
Let’s delve into some key SEO practices to optimize your WordPress blog post:
1. Keyword Magic:
- Keyword Research: We briefly touched on this earlier. Before creating your content, consider what keywords your target audience might use to search for information related to your topic. Various keyword research tools are available online, e.g., Google Keyword Planner, Ubersuggest, Semrush, Ahrefs, and Moz Keyword Explorer.
- Strategic Integration: Once you’ve identified relevant keywords, strategically incorporate them throughout your blog post. However, avoid keyword stuffing and focus on creating natural-sounding content that prioritizes value for your readers.
2. Title Tags and Meta Descriptions:
- Title Tags: These are the clickable headlines that appear in search results. Craft a compelling and informative title tag that includes your target keyword and accurately reflects your blog post’s content. Ideally, keep your title tag under 60 characters to ensure it doesn’t get cut off in search results.
- Meta Descriptions: Short snippets appear beneath your title tag in search results. They provide a concise overview of your blog post’s content and entice users to click. Aim for meta descriptions of around 150-160 characters, and include your target keyword naturally.
3. Leverage SEO Plugins:
WordPress offers a vast library of plugins, including SEO plugins that can assist you with various optimization tasks. These plugins can suggest relevant keywords, analyze your content’s SEO score and checklist, and even help you generate optimized title tags and meta descriptions. For example, you can use Rank Math.
Here’s a table summarizing the critical SEO elements we’ve discussed:
| SEO Element | Description |
| Keyword Research | Identifying relevant keywords your target audience uses to search for information. |
| Strategic Keyword Integration | Naturally incorporating keywords throughout your blog post for better search engine discoverability. |
| Title Tags | Clickable headlines in search results (ideally under 60 characters). |
| Meta Descriptions | Short snippets summarizing your blog post’s content (around 150-160 characters). |
| SEO Plugins (Optional) | Tools that assist with keyword research, content analysis, and title/meta description generation. |
Remember, SEO is an ongoing process. As you publish more content and gain experience, you can continue to refine your SEO strategies to maximize your blog’s visibility.
By following these tips, you’ll be well on your way to crafting SEO-friendly blog posts that attract readers and establish your blog as a trusted source of information within your niche.
Step 5: Scheduling and Publishing Your Post
Now that your crafted and SEO-optimized blog post is ready to be posted, let’s learn how you can schedule and publish your post in WordPress.
1. The Publish Button:
Once you finalize your post after proofreading, locate the blue “Publish” button prominently displayed on the right side of the editor. Clicking this button will make your blog post live and accessible to the world!

2. The Power of Scheduling:
But wait, there’s more! WordPress allows you to schedule your post for a later date and time. This can be particularly beneficial if you aim to publish your content when your target audience is most active.
Here’s how to schedule your post:
- Locate the “Publish” box on the right side of the editor.
- Click on the “Publish immediately” link to reveal a drop-down menu.
- Select “Schedule” from the menu.

- A calendar interface will pop up. Choose your desired date and time for publication.
- Once you’ve selected the date and time, click the blue “Schedule” button.
3. The “Save Draft” Option:
If your post isn’t quite ready to go live yet, you can always save it as a draft and revisit it later. Simply click on the “Save Draft” button at the editor’s top right corner. Your post will be saved as a draft, allowing you to continue working on it at your convenience.
4. The “Preview” Function:
Before hitting publish (or schedule), you can use the “Preview” function to see exactly how your blog post will appear live on your website.

It allows you to catch any formatting errors or make last-minute adjustments before publishing.
Here are some additional points to consider:
- Post Categories and Tags: WordPress allows you to categorize your posts and assign relevant tags. It helps organize your content and makes it easier for readers to find specific topics they’re interested in.
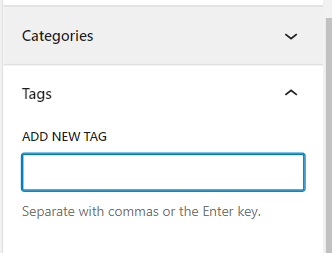
You can find these on the right-side panel of the editing page.
That’s all you have successfully posted a blog on WordPress.
Track Analytics of Your New WordPress Blog Post
Tracking your blog analytics is necessary and recommended to grow your blog further. You can check how many people are reaching and reading your blog. This will ultimately suggest changes in your content.
Analytify is the best tool for tracking all these analytics right on your WordPress dashboard.
We Make Google Analytics Look Easy!
You know all about Google Analytics and love the data it provides, but wouldn’t it be nice if there is a tool to manage all of that complex information within your WordPress dashboard?
Here’s an overview of the Analytify dashboard showing all your website’s general stats in one place:

Read How to Install Analytify Pro to track my WordPress analytics.
Key Features Tailored for Bloggers:
- Page-Level Analytics: Understand how each blog post performs with detailed insights directly on your post editor page. Discover which posts captivate your audience, where you’re losing readers, and how to optimize content to keep them engaged.
- Custom Post Types Tracking: Not all content fits the same mold. Analytify’s versatility extends to tracking custom post types, ensuring every piece of content, from your standard posts to unique custom formats, is analyzed for its unique contribution to your site’s success.
- Real-Time Stats: Capture the pulse of your audience with real-time statistics. See immediate reactions to new content or updates, allowing for timely adjustments and engagements.

- Total Number of Visitors and Views: Check how many visitors come to your site each day accumulating towards the total number of visitors and views per month.
- Enhanced User Demographics: Dive deeper into who your readers are. With enhanced demographics, understand your audience’s geographical locations, interests, and behaviors, tailoring your content to match their preferences.

6. Social Media Insights: Discover how your content is performing across social platforms. Find out which posts are being shared the most and on which networks, helping you fine-tune your social media strategy.

WordPress Blog Posting FAQs
1. How to create a post in WordPress?
It’s simpler than you think! Start by logging into your WordPress dashboard. Once there, navigate to the left sidebar and click on Posts >> Add New. You’re now ready to create your content. Write your heart out, add images or videos to spice things up, and when you’re ready, hit the “Publish” button to share your thoughts with the world.
2. Can I add a post directly to a specific page on my WordPress site?
While WordPress posts appear in your blog section by default, adding them to specific pages requires a workaround. You can use the “Posts” widget or a plugin to display posts on a page. Alternatively, categorize posts and use custom menus to link these categories to your navigation menu, making them appear as if they’re part of specific pages.
3. What steps should I follow to effectively post a blog post on WordPress?
After creating your content in the “Add New Post” section, make sure to choose the right category and tags to help your readers find your post. Adding a featured image can also make your post stand out. Preview your post to ensure everything looks good, then hit “Publish.” Remember, consistency is key to building your audience!
4. Is there a difference between adding a blog post in WordPress and creating a new page?
Absolutely! When you’re adding a blogpost in WordPress, you’re contributing to the dynamic, regularly updated part of your site—your blog. Posts are time-stamped and listed in reverse chronological order. In contrast, pages are for static content that doesn’t change often, like your “About” or “Contact” pages. Understanding this difference helps you organize your site content better.
5. What are the best practices for a new WordPress blog post?
Best practices include using compelling headlines, breaking text into manageable paragraphs, and incorporating visuals. Don’t forget to use categories and tags for organization and SEO benefits. Before publishing, using a plugin like Yoast SEO can help optimize your post to ensure it reaches its fullest potential audience.
6. How can I ensure my WordPress blog post stands out?
Focus on creating high-quality content that provides value to your readers. Use attractive titles engaging openings, and include images or videos to make your post visually appealing. SEO techniques like keyword optimization and internal linking can also increase your post’s visibility and engagement.
7. Do you have any tips for efficiently managing my blog posts on WordPress?
Stay organized by planning your content calendar, categorizing your posts, and regularly reviewing your analytics to understand what resonates with your audience. Plugins like Analytify can help you track your post performances directly from your WordPress dashboard, making it easier to optimize your strategy.
Conclusion
Congratulations! You’ve successfully learned how to post WordPress blog. From choosing a catchy domain name to crafting an SEO-friendly masterpiece, you’ve equipped yourself with the essential tools to share your voice and passions with the online world.
Remember, the blogging journey is an ongoing adventure. Your blog will evolve and grow as you publish content, experiment with different writing styles, and engage with your audience.
Regularly publishing fresh content is critical to attracting and retaining readers. Set a realistic publishing schedule and stick to it as much as possible.
The beauty of blogging lies in the potential for connection. Feel free to interact with your readers in the comments section, participate in online communities related to your niche, and collaborate with other bloggers.
We hope this article has helped you in learning how to add a blogpost in WordPress.
We would love to hear from you; what’s your blog niche, how often do you post, and what plugins do you use for assistance?
Share your thoughts in the comments below!


Is wordpress better?
WordPress is popular because it’s easy to use and very flexible. You can build anything from a blog to an online store. It’s good for SEO, has lots of support, and gives you full control over your site. Whether you’re just starting or growing, WordPress is a great option.
Excellent tutorial! Your step-by-step guide on posting a blog on WordPress in 2024 is clear and easy to follow. It’s great to see detailed instructions on everything from drafting to publishing, including tips for optimizing posts for SEO. Perfect for beginners and a helpful refresher for experienced users. Thanks for sharing!
Thank you so much for your feedback! I’m glad you found the tutorial helpful and easy to follow. If you have any more questions or need further assistance with WordPress or anything else related to blogging, feel free to ask.
Thanks,
Saud