How to Track Form Submissions in GA4 (Explained)
Are you struggling to capture every form submission on your website using Google Analytics 4?
Form submissions tracking in GA4 is essential for understanding user intent, evaluating lead-generation efforts, and optimizing your site’s user experience. In Google Analytics 4 (GA4), form tracking allows you to identify each time a user completes a form, whether it’s a lead form, a contact request, or any other user-submitted data.
This guide covers how to track form submissions in Google Analytics 4, including various tracking methods and setup options through Google Tag Manager (GTM). You’ll learn why form tracking is important in business, explore GA4’s enhanced measurement capabilities, and GTM’s flexible tracking solutions. The process is much simpler if you’re a WordPress user as you can use Analytify’s forms tracking feature.
Let us get started to learn more about GA4 form tracking!
Form Submission Tracking in GA4 (TOC)
What is Form Submission Tracking in GA4?
Form submission tracking is essential for monitoring user interactions with forms on your website, such as contact forms, sign-ups, or lead generation forms. In GA4, tracking these submissions helps you understand user behavior, improve form design, and optimize conversions by analyzing which forms are most effective.
Unlike Universal Analytics, GA4 automatically tracks certain interactions, but for more specific form submission tracking, manual setup is often required.
For more advanced or flexible form tracking in Google Analytics, Google Tag Manager (GTM) is a powerful tool that can simplify the process. GTM enables you to track form submissions without needing to alter your website’s code directly. With GTM, you can create a trigger that detects when a form is submitted and sends that data to GA4 as a custom event.
Why Track Form Submissions with GA4?
GA4 form interactions tracking is crucial for several reasons. Here’s why you should implement it:
- Measure User Engagement: Form submissions are key interactions that indicate strong user engagement, such as lead generation or sign-ups. Tracking these events helps you evaluate how well your website encourages user participation.
- Optimize Conversion Rates: By analyzing form submission data in GA4, you can identify patterns in user behavior, such as which forms convert best, and make improvements to increase your overall conversion rates.
- Identify Drop-off Points: GA4 form interactions tracking allows you to see where users might abandon a form. This insight helps you optimize form design or simplify the submission process, improving completion rates.
- Monitor Key Events: Setting up custom events for form submissions in GA4 enables you to track and report on essential user actions, making it easier to measure campaign success or specific conversion goals.
- Leverage Google Tag Manager (GTM) for Advanced Tracking: By integrating GA4 with GTM, you can track various form interactions, including submission messages, thank you pages and button clicks, without modifying website code directly.
- Track Form Fills for Better Insights: You can create GA4 key events for form fills and other form interactions to gather comprehensive data about how users interact with your forms.
- Evaluate Campaign Performance: If your campaigns involve forms, such as sign-up forms or contact forms, form submission tracking in GA4 helps you measure how effective your marketing efforts are in driving conversions.
Form tracking in Google Analytics gives you detailed information about user behavior, helping you make informed decisions to improve engagement and optimize your site’s forms for better performance.
Which Form Submission Tracking Method to Use?
When it comes to GA4 form tracking, selecting the right method depends on your specific needs, technical expertise, and the forms you’re working with. Each method has its own advantages, from simple setups to more advanced options, offering different levels of control and flexibility.
- Direct Tracking in GA4: If your website uses simple forms or if you want to set up basic form submission tracking with minimal configuration, creating custom events directly in GA4 may be the easiest option. This method is best for straightforward form submissions where minimal interaction tracking is required.
- Google Tag Manager (GTM) Form Tracking: For more advanced tracking needs, using GTM offers greater flexibility. GTM allows you to track various form interactions without modifying your website’s code. It’s particularly useful when you want to track multiple forms or specific interactions (e.g., clicks, confirmation messages). GTM also enables you to fire specific triggers for unique forms based on form IDs, form classes, or submission buttons.
- Analytify Forms Tracking: If you’re a WordPress user and want all your form tracking analytics within your admin dashboard with simplified reports, Analytify is the best solution for you. Find out how by jumping to this section!
As we refine the methods for tracking form submissions in GA4 and GTM, select the most appropriate method based on their form complexity, tracking goals, and technical knowledge.
How to Track Form Submissions in Google Analytics 4 (5 Methods)
Form submission Tracking in GA4 allows you to capture a detailed understanding of user interactions with your forms. Setting up the GA4 form submission event allows you to monitor form fills, interactions, and submission messages, helping you understand which forms drive conversions and identifying user journey issues. This flexibility lets you track form interactions directly in GA4 or use GTM for advanced tracking, giving you all measurements in GA4.
Method #1: Track Form Submissions using Enhanced Measurement in GA4
To track form submissions using Enhanced Measurement in GA4, follow these steps:
Step 1: Enable Enhanced Measurement in GA4
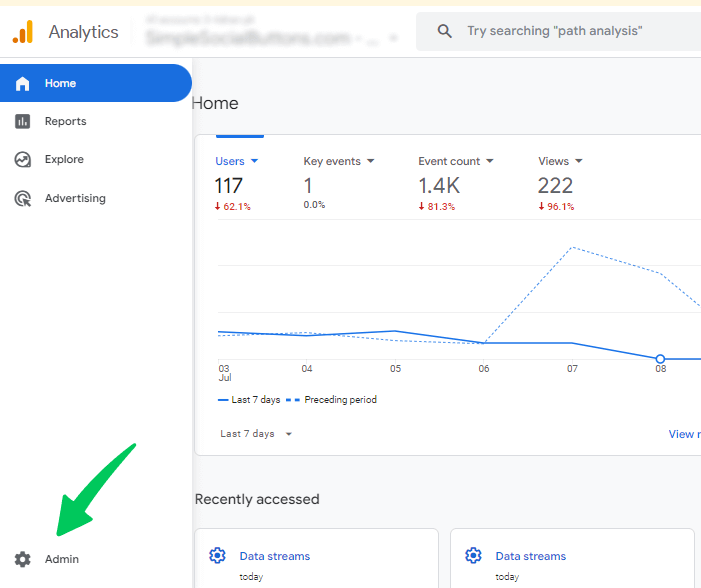
- Sign in to your Google Analytics account and navigate to the Admin section.
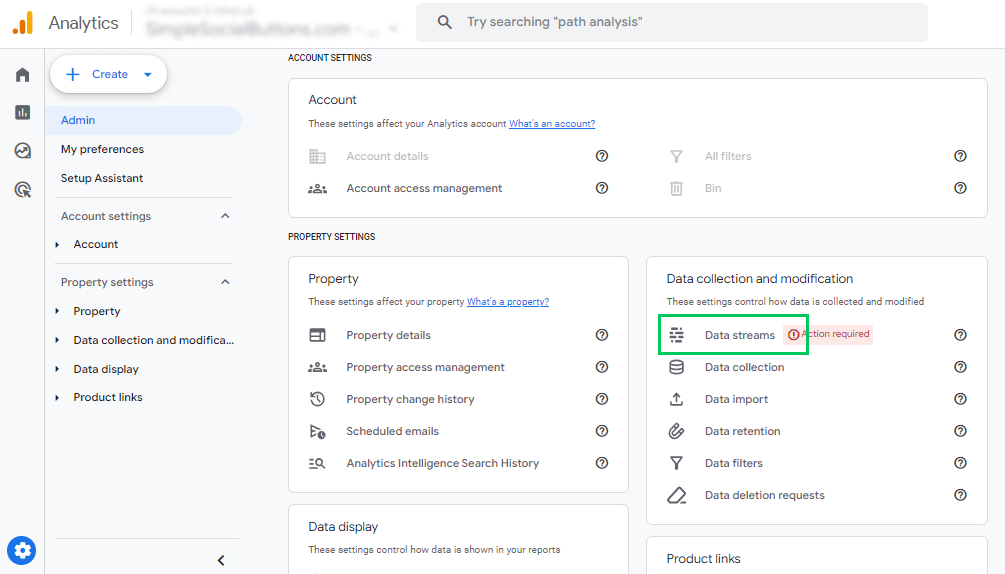
- Under Property, select Data Streams.
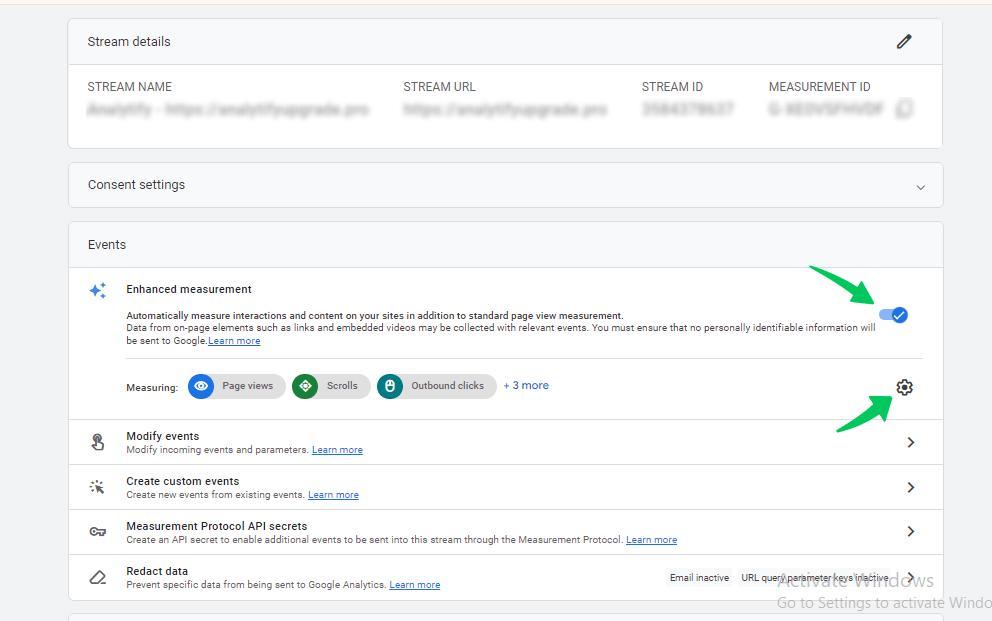
- Choose the data stream for your website.
- Ensure it’s toggled On in the Enhanced Measurement section to track user interactions automatically.
- Click on the gear icon to access Settings of enhanced measurement events.
Step 2: Configure Form Interaction Tracking
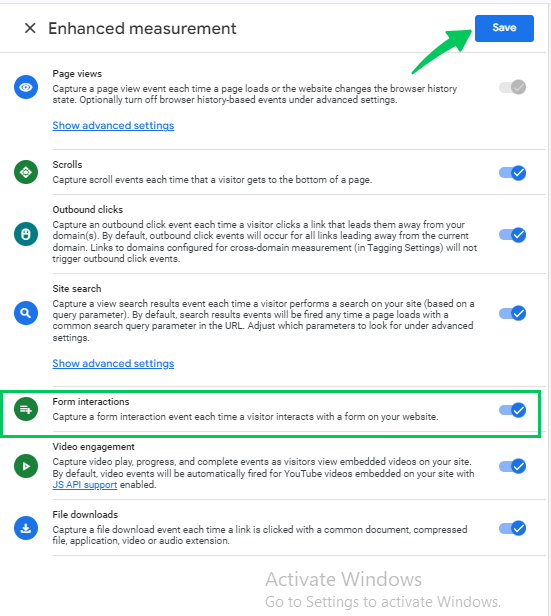
- In the Enhanced Measurement settings, scroll down to see available events.
- Locate Form Interactions tracking options. Switch the toggle on to enable Form Interactions tracking. Then click on the save tab to save changes.
Step 3: View Form Submission Data in GA4 Reports
- Navigate to Reports > Engagement > Events in GA4 to see data for your form submission event.
- If marked as a conversion, form submissions will also appear under key events in the Reports section.
These steps allow you to track form submissions effectively in GA4 and see the impact of form interactions on engagement and conversion rates.
Tracking Form Submissions in GA4 with Google Tag Manager (GTM)
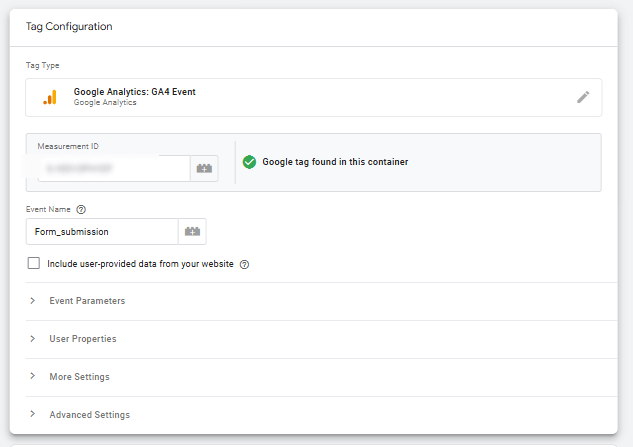
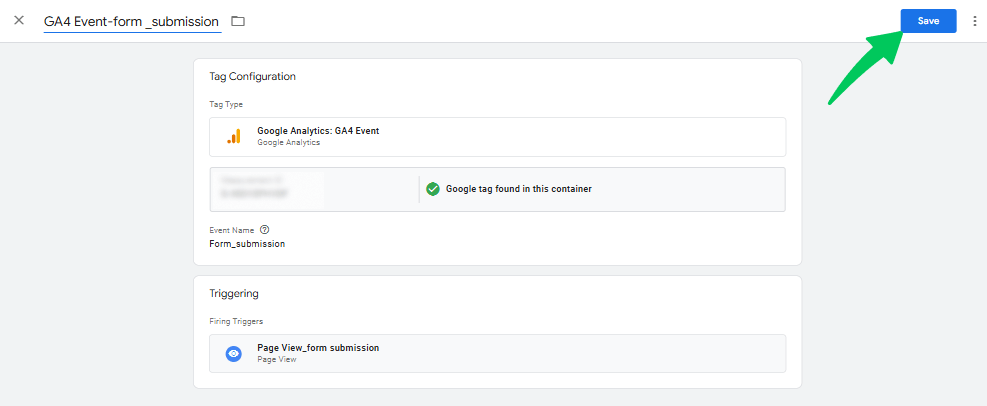
You need to set up a tag and a trigger for Google tag manager form tracking. Begin by creating a GA4 event tag, which involves adding your measurement ID to the tag configuration.
In this example, the event name is set to form _ submission, but you can choose a different name if needed. Save the tag for now, as triggers will be added later based on the form’s development. Follow the following steps to create the tag.
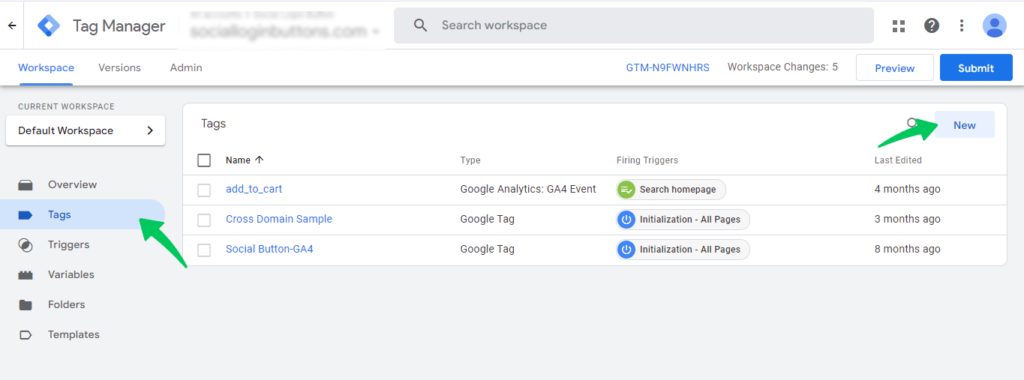
- Go to the Tags section.
- Press the New button.
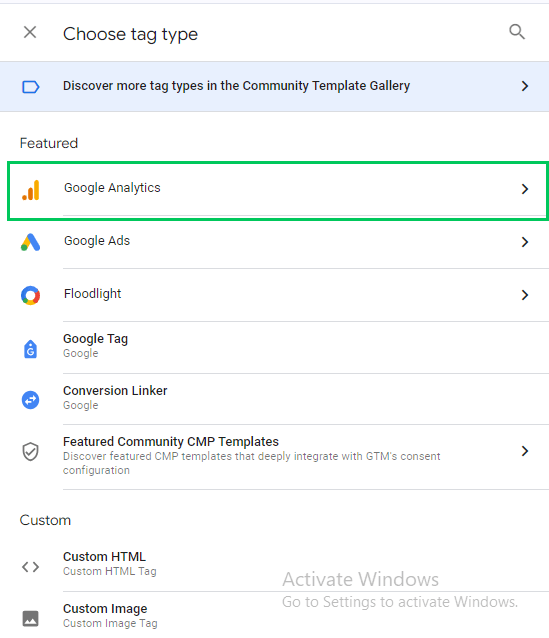
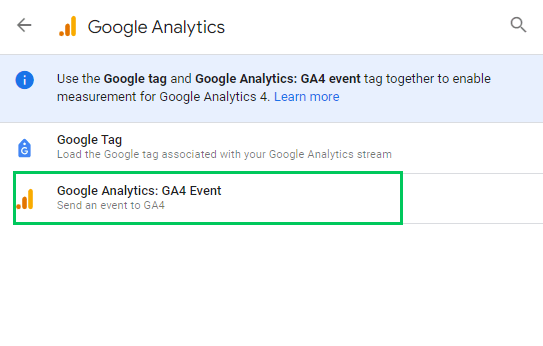
- In Tag Configuration, choose Google Analytics > Google Analytics: GA4 Event.
- In the Measurement ID section, insert Measurement ID
- In the Event Name field, I enter form_submission.
Method #2: Google Tag Manager Form Submission Trigger
This method uses Google Tag Manager’s (GTM) built-in form listener to track form submissions in GA4. Here’s how to set it up:
Step 1: Enable Form Variables
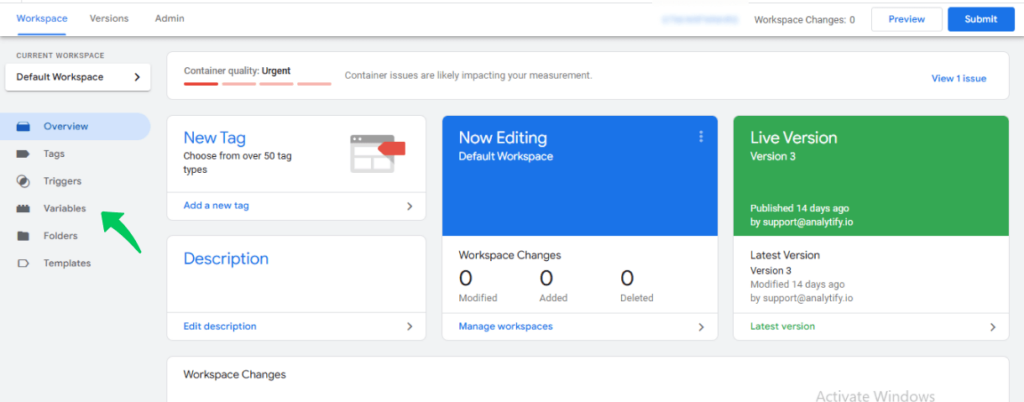
- In your GTM account, navigate to Variables on the left sidebar.
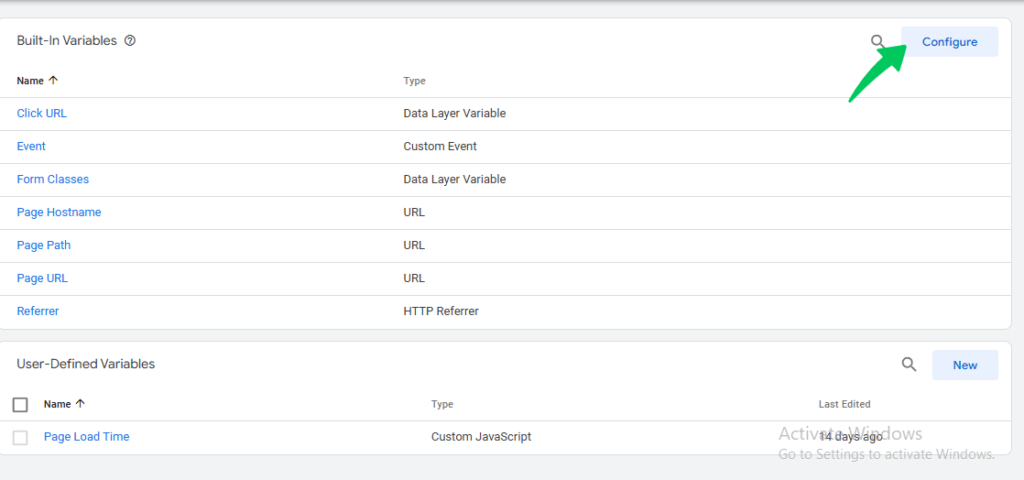
- Under Built-In Variables, click Configure.
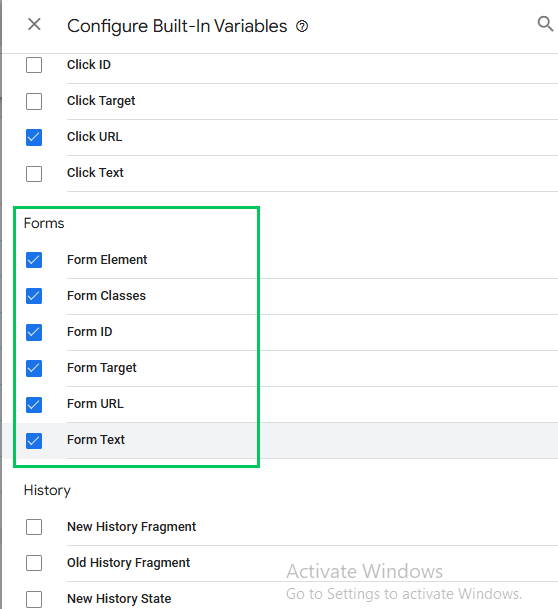
- Enable all Form variables in the right sidebar. These changes are saved automatically.
Step 2: Create a New Form Submission Trigger
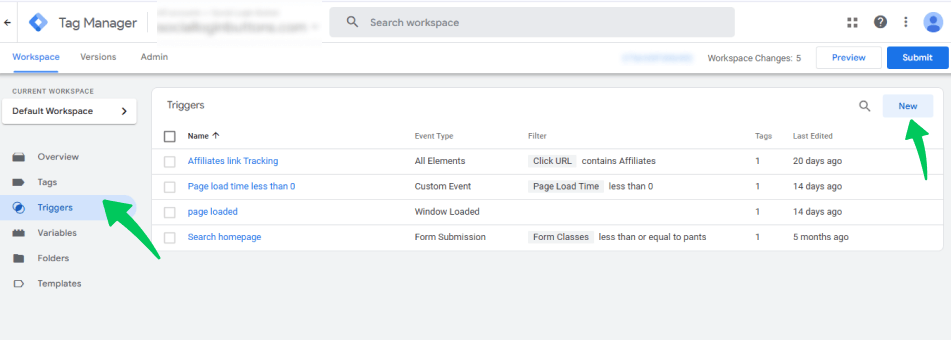
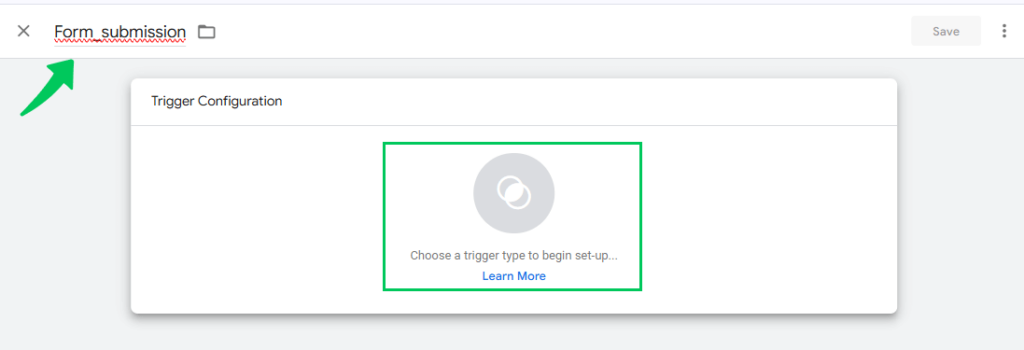
- Go to Triggers in GTM, then click New to create a new trigger.
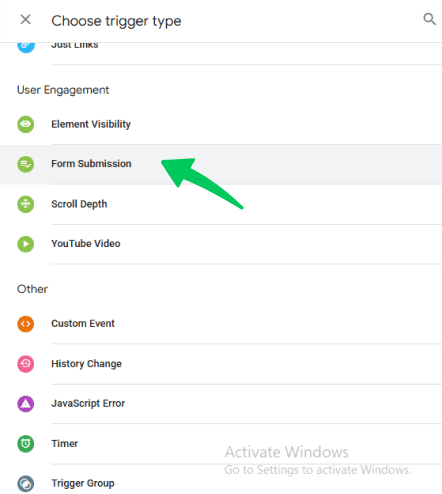
- Set the Trigger Type to Form Submission.
- Check Wait for Tags and set the timeout (e.g., 2000 milliseconds).
- Enable Check Validation to prevent the trigger from firing on invalid submissions. This way, the form submit trigger will only activate when the form is successfully submitted.
- Set Enable Trigger When… to activate on all pages by entering Page Path contains.
Step 3: Test the Trigger with Preview and Debug Mode
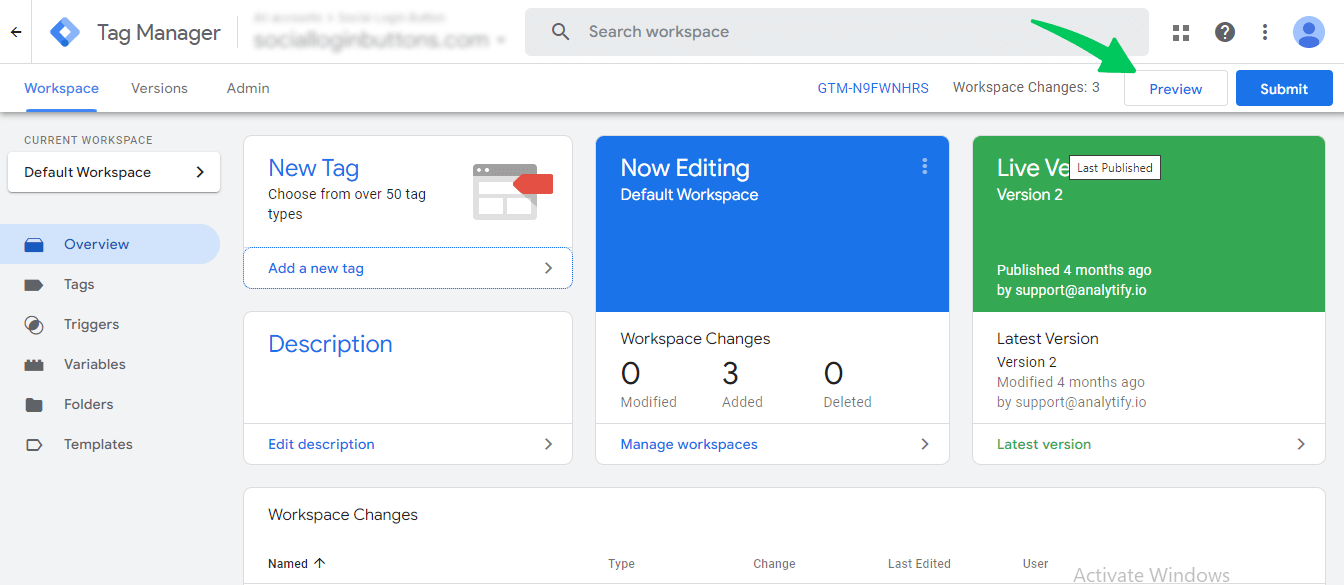
- In GTM, click Preview in the top-right corner to enter Preview and Debug mode.
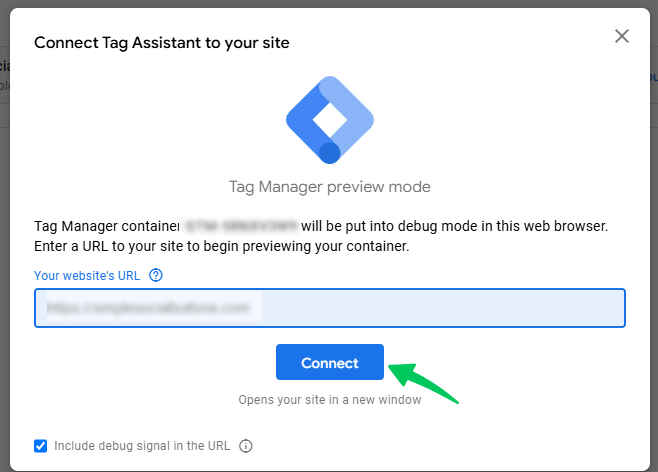
- Enter the page URL where the form is located and click connect.
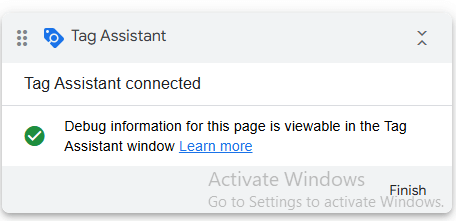
- Your website will open with a “Connected” badge at the bottom, confirming Preview mode.
- Fill in and submit the form to see if a Form Submit event appears in the GTM Preview console.
- If the event appears, try leaving a required field empty and resubmit. This will simulate an error in the form.
- If the Form Submit event does not trigger invalid submissions, the trigger is working correctly.
Step 4: Set Up a Trigger for a Specific Form
- In Preview mode, locate the Form Submit event, then click Variables.
- Look for a unique Form Variable, like Form ID, that identifies the form (e.g., wpdevart-forms-7).
- Go to Triggers, edit the Form Submission trigger, and select Some Forms instead of All Forms.
- Enter the condition (e.g., Form ID equals wpdevart-forms-7) to target only that specific form.
Step 5: Add a Custom Parameter for Tracking in GA4
- In GTM, go to Tags and open the GA4 Event Tag you created for form submissions.
- Add a custom parameter by naming it something like form_id and set its value to the {{Form ID}} variable.
- Save the tag and ensure the trigger is assigned to this tag.
Step 6: Test and Register Custom Dimensions in GA4
- Refresh the Preview mode in GTM and submit the form to check if the GA4 event fires.
- To verify, open GA4 Debug View and ensure the form submission events appear.
- If using form_id or other custom parameters, register them as Custom Dimensions in GA4 to track and report on this data.
This setup allows GTM to track form submissions effectively, even across multiple forms, helping you monitor form performance directly in GA4.
Method #3: Tracking Form Submissions Using a “Thank You” Page with GTM
If the standard form listener in Google Tag Manager (GTM) isn’t compatible with your form, check whether the form redirects users to a “Thank You” page after submission. If so, you can track form submissions by setting up a trigger that only fires when users land on this page. Here’s how:
Step 1: Identify the “Thank You” Page URL
- Confirm that a successful form submission redirects to a unique URL, such as https://www.example.com/form/thankyou.html.
- Ensure that users can only reach this page by submitting the form to avoid accidental visits to the “Thank You” page.
Step 2: Create a “Thank You” Page Trigger
- In GTM, go to Triggers and click the New button.
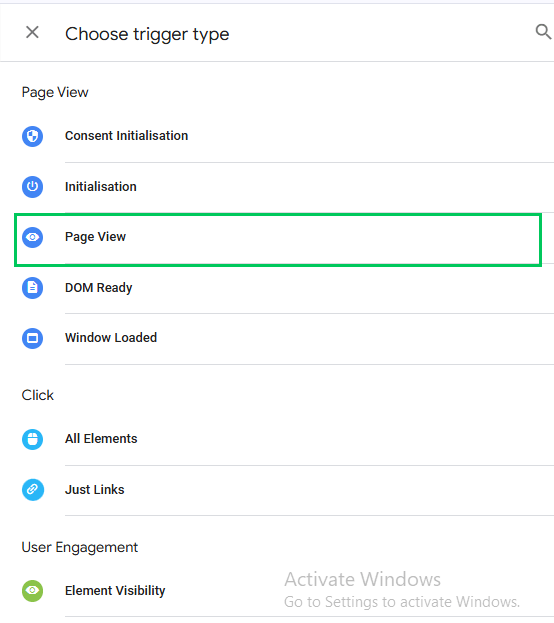
- Set Trigger Type to Pageview.
- Name your trigger (e.g. Form Submission-Thank you page ”) and choose Some Page Views.
- Then set the condition based on the Thank You page URL.
- Page Path equals /thankyou.html (Use this if your Thank You page has a unique path).
6. Page URL contains thankyou (Use this if multiple pages might include that word).
7. Save the trigger.
Step 3: Test the Trigger in Preview Mode
- Assign this trigger to your GA4 Event Tag for form submissions.
- Open Preview and Debug Mode in GTM and refresh the page where the form is located.
- Fill out and submit the form. After submission, the “Thank You” page should load, and the event tag should fire.
Step 4: Review Events in GA4 Debug View
- Open GA4’s Debug View to ensure the form submission events are tracking as expected.
Method #4: Track Form Submissions with the Element Visibility Trigger
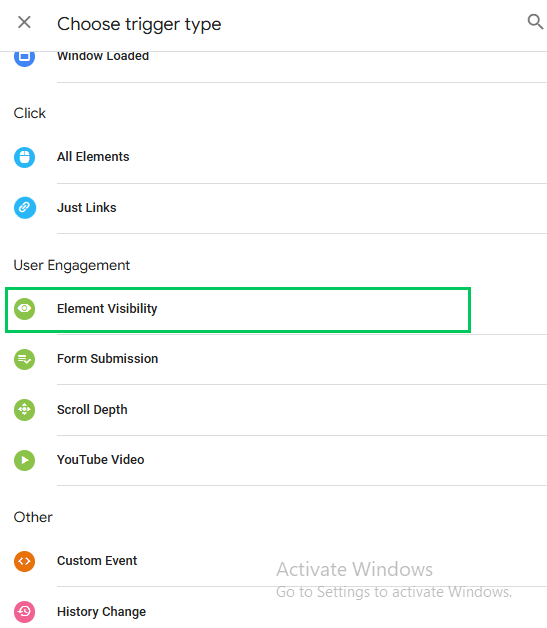
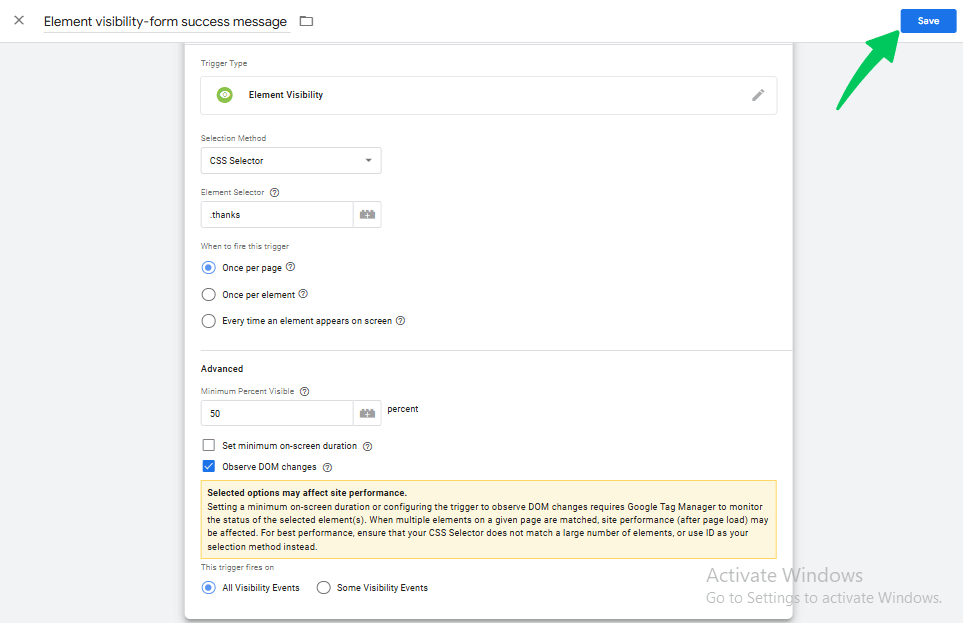
One of the most useful triggers in Google Tag Manager form tracking is the Element Visibility trigger, which can track when a specific element appears on screen, such as a “Thank You” message that shows up after a form submission. This trigger is ideal if your form displays a success message without redirecting users to a new page.
Step 1: Inspect the Success Message Element
- Submit the form, then right-click on the success message and select Inspect Element to open the browser’s developer tools.
- Look for the element’s unique identifier, such as a CSS class or ID if it has a CSS class (e.g., .thanks), that can be used to create a trigger.
Step 2: Create an Element Visibility Trigger
- In your GTM container, go to Triggers and create a new trigger.
- Set the Trigger Type to Element Visibility.
- In the Selection Method, choose either:
- Element ID if the success message has an ID.
- CSS Selector if it has a CSS class.
- In the CSS Selector field, add a period (.) before the class name (e.g., .thanks for a class called “thanks”).
- Tick Observe DOM Changes to ensure GTM detects the element if it dynamically appears without scrolling.
- Save the trigger.
Step 3: Test the Trigger
- Assign the new trigger to your GA4 Event Tag for form submissions.
- Open or refresh Preview and Debug Mode in GTM.
- Submit the form. If everything is set correctly, an Element Visibility event should appear in the Debug Console, confirming that the GA4 tag fired successfully.
- If the Element Visibility event doesn’t appear, recheck your selection method, CSS selector, or the Observe DOM Changes checkbox.
This method works well for most forms, though if your form resides within an in frame, additional GTM configuration may be necessary to capture the event.
Tracking form submissions in GA4 is essential for understanding user interactions and optimizing lead generation. Whether you’re monitoring contact forms, newsletter signups, or appointment bookings, setting up event tracking ensures you capture valuable data. If you use Calendly for scheduling, you can also track Calendly bookings in Google Analytics 4 to measure how effectively your booking page converts visitors into appointments.
Method #5: Track Form Submissions Using DOM Scraping
Tracking form submissions through DOM scraping should always be your last option. Try implementing all other Google Tag Manager (GTM) methods outlined in this guide before attempting this one.
DOM scraping is not recommended if your website’s code undergoes frequent updates, as it’s prone to breakage. Even a small change in the code by a developer can disrupt this tracking setup. Additionally, this method requires some knowledge of JavaScript and DOM concepts, which may be challenging for marketers without coding experience.
In this example, we’ll use the DOM Element Variable in Google Tag Manager, which allows you to capture specific text or content directly from the Document Object Model (DOM) and pass it to marketing tools like Google Analytics. Here’s how to set it up using an example of successful newsletter subscriptions on the Analytify:
Step 1: Locate the Form Success Message
- On the Analytify website, there’s a newsletter signup form in the footer. After submitting an email address, the page doesn’t redirect. Instead, a “Thank You For Subscribing!” message appears on the same page. This is a great use case for DOM scraping.
Step 2: Inspect the Success Message
- Enter an email in the newsletter form and click Subscribe Now!
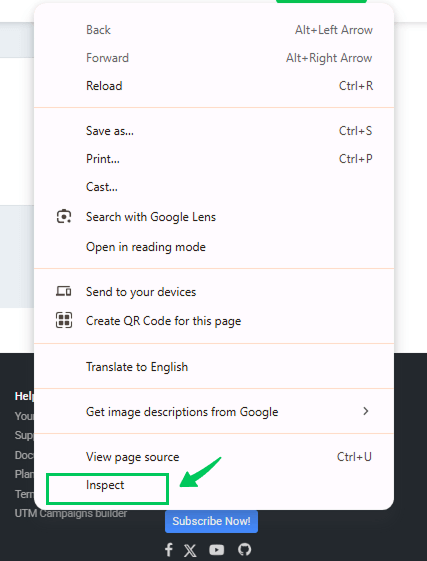
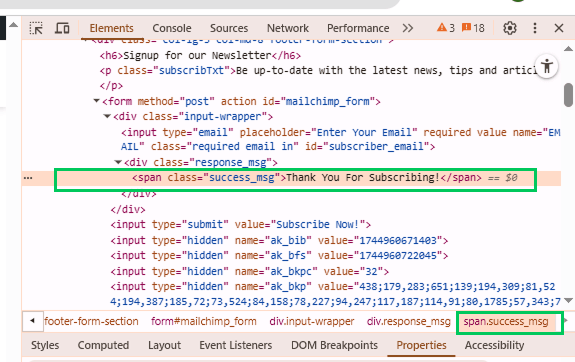
- Once the thank-you message appears, right-click it and select “Inspect”.
- Here, the success message is wrapped in a <span> with the class success_msg.
Step 3: Define the DOM Element Variable
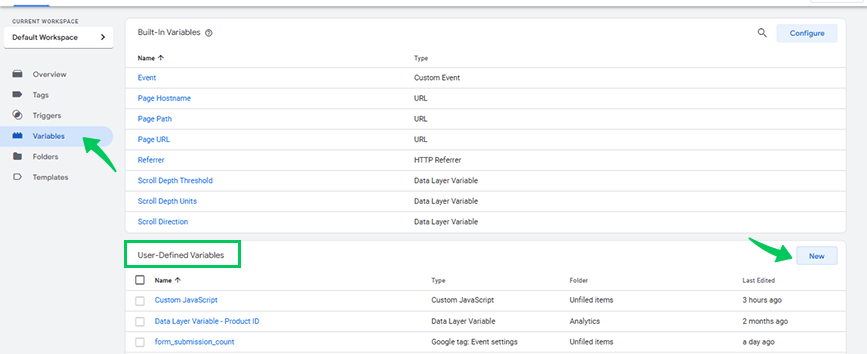
- Open GTM and go to Variables >> User-Defined Variables >> New
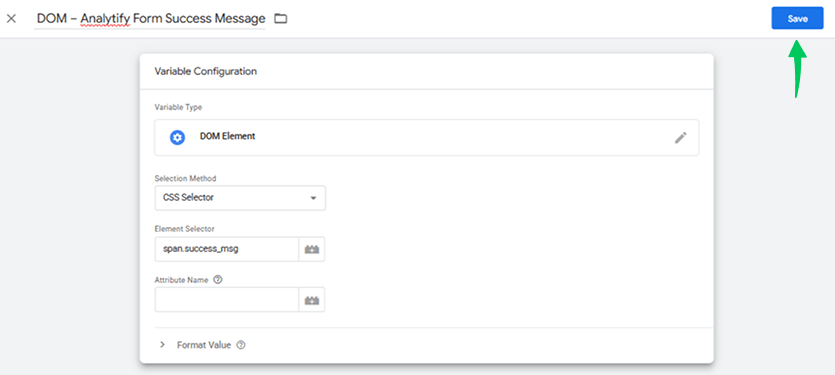
- Name your variable DOM – Analytify Form Success Message. Click on the pen icon to start its configuration.
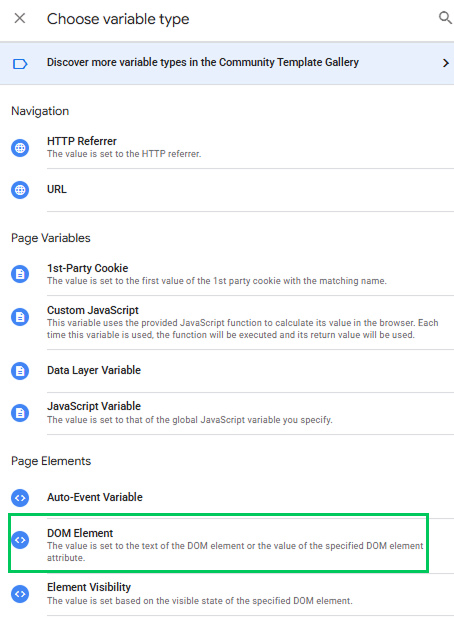
- Choose DOM Element as the variable type.
- Under Selection Method, select CSS Selector.
- In the Element Selector field, enter:
- Leave the Attribute Name blank to capture the inner text.
- Save the variable.
Step 4: Test the Variable
- Click Preview in GTM to open Debug mode.
- Go back to the Analytify site, fill out the form, and hit Subscribe Now!
- In the Debug panel, check if your variable correctly picks up the message of Thank You For Subscribing!
Step 5: Create a Trigger for the DOM Element Variable
- Go to Triggers >> New.
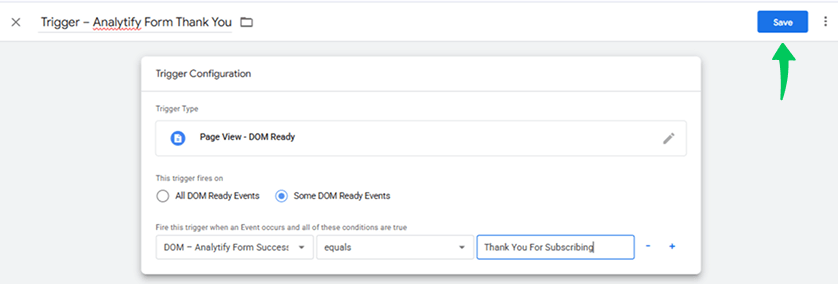
- Name the trigger: Trigger – Analytify Form Thank You. Click on the pen icon to start trigger configuration.
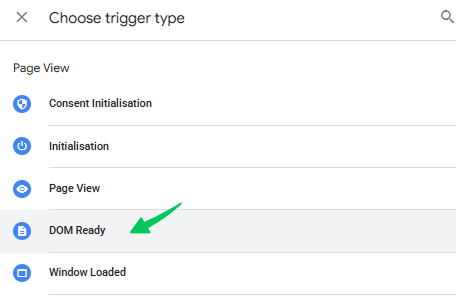
- Choose DOM Ready as the trigger type.
- Select Some DOM Ready Events.
- Set the following conditions:
- DOM – Analytify Form Success Message
- equals
- Thank You For Subscribing!
- Than, click on the save tab to save all the trigger configuration.
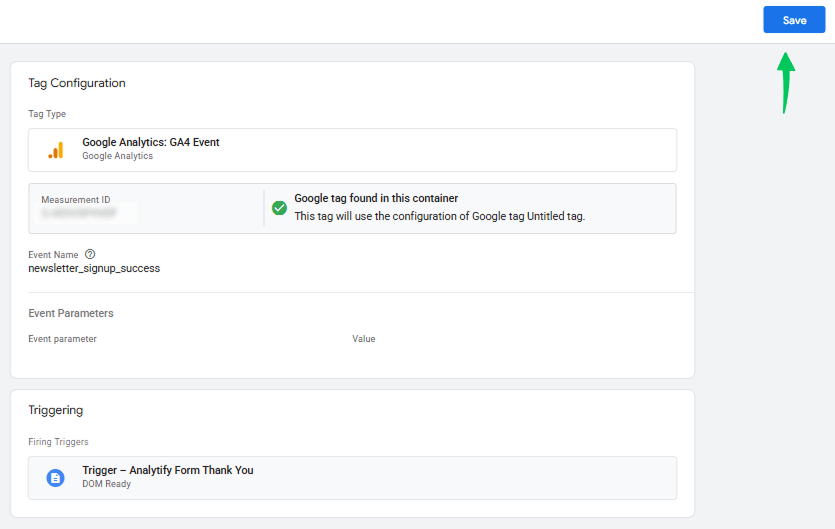
Step 6: Assign the Trigger to a GA4 Event Tag
- Create a GA4 Event Tag.
- Set the event name (e.g., newsletter _signup_ success).
- Add required parameters.
- Attach the Trigger – Analytify Form Thank You.
- Save the tag.
Step 7: Final Testing
- Use GTM Preview mode and GA4 Debug View to ensure the tag fires only when the thank you message appears. Try submitting with invalid data and confirm that no event fires unless the success message is shown.
DOM scraping can be complex, especially if you’re unfamiliar with CSS selectors and JavaScript, but it can be a helpful workaround when other tracking options are unavailable.
Simplify Your Form Submission Tracking with Analytify
Join 50,000+ beginners & professionals who use Analytify to simplify their Google Analytics!
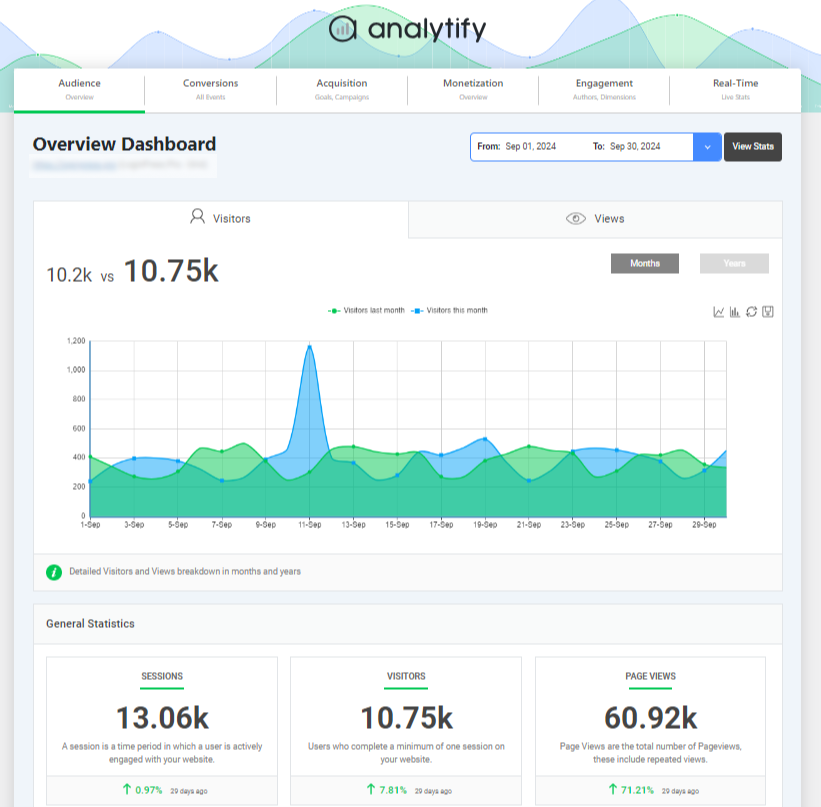
Analytify is the best and most user-friendly plugin for WordPress that brings advanced Google Analytics directly to your dashboard. It simplifies complex data into easy-to-read reports, covering essential metrics like website traffic, user engagement, and conversion tracking. Analytify provides comprehensive analytics to help optimize website performance without needing technical expertise.
Forms Tracking Features & Functionality
Analytify Forms Tracking offers robust features designed to meet the needs of businesses and websites that depend on form submissions for lead generation and conversions. Here’s an overview of how it can enhance your form submission analytics:
1. Multiple Form Submission Tracking
Analytify’s Forms Tracking addon allows you to track multiple forms on your WordPress site seamlessly, with compatibility across popular form plugins like Gravity Forms. You can measure each form’s performance to better understand conversion rates and optimize your lead generation strategies.
- Compatible with popular plugins such as Gravity Forms
- Tracks multiple forms on your website
- Helps analyze and improve form conversion rates
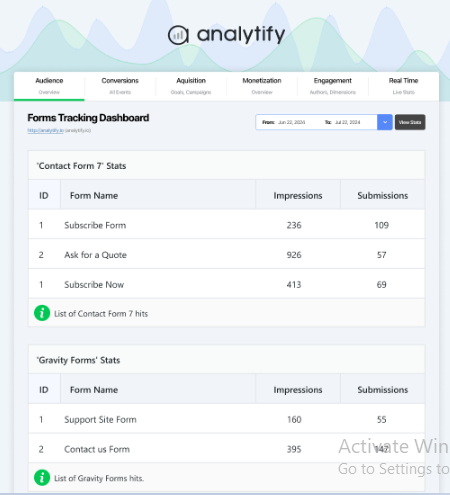
2. Forms Analytics Dashboard
With Analytify’s comprehensive dashboard, you get a visual overview of your form submission metrics, including form impressions, submissions, and other key data, all displayed in an easy-to-read format.
- View impression and submission reports
- Identify your most popular forms
- Display key metrics for actionable insights
3. Customizable Reports
Analytify provides flexibility in reporting, allowing you to generate customized reports based on specific form-tracking data. This helps create targeted user segments or time-specific insights to understand your audience better.
- Generate user segments and time-specific reports
- Create multiple form tracking reports within your dashboard
- Seamless tracking and export options
4. Integration with Google Analytics
Analytify’s Forms Tracking addon integrates directly with Google Analytics, making it easy to view your form submission data alongside other website analytics. This integration gives a complete view of your website’s performance, helping you assess form submission impact in the broader context.
- Smooth GA4 integration for comprehensive analytics
- Track website performance in context
- Provides a complete view of online presence
5. Easy Setup
Analytify Forms Tracking is designed for easy setup, allowing you to start tracking forms quickly and without any technical skills. With just a few clicks, you can configure the addon and begin capturing valuable insights from your forms.
- Easy configuration
- No coding skills needed
With Analytify, you can simplify and enhance your form submission tracking, enabling you to make data-driven improvements to your form strategy effortlessly.
Form Submission Tracking in GA4 (FAQ)
1. What is the simplest way to track form submissions in GA4?
The simplest way is using GA4’s Enhanced Measurement feature, which automatically tracks fundamental interactions.
2. Can I track specific forms separately in GA4?
You can create custom events or use unique triggers in GTM to differentiate between multiple forms.
3. What’s the best method for tracking form submissions with thank-you pages?
Use a custom event or set up a URL-based trigger in GTM that fires when users land on the thank-you page.
4. Can GA4 track all types of form submissions?
GA4 can track many types, but for complex forms, custom events or GTM may be required for accurate tracking.
5. How do I view form submission data in GA4?
You can view form submission events under “Events” in the GA4 dashboard, where custom events will be listed.
6. Can Google Forms track your location?
No, Google Forms cannot track your exact location directly. However, if the form creator has enabled Collect email addresses or if you’re signed in, they may see some information like your IP address, which can provide general location data but not precise tracking.
Final Thoughts: GA4 Form Interactions Tracking
In conclusion, GA4 form tracking is a crucial step in understanding your users’ behaviors and optimizing conversion rates. This guide has taught you multiple methods for setting up GA4 form tracking, from leveraging Google Tag Manager (GTM) to utilizing specific triggers like “Thank You” pages and element visibility. Implementing these techniques will give you a clear view of form interactions, helping you fine-tune your site for better engagement and results.
One effective way to capture detailed information about user interactions is to learn how to track form submission messages in the Tag Manager. By setting up specific triggers and variables in Google Tag Manager, you can ensure that each form submission message is accurately tracked, providing valuable data for optimizing user experience.
You may also like to read our guide on How to Track Affiliate Links with Google Analytics 4.
Now, we’d love to hear from you! Have you tried tracking form submissions in GA4? Share your thoughts, tips, or questions in the comments below – let’s continue the conversation!

