Have you ever wondered how to accurately track user behavior and interactions across multiple domains in Google Analytics 4?
Look no further because this blog post will explore GA4 Cross Domain Tracking. For webmasters, marketers, and business owners, having a complete understanding of their online traffic is crucial for improving overall website performance.
This blog post will explain cross-domain tracking and how it works in GA4. We will also discuss why it is essential for businesses and how to set it up effectively.
Continue reading “How to Setup GA4 Cross-Domain Tracking (Recommended)” →
GA4 Debug View Not Working? It’s a common difficulty many people face when using Google Analytics 4.
Whether you’re a digital marketer or a web owner, understanding why DebugView in Google Analytics 4 is not working can save you a lot of frustration.
In this article, we’ll explore why is your debug view not showing anything and, most importantly, how to fix Google Analytics DebugView.
Continue reading “How to Fix GA4 Debug View Not Working? (2025)” →
Have you ever set up GA4 Custom Events, but they are not showing up in your reports?
Frustrating, right? Well, you’re not alone.
Many users experience GA4 custom events not showing up in their Google Analytics dashboard, and it can be a real headache to figure out why.
Custom events are a great way to understand user behavior in GA4. They allow you to track specific interactions beyond pre-defined events, providing invaluable insights into how users engage with your website or app. But sometimes, despite your best efforts, those custom events seem to vanish from analytics reports. This can be incredibly frustrating, hindering your ability to measure website performance and optimize the user experience.
In this article, we’ll explain every possible reason why your custom events are not showing up in GA4 and offer straightforward solutions to get them back on track.
Continue reading “GA4 Custom Events Not Showing Up (FIXED)” →
Are you eager for Google Ads conversion tracking to get the most out of your advertising efforts? Look no further – Analytify is here to make the process simple and effective.
Anaytify’s Google Ads Tracking addon will allow you to monitor the effectiveness of your ads in real-time with GA4, helping you make informed decisions to enhance your advertising strategies.
In this Knowledge Base article, we’ll walk you through the steps to set up Google Ads Conversion Tracking with Analytify.
Continue reading “How to set up Google Ads Conversion Tracking with Analytify?” →
Have you ever checked your website’s analytics only to find that Google Analytics 4 is not working as expected?
This can be a frustrating experience, especially when you rely on data to make important decisions. Google Analytics 4 (GA4) is an important tool for businesses and website owners because it gives a lot of information about how users interact with a site and how well it works. But GA4 might not always work as expected, leaving you without access to important info. In this article, we’ll explain why your Google Analytics not working and provide practical solutions to get your analytics back on track.
Continue reading “How to Fix Google Analytics Not Working (2025)” →
Are you struggling with Google Analytics Real Time Not Working? Don’t worry, this article will help you fix it in no time!
Google Analytics Real-time reports offer a dynamic and immediate view of user activities on your website. Sometime issues arise with Google Analytics Real Time Reporting, you’re not alone. Many users experience similar frustrations with GA4 Real Time not working.
In this blog post, we’ll look at some of the most common reasons why your Google Analytics real time reports are not working and how to fix them.
Continue reading “How to Fix Google Analytics Real Time Not Working? (2025)” →
Are you aiming to reach the global market with your products?
In today’s globalized world, with a multilingual ecommerce website, you can reach international audiences and convert their interest into sales. You should create a seamless multilingual online store catering to their needs and preferences.
In this article, we’ll explain various aspects of creating a multilingual ecommerce experience, from identifying your target markets to choosing the right platform and integrating multilingual ecommerce solutions. It provides practical strategies and actionable steps, making it an invaluable resource for anyone looking to take their business global.
Continue reading “How to Set Up Multilingual Ecommerce Website (Sell Globally)” →
Disclaimer: Kindly note that this doc is now deprecated as this feature is no longer supported.
Do you want to perform A/B testing on your WordPress website? You can use Google Optimize to perform the different experiments on your website to see which experiment or test works best on your WordPress website. With the Analytify plugin you can easily connect Google optimize with Google Analytics for A/B testing.
Continue reading “How To Set Up Google Optimize With Analytify” →
Do you want to share your website’s analytics reports with multiple people or clients using Analytify’s Email Notifications Addon? It’s a common need for many to distribute analytics information to various stakeholders.
Continue reading “How to Add More than One Receiver Email Address in Email Notifications Addon?” →
Wondering how to ensure that your email settings in Analytify are correctly configured? Testing your email setup is an important step before you start receiving scheduled analytics reports in your inbox. This guide will walk you through the process to send a test email using the Email Notifications Addon in Analytify.
Step-by-Step Guide to Testing Your Email in Analytify
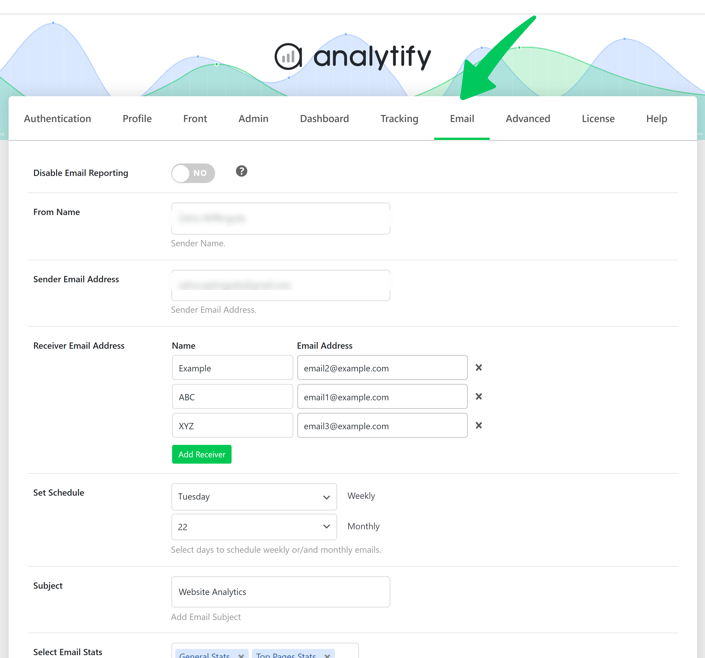
- Finalize Your Settings: Before testing, ensure that you’ve correctly set up the Sender Name, Sender Email, Receiver Email, and any other relevant settings in the Analytify Email Notifications Addon.
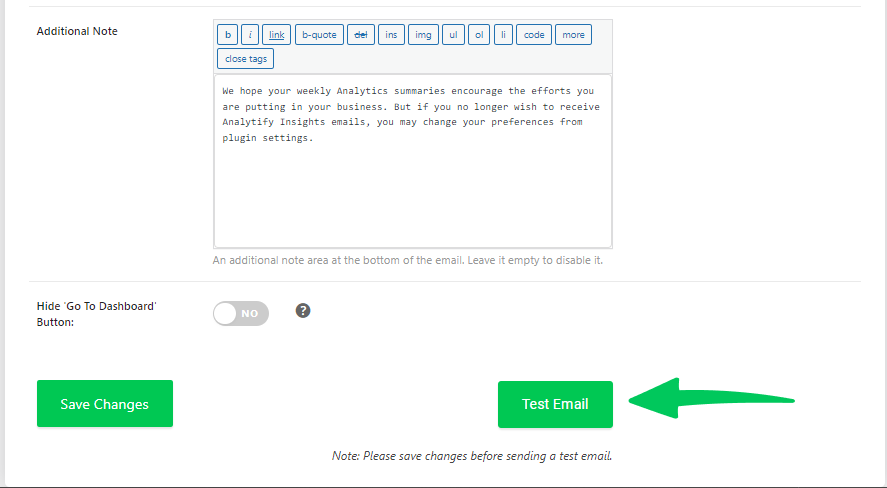
- Save Your Settings: Once you’re satisfied with your configurations, click the Save Changes button. This action saves all your current settings.
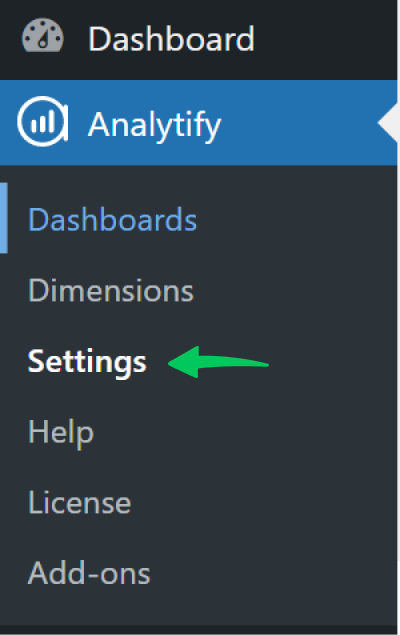
- Locate the Test Email Button: Navigate to Analytify >> Setting.
- Navigate to Email Tab: Within the setting, find the Email tab.
- Now scroll down the page and under the Save Changes button, you’ll find the Test Email button.
- Initiate the Test: Simply click on the Test Email button. By doing this, Analytify will send a test email to the configured receiver email address.
- Check Your Inbox: After clicking the Test Email button, check the inbox of the receiver email. You should receive a test email from Analytify, confirming that your settings are correctly configured.
- Troubleshoot if Necessary: If you don’t receive the test email, recheck your settings, especially the email addresses, and ensure they are correctly entered. Also, consider checking your spam or junk folder.
Why Test Email Settings and Delivery?
- Verification: It confirms that the email settings are correctly configured.
- Avoid Missed Reports: Ensures you won’t miss out on important analytics reports due to incorrect email setup.
By following these steps, you can rest assured that your analytics insights will reach the right inboxes, keeping you and your team informed and ahead of the curve. Remember, regular testing and updates to your email settings are key to maintaining effective communication.
If you have any queries, feel free to contact our support team.


