How to Set Up Ecommerce Tracking with Google Tag Manager
Are you facing challenges in setting up ecommerce tracking with Google Tag Manager for your online store? Setting up ecommerce tracking with GTM might seem like a tough job, especially with all the tags, triggers, and variables involved. But with the proper setup, you can easily track how users interact with your store, from product views to successful purchases.
In this guide, you’ll learn what ecommerce tracking with Google Tag Manager is, and how it works with GA4. We will also explore common issues and fixes in Google Tag Manager ecommerce tracking, and discover how plugins like Analytify make things even easier for WooCommerce and EDD users.
Let’s get started!
Ecommerce Tracking With Google Tag Manager (TOC):
What is Ecommerce Tracking with Google Tag Manager?
Ecommerce tracking with Google Tag Manager (GTM) is a method of tracking how people interact with your online store, such as viewing products, adding items to their cart, or making a purchase, without needing to manually insert tracking codes into your website.
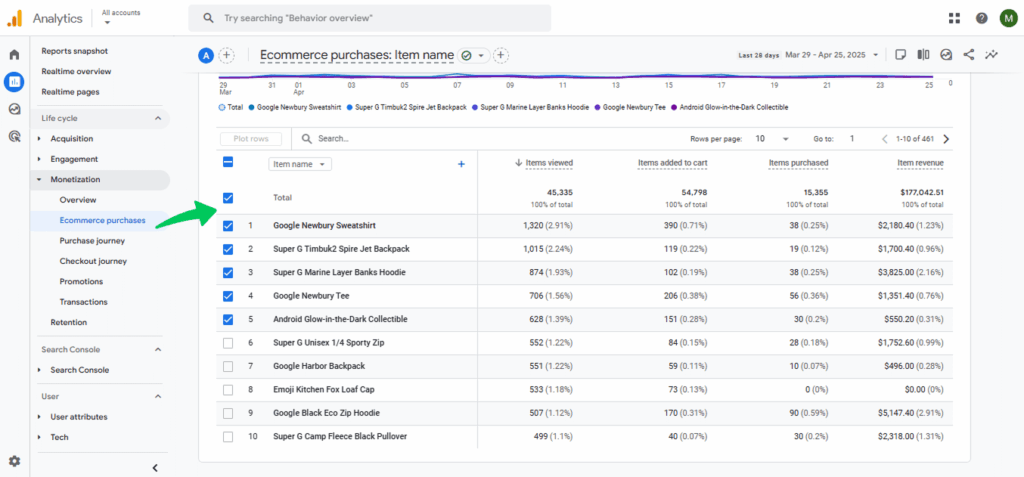
Instead, Google Tag Manager lets you manage all your tracking in one simple platform. It collects and sends ecommerce data, such as product views, checkout steps, and purchases, from your website to GA4, helping you better understand your store’s performance.
Ecommerce tracking in Google Analytics via GTM works by setting up a series of tags, triggers, and variables that capture ecommerce events and send them to Google Analytics 4.
With GTM and GA4, you get better tracking of what shoppers do on your site, like viewing or buying products. It also saves time with automated tracking setups and gives you a clear idea to improve your sales and customer experience.
How Does GTM Ecommerce Tracking Work with GA4?
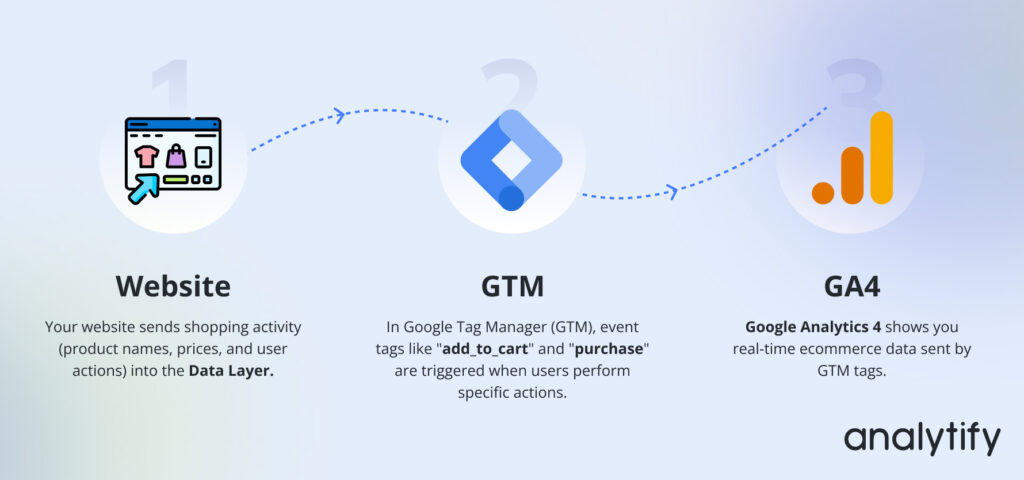
Here’s how GTM works with GA4 for ecommerce tracking:
- Your website sends shopping activity, such as product names, prices, and actions, into a special container called the data layer.
- In GTM, you create event tags (like add_to_cart or purchase) that are triggered when users take specific actions on your site.
- GTM tags automatically send data to your Google Analytics 4 account, helping you see what customers are doing in real-time.
There’s no need to touch the site’s code every time you want to update tracking. It’s all handled in Google Tag Manager (GTM).
Requirements for Setting Up Ecommerce Tracking in GTM
Before you can start tracking ecommerce data using Google Tag Manager (GTM) and Google Analytics 4 (GA4), a few key things need to be in place:
- Ecommerce Website: You must have an ecommerce website that pushes essential data, such as product IDs, names, prices, and transaction details, into the GTM data layer when users perform actions like adding items to the cart, checking out, or completing a purchase.
- Google Tag Manager Account Setup: You need an active Google Tag Manager account with the GTM container properly installed on your website. This acts as the main requirement for managing all your tracking tags.
- Google Analytics 4 (GA4) Property Linked: Make sure you have a GA4 property set up in your Google Analytics account and connected to your GTM container using a GA4 configuration tag. This allows GTM to send ecommerce event data directly to GA4.
Analytify simplifies ecommerce tracking setup by handling the entire process for WordPress websites. It automatically manages data layer integration, configures GA4 events, and sends purchase data, without the need for manual tagging, making it an ideal solution for non-technical users.
How to Set Up Ecommerce Tracking with Google Tag Manager (Step by Step)
Now that you understand what ecommerce tracking with GTM is and why it’s important, let’s discuss how to set it up step by step. We’ll guide you in an easy and beginner-friendly way.
Here’s how you can start tracking your ecommerce data using Google Tag Manager and GA4:
Step 1: Set Up Google Tag Manager
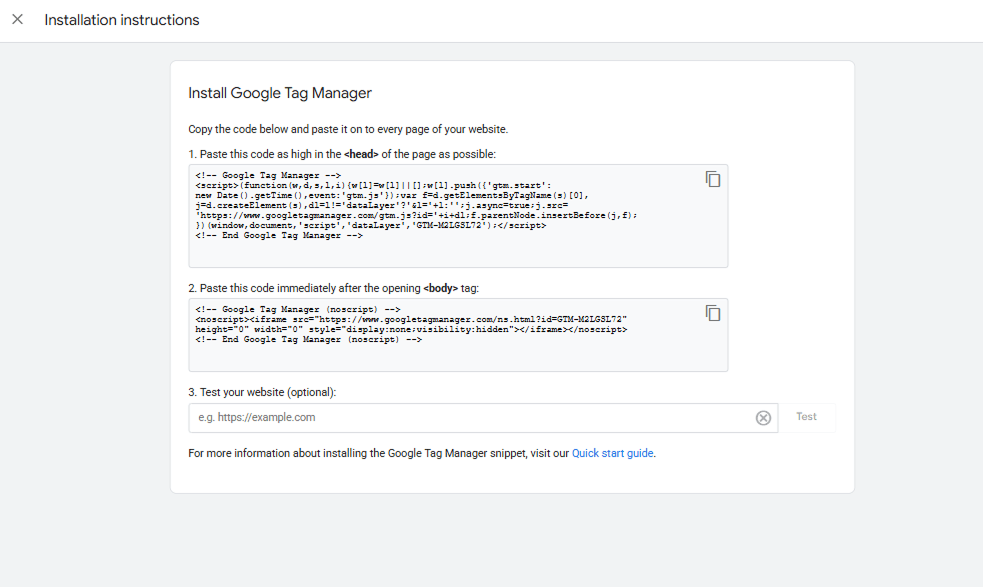
Start by creating a free GTM account at Google Tag Manager. Once your account is ready, Google will provide you with two code snippets: a <script> tag and a <noscript> tag. These need to be added to your website:
- The <script> goes inside the <head> section.
- The <noscript> version should be right after the opening <body> tag. This allows GTM to manage all tracking tags from a central dashboard—no manual code edits needed later.
But if you are still confused about the placement of GTM code, look into the guide.
Step 2: Copy Measurement ID
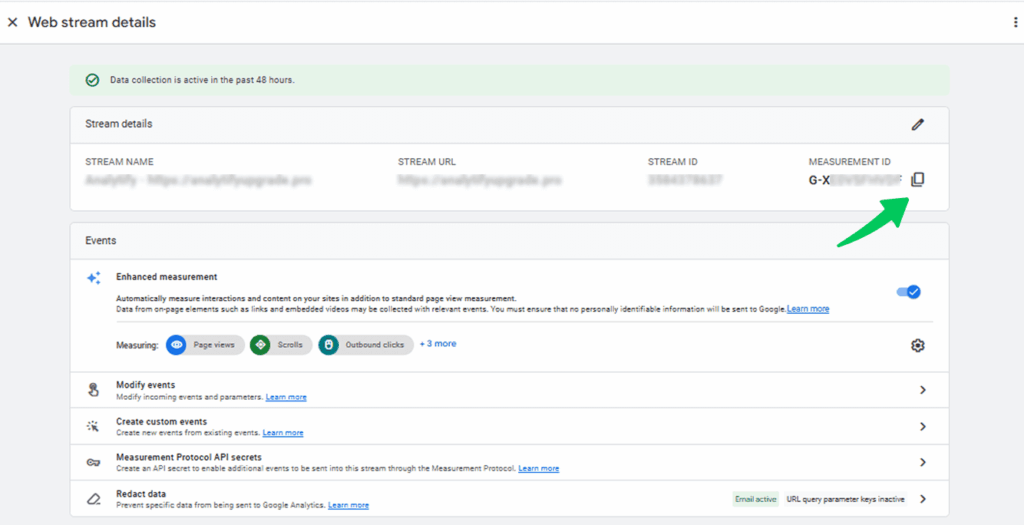
In your GA4 account, go to your GA4 Property Admin >> Data Streams >>Select your Web Stream >> Copy the Measurement ID at the top. This ID is necessary because it tells GA4 where the data is coming from when it receives tracking info from GTM.
Step 3: Add a GA4 Configuration Tag in GTM
In your GTM workspace:
- Click Tags >> New and choose GA4 Configuration as the tag type.
- Paste your GA4 Measurement ID into the provided field.
- Set the trigger to All Pages so this tag fires on every page load. This tag ensures your site is always connected to GA4 and ready to send tracking data.
Step 4: Implement the Ecommerce Data Layer
Setting up the ecommerce data layer is the most important step for successful Google Tag Manager ecommerce tracking. The data layer acts as a middleman between your website and GTM, holding ecommerce data (like product IDs, names, prices, and transaction details) that you want to track in Google Analytics 4 (GA4).
The data layer organizes and pushes ecommerce event information in the correct format, so GTM can easily capture and forward it to GA4. Without it, your tracking won’t work properly.
Where to Add the Data Layer Code:
You (or your developer) need to insert data layer snippets on relevant pages of your website:
- Product Pages (for product views)
- Cart Pages (for add-to-cart events)
- Checkout Pages (for checkout events)
- Order Confirmation Pages (for purchases)
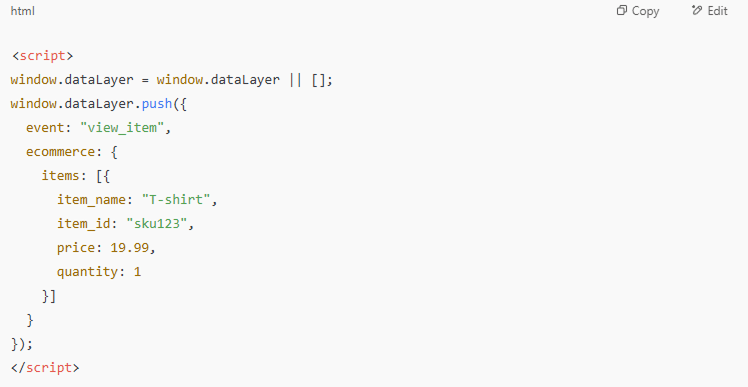
If you’re using Analytify, this process is handled automatically without coding. Otherwise, you must manually inject JavaScript snippets into your website pages. For example:
- Product View (view_item):
Add this snippet to your product pages:
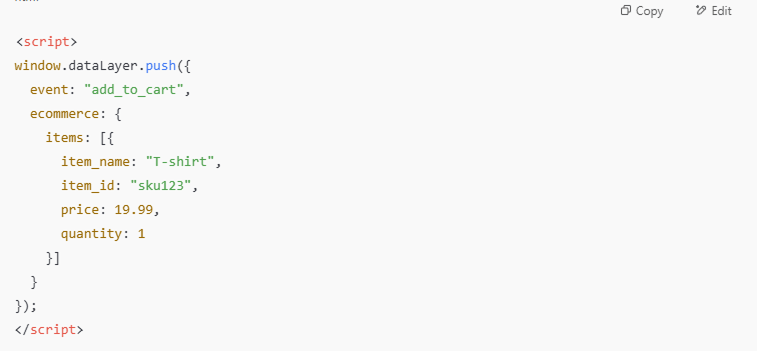
- Add to Cart (add_to_cart):
Trigger this when users add a product to their cart:
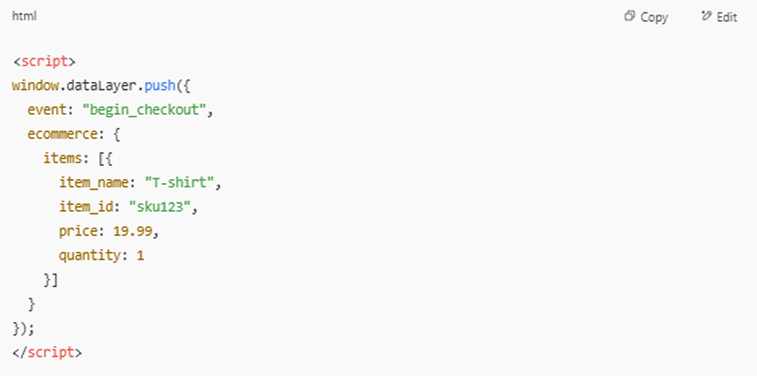
- Checkout Started (begin_checkout):
Push checkout start details into the data layer:
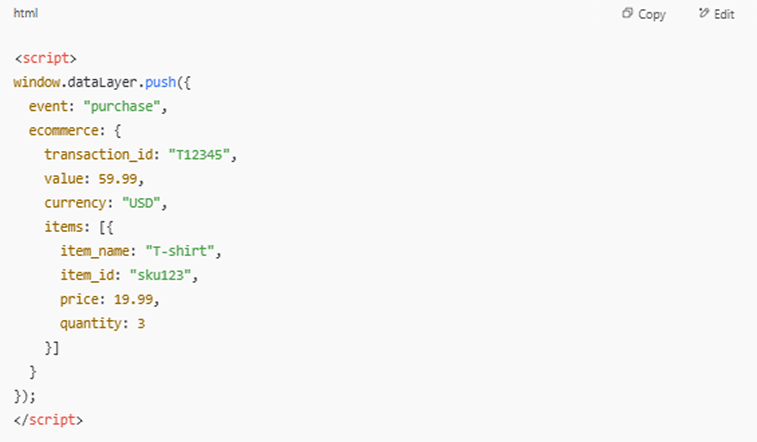
- Purchase (purchase):
On the order confirmation page:
This step may require help from a developer if you’re not using an ecommerce plugin or platform that already supports GA4 data layer format.
Step 5: Create GA4 Event Tags in GTM
Now, create event tags in GTM to capture specific ecommerce interactions:
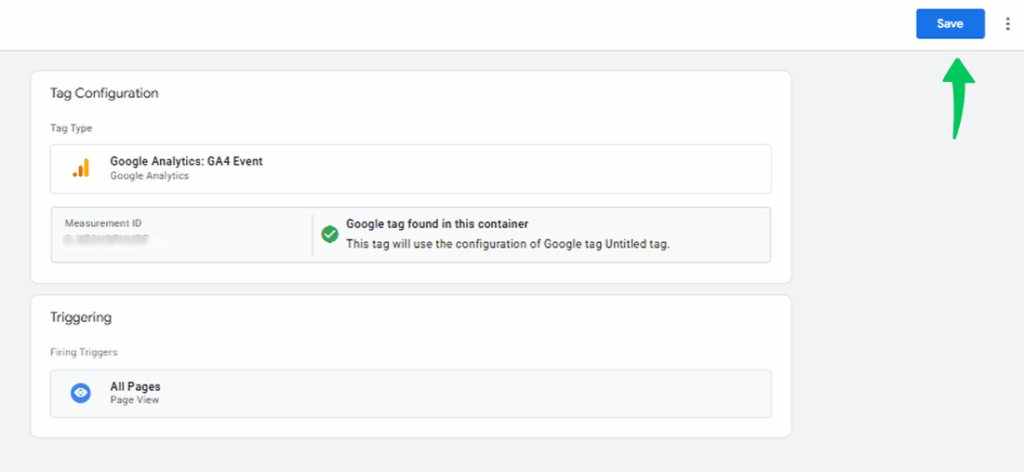
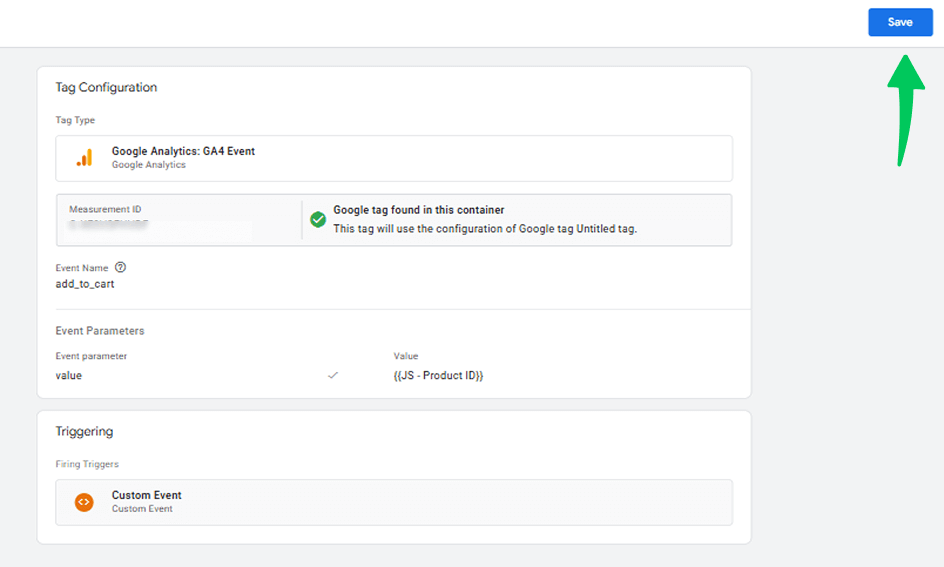
- Click Tags >> New >> GA4 Event.
- Set the Event Name to match GA4’s recommended ecommerce events like view_item, add_to_cart, purchase, etc.
- Under Event Parameters, map data layer variables (e.g., items, value, currency) so GA4 receives all necessary details.
- Assign the appropriate Trigger to each tag. For example:
- Use a Custom Event Trigger for add_to_cart
- Use a Page View Trigger for purchase on a thank-you page
- Use a Custom Event Trigger for add_to_cart
Step 6: Test Your Setup
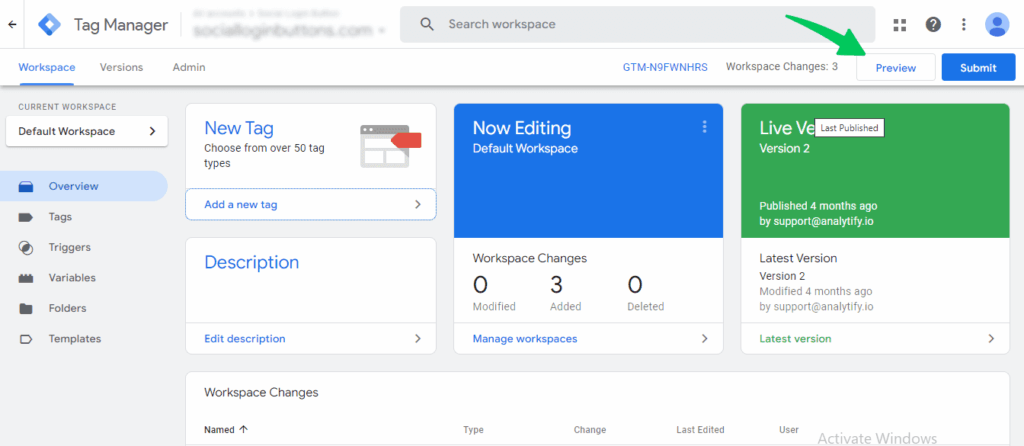
Use Preview Mode in GTM to test your tags in real time. This lets you confirm that:
- Your tags are firing at the right time.
- The correct data is being pulled from the data layer.
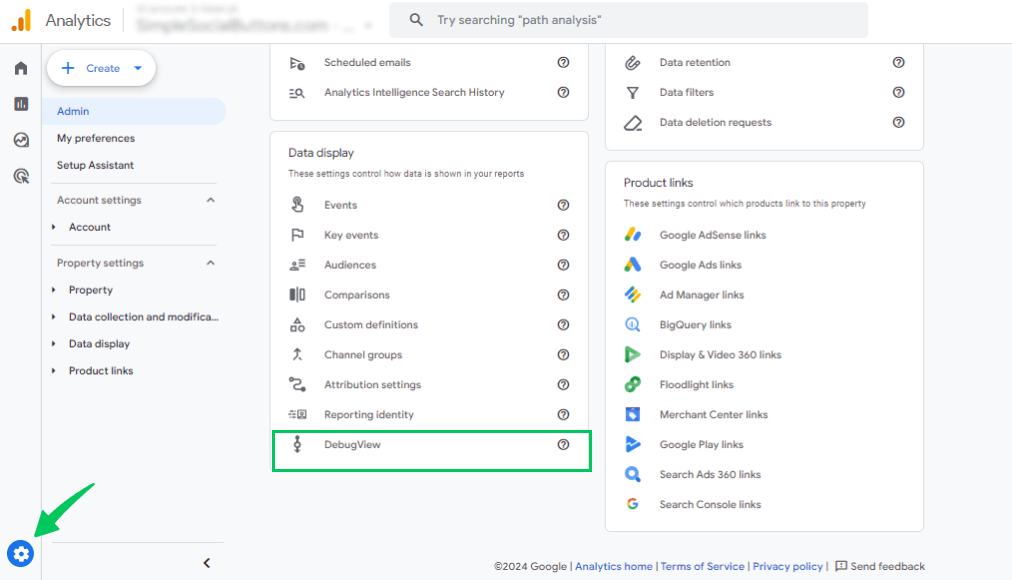
In GA4, use DebugView to verify that events are being received properly and include all the necessary parameters.
Step 7: Publish Your Changes
Once everything looks good and has been tested:
- Click the Submit button in GTM.
- Add a version name and description to keep track of what you’ve changed. Now your ecommerce tracking setup is live and sending data to GA4.
Google Tag Manager Ecommerce Tracking: Common Issues & Fixes
Even when everything seems set up correctly, ecommerce tracking Google Tag Manager can sometimes run into problems. Below are some common issues users face, along with simple ways to fix them:
1. Ecommerce Events Not Showing in GA4 Reports
Issue: You’ve configured your tags in Google Tag Manager, but you’re not seeing any events show up in GA4’s monetization or event reports. This can happen even if the tag fires, typically due to issues with event setup or the data layer.
Fix: By following the tips below, you can fix this issue:
- Double-check that your data layer includes GA4’s recommended event names, such as ‘purchase’, ‘add_to_cart’, and ‘view_item’.
- Ensure the event parameters (such as value, currency, items, etc.) exactly follow GA4’s expected format.
- Ensure that your GA4 event tags in GTM retrieve values from data layer variables.
- Use GTM’s Preview Mode and GA4’s DebugView to confirm that the events are being triggered and sent with the right data.
2. Missing or Incorrect Ecommerce Data in the Data Layer
Issue: GA4 relies on a well-structured data layer to track ecommerce events, such as product views, add-to-cart actions, and purchases. If important details, such as product ID, name, price, or quantity, are missing or the data is not formatted correctly, GA4 won’t be able to capture these actions properly in your reports.
Fix: By using the tricks given below, you can resolve this issue:
- Your website must push ecommerce data using correctly formatted dataLayer.push() code. This should include all required values, such as item_id, value, currency, etc.
- Open Chrome DevTools, then go to Console and type’ dataLayer’ to check if the right data is being pushed.
- Test if the events and parameters are triggering as expected.
- If this feels too technical, work with a developer or use Analytify (for WordPress and WooCommerce) to automatically generate and push the correct ecommerce data into the data layer without manual coding.
3. Use GA4 Recommended Event Names for Accurate Ecommerce Tracking
Issue: If you’re using custom names for events (like ‘addProductToCart’ instead of ‘add_to_cart’), GA4 may not recognize them for ecommerce tracking.
Fix: Use GA4’s recommended event names for ecommerce (such as view_item, begin_checkout, and purchase) to ensure automatic tracking and reporting.
4. Using Wrong Tag Types
Issue: Some users accidentally use outdated Universal Analytics tags instead of GA4 event tags.
Fix: Always use GA4 Configuration and GA4 Event Tags in GTM, not Universal Analytics tags. GA4 uses a different structure.
5. DebugView Not Showing Events in GA4
Issue: You’re testing your ecommerce setup, but no events appear in GA4’s DebugView, even though your tags seem to be firing in GTM. This can be frustrating, especially during setup or troubleshooting.
Fix:
- Make sure your website is open in GTM’s Preview Mode. This automatically activates debug mode for GA4 when the GA4 Configuration tag is present.
- Install these Chrome extensions to see if your GA4 tags are working and if your browser is sending the events to GA4.
- GA4 DebugView won’t work properly if your browser blocks cookies or if you’re using Incognito mode without enabling third-party cookies.
- Double-check that the GA4 Measurement ID used in GTM matches the one in your GA4 property; if it’s incorrect, data won’t show up.
- Events may take a few seconds to appear in DebugView, especially during initial testing.
6. Duplicate Purchases Showing in GA4
Issue: If you’re seeing multiple purchase events for the same transaction in GA4, it likely means your purchase tag is firing more than once, causing inflated revenue data and misleading reports.
Fix:
- Set up a condition in GTM to trigger the purchase event only when a unique transaction ID appears. This helps prevent the tag from firing again if the user refreshes the confirmation page.
- Instead of firing the purchase event on page load, use a more specific trigger, such as a custom “purchaseComplete” event or a unique URL pattern (e.g., /thank-you), and combine it with a check for the transaction ID.
- Consider using a one-time trigger setup with a custom variable or cookie to track whether the event has already fired for the user session.
7. Tags Not Firing Correctly in GTM
Issue: Your GA4 event tags may not fire at the right time or on the correct pages, often due to misconfigured triggers in Google Tag Manager (GTM). This can prevent important ecommerce events, such as “purchase” or “add_to_cart”, from being captured in GA4.
Fix:
- Review your trigger conditions carefully. Ensure you’re using the correct trigger types (e.g., click, custom events, or page views) based on user interactions.
- Check page conditions. For example, the “purchase” event should fire only on the order confirmation page, not on page reload or earlier steps.
- Use GTM’s Preview Mode to test your tags and verify that they fire during the right interactions.
- Ensure your GA4 Configuration Tag is firing on all pages so event tags can function properly.
How Analytify Simplifies Ecommerce Tracking with GTM
Setting up ecommerce tracking with Google Tag Manager can be time-consuming and technical, especially when managing multiple events, data layers, and triggers. This is where Analytify comes in.
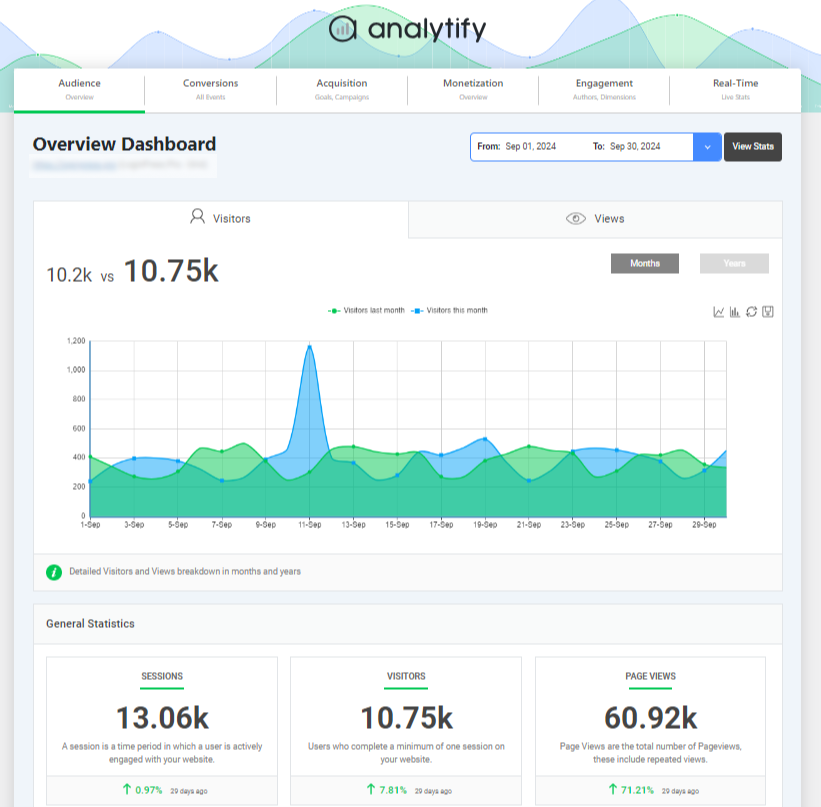
Analytify is the best Google Analytics plugin for WordPress, offering a user-friendly overview of your website’s performance. You can quickly see important metrics like total visitors, page views, bounce rate, top pages, and geographic locations without having to dig into Google Analytics manually.
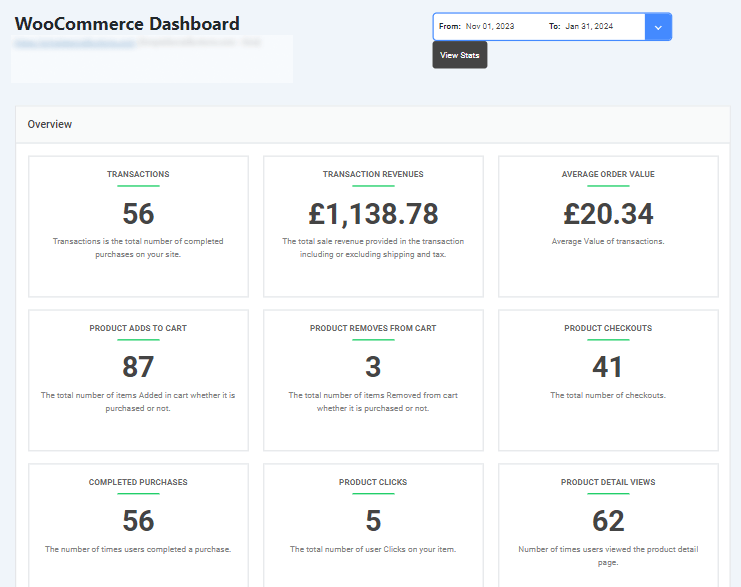
When it comes to ecommerce tracking, Analytify simplifies the entire process by automatically configuring your ecommerce tracking without needing to edit tags or data layer code manually.
For WordPress and WooCommerce users, Analytify pulls ecommerce data (like product names, IDs, prices, and transactions) through the Analytify WooCommerce Add-on and structures it according to GA4’s requirements. It pushes this data into the data layer correctly and in real time, ensuring compatibility with GTM and GA4.
Instead of configuring each GA4 event manually in GTM, Analytify works behind the scenes to:
- Push well-formatted ecommerce data into the data layer
- Ensure all required parameters (e.g., item_id, value, currency) are included.
- Enables ecommerce events such as view_item, add_to_cart, begin_checkout, and purchase to be tracked with the right format and values.
- Reduce tracking errors caused by incorrect formatting or missing data
By using Analytify, you can enjoy accurate GA4 ecommerce reporting with minimal configuration in Google Tag Manager (GTM), ideal for users who want quick and reliable insights without diving into complex technical steps.
Frequently Asked Questions About GTM Ecommerce Tracking
1. What is ecommerce tracking with Google Tag Manager?
Ecommerce tracking with Google Tag Manager lets you track product views, cart actions, and purchases by sending event data to GA4 using GTM tags and triggers. It’s a flexible way to monitor user shopping behavior without hardcoding analytics.
2. How to set up ecommerce tracking in GTM?
First, push ecommerce data to the data layer. Then, use Google Tag Manager to create GA4 event tags (like view_item, add_to_cart, and purchase) and connect them to the corresponding triggers. Link everything to your GA4 Configuration tag.
3. How to collect ecommerce data?
Collect data using dataLayer.push() for each ecommerce interaction. This includes product ID, name, price, quantity, and transaction details. Ensure the data follows GA4’s recommended ecommerce schema.
4. Why use Google Tag Manager for ecommerce tracking?
Google Tag Manager for ecommerce simplifies tracking setup by letting you manage all your GA4 events without editing your website’s code. It’s ideal for ecommerce websites needing flexible, scalable tracking.
5. How to create ecommerce events in GA4?
Use GA4 Event Tags in GTM to manually send events like begin_checkout or purchase. Set event parameters (like items, value, currency) as variables pulled from the data layer.
Final Thoughts: Ecommerce Tracking with Google Tag Manager
Setting up ecommerce tracking with Google Tag Manager may seem challenging at first, but with the right steps, it becomes a powerful way to understand how customers interact with your online store. In this guide, we covered everything from what ecommerce tracking in GTM is, how it works with GA4, the essential setup requirements, and a complete step-by-step process to create tags and triggers.
We also walked through how to implement the data layer, test your setup, and troubleshoot common issues, such as missing events or duplicate purchases. For WordPress and WooCommerce users, Analytify makes things even easier by automatically handling the data layer, configuring events, and sending accurate purchase data to GA4. With accurate tracking in place, you can boost sales and improve user experience.
For further guidance, you can read these articles:
- How to Enable Google Analytics Ecommerce Tracking?
- Enhanced Ecommerce Tracking with Analytify
- 15 Most Common Enhanced Ecommerce Mistakes
If you have any questions about this guide, feel free to ask us. We’d be happy to help!

