How To Add A Website To Google Analytics In 2025
Do you want to know how to add a website to Google Analytics? If yes, you’re at the right place.
Google Analytics acts as the eyes and ears, keeping track of every interaction and footfall on your website. The success of your business depends on how well you know your online customers and website performance. To track the web performance, you must connect your website with a Google Analytics account.
In this blog, we will explain how to add a website to Google Analytics step by step. You’ll also find some expert tips on how to manage your GA4 Property.
Let’s get right into it!
Table of Contents
What is Google Analytics 4 Property
Google Analytics 4 property is any website, mobile app, or blog with a unique tracking ID. This tracking ID is the most crucial way to identify the property, so it can be used to get correct data and analyze it.
Simply put, a property is an online container that stores all the valuable insights and metrics that Google Analytics collects.
Having a Google Analytics account is a game changer when handling the data on your website. This powerful analytics tool lets you track and examine different parts of how well your website is doing.
However, did you know that a Google Analytics account can have multiple properties?
Whether you only have one website or several online businesses, you can easily handle them all with a single Google Analytics account. This trait gives you a smooth ride.
Are you still confused between account and property? Don’t worry we’ll clear it out for you in the following section.
Google Analytics Account vs. Property
Google Analytics Account is the main portal for controlling and organizing your different websites and apps on Google Analytics. Your account is the way to get into analytics. A company or group can have one or more Analytics accounts.
You need at least one account to get to Analytics and determine which features you want to track. You decide how to handle the link between your accounts and your properties. You can set up a relationship between one account and one property or between one account and many properties.
GA4 Property, on the other hand, is a unique website or app we add to our Google Analytics account. The property is the website or app, which you’re tracking and gathering data for.
In simpler terms, if Google Analytics were a bookshelf, the Account would be an entire shelf, and each GA4 Property would be an individual book on that shelf.
Let’s learn how to add a website (property) to Google Analytics account in the next section.
How To Add Website to Google Analytics [Step-by-Step]
You can add a property to Google Analytics in two different ways.
You can choose the one that works best for your needs. In this section, we’ll look at these two ways in-depth and discuss their differences and advantages.
1. Create a New Google Analytics Account
One way is to make a new Google Analytics account and start over. This allows you to start over and make the account fit your needs. For example, you might want to create a new account if a particular website or app belongs to a different business.
2. Create a New Property Within an Existing GA4 Account
The second way is to make a new property within an existing analytics account if you already have one. This method is useful if you want to keep all of your tracking data in one place but still be able to track different websites or apps in their own ways.
Both ways have advantages, so it’s important to consider your needs before choosing the one. Whether you opt for a new Google Analytics account or a new property within an existing one, the most important thing is ensuring you have a solid command for tracking and analyzing your website’s performance.
So, without further ado, let’s get right down to business and find out how to connect your website to a Google Analytics account.
Note: If you don’t already have one, your first step is creating a Google Analytics Account. If you don’t want to make a different account for your website, you can skip to the second step.
Step 1: Create a Google Analytics Account
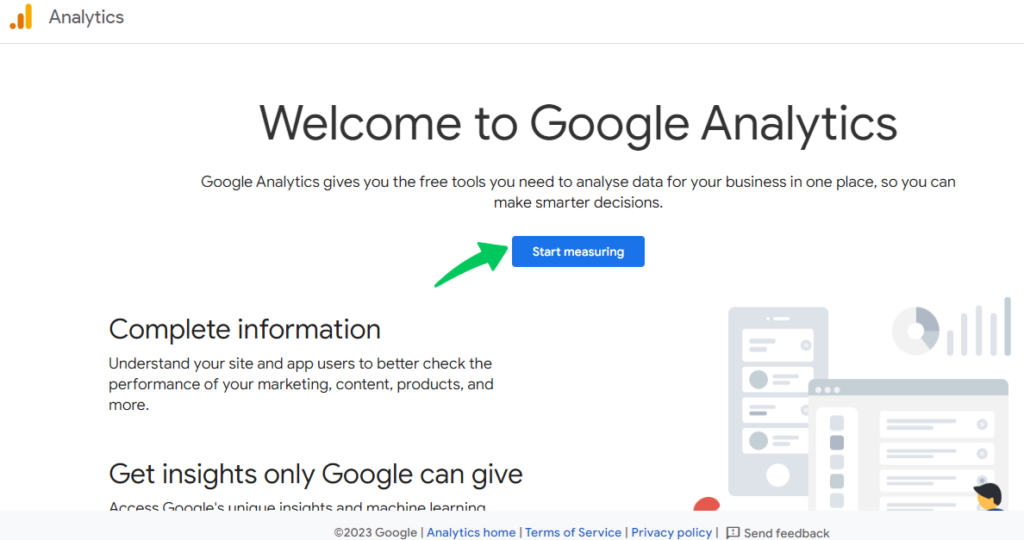
Go to the Google Analytics website.
Click Start measuring under Welcome to Google Analytics if this is your first time setting up an Analytics account.
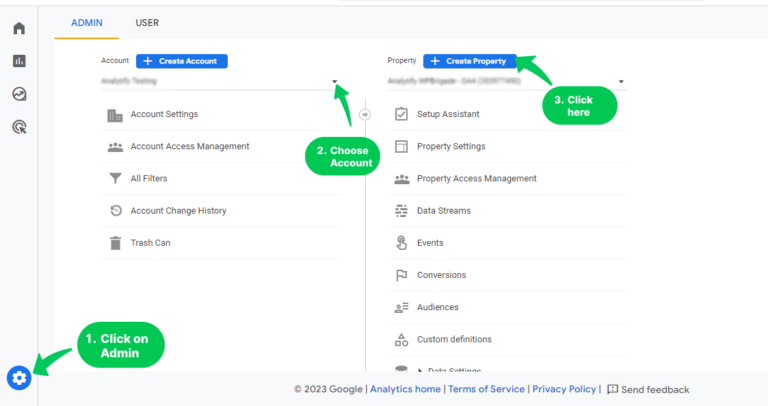
To make a new account, go to Admin and then click Create Account under the Account heading.
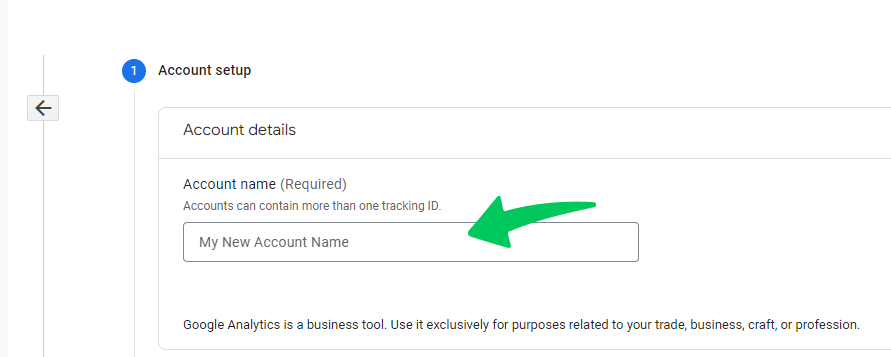
Give a proper name to the account. And then, change the data-sharing settings per your requirements to decide what information you want to share with Google.
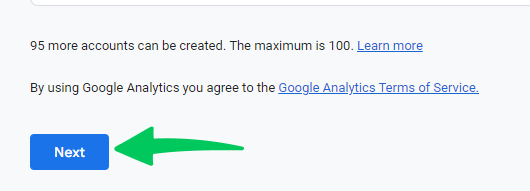
To add the first item to the account, click Next.
Step 2: Create GA4 Property
Note: You need the Editor role to add property to a Google Analytics account, If you made the Google account, you would have the Editor job by default.
To create a property for an existing Google Analytics account, click Create Property in your Google Analytics account. Follow the below screenshot:
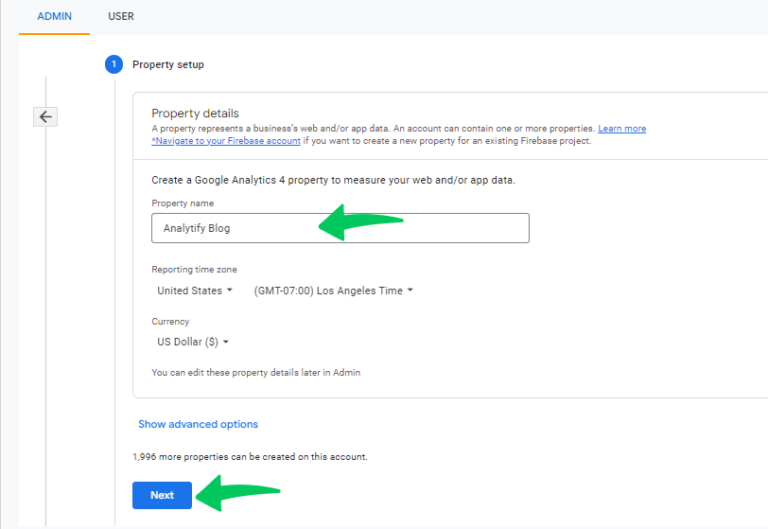
Enter a name for the property and choose the time zone and currency for reports. Then, click on Next.
After clicking the next button, choose the industry category and business size.
Then, click the Next button and choose how you intend to use Google Analytics.
Finally, click on Create.

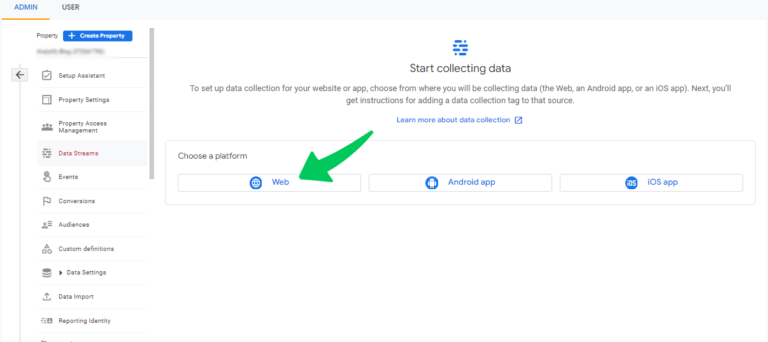
After clicking on Create, you’ll go to the Data Streams page.
Choose your data stream platform. In our case, we decided to use Web.
Step 3: Set Up the Data Stream
You’ll be automatically redirected to the Web Stream Page after the last step.
Enter the URL of your main website and a Stream name.
You can choose to turn on or off Enhanced measurement. Page views and other events are instantly tracked by enhanced measurement. After you’ve set up the data stream, you can always turn off the enhanced measurement events you don’t want to receive.
However, we recommend you turn on improved measurement. After this, click on Create stream.
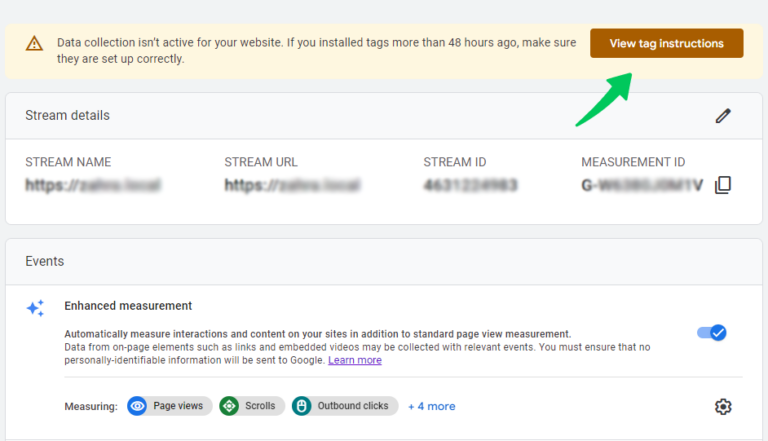
Then, click on View Tag Instructions to see the installation instructions.
To activate data collection, you must integrate GA4 property with your WordPress site.
Step 4: Set Up Data Collection for Your Website
For your new Google Analytics 4 property to start showing data, you’ll need to integrate Google Analytics 4 into your WordPress site.
There are two ways to add Google Analytics 4 to your WordPress site:
- One way to add is through a WordPress Plugin, Analytify.
A one-stop analytics solution for your WordPress website with no coding required. In this blog, we’ll cover this method only. - The other way to add is without a WordPress Plugin.
In this way, you can Integrate Google Analytics and WordPress manually with codes, or use Google Tag Manager. To know more, read our guide on: How To Add Google Analytics 4 to WordPress (Easy Way).
Let’s install it with Analytify first.
Step 5: Install Analytify on your WordPress Site
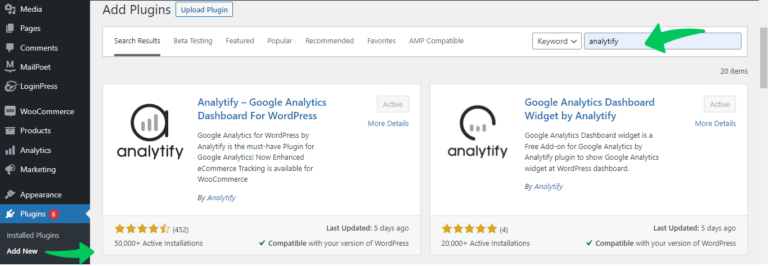
First, go to your WordPress dashboard. Then, click Plugins>>Add New.
You’ll be navigated to a new page. Type Analytify into the search bar to find it, as shown in the picture below.
Find the Google Analytics Dashboard Plugin for WordPress by Analytify in the search results, then click Install Now and Activate when the installation is done.
You can buy Analytify Pro to make the maximum use of its features.
For more info, read How to Install And Activate Analytify Pro Plugin for a complete guide.
Step 6: Add Google Analytics Property to Your WordPress Site
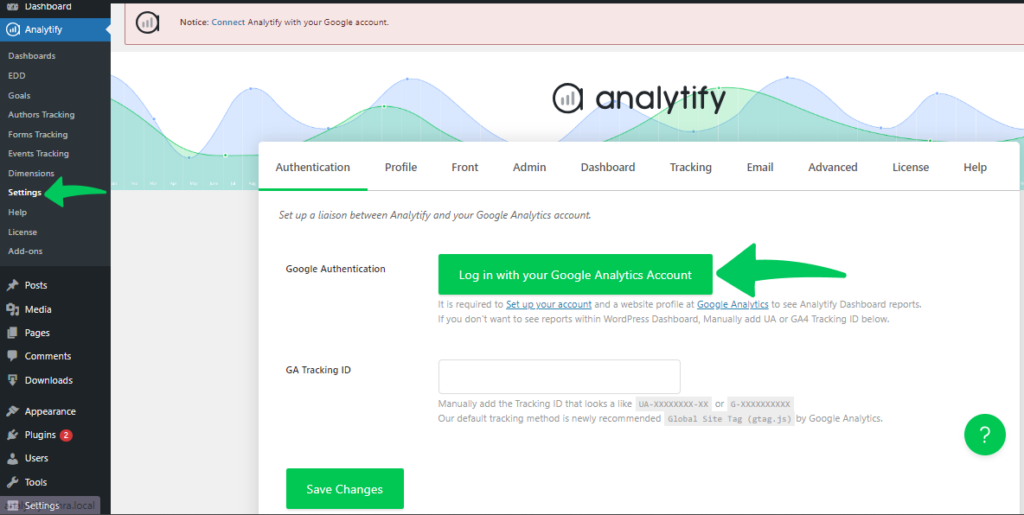
After successfully installing Analytify, navigate to Analytify Dashboard >> Settings >> Authentication tab in your WordPress dashboard.
Then click on Log in with your Google Analytics Account.
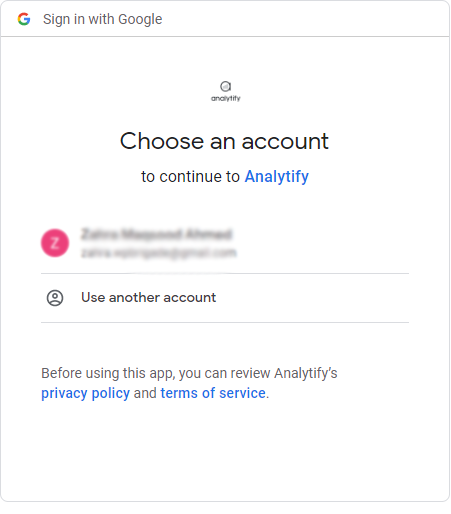
You’ll be navigated to the next page. Here, choose an account to continue with Analytify.
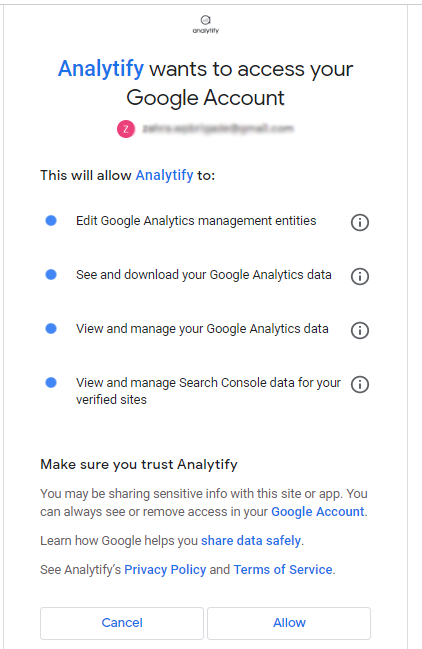
Next, grant the requested permissions. Then select Allow, as shown below:
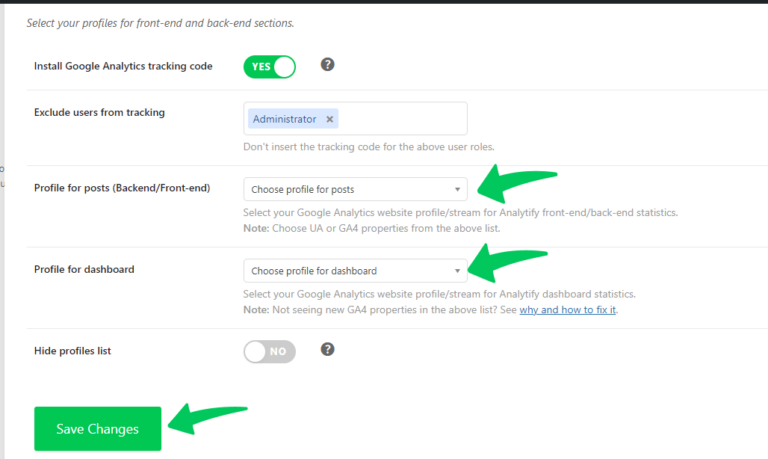
After successfully connecting to your Google Analytics account, you’ll be navigated back to the Analytify settings page on your WordPress dashboard.
Here, select the Google Analytics profile (GA4 property) you want to use for your WordPress site from the dropdown menu and click Save Changes.
After setting up the basic settings, you can explore the Analytify plugin’s other settings tabs to restrict particular user roles from being tracked or improve eCommerce tracking.
Step 7: Verify If Google Analytics is Working Properly
Go to your Google Analytics account after visiting your website in a new browser or private window. Find out if your visit is tracked in the Realtime Report. The data should indicate at least one visitor if everything is set up correctly.
However, you can also see your analytics reports right on your WordPress Dashboard. For this, go to Analytify>>Dashboards.
Moving Google Analytics 4 Property to Another Account
Can you also move Google Analytics property from one account to another?
Yes, if you need to rearrange your properties in Analytics, you can move them (and their views) from one account to another.
You may need to move a Google Analytics property to another account for multiple reasons, like reorganizing your business or handling properties for new clients.
To move a property, you must have the Administrator and Editor roles for both the source account and the account to which you want to move the property.
How to Move Google Analytics 4 Property to another Account
You can follow the below simple steps to move a GA4 property from one account to another.
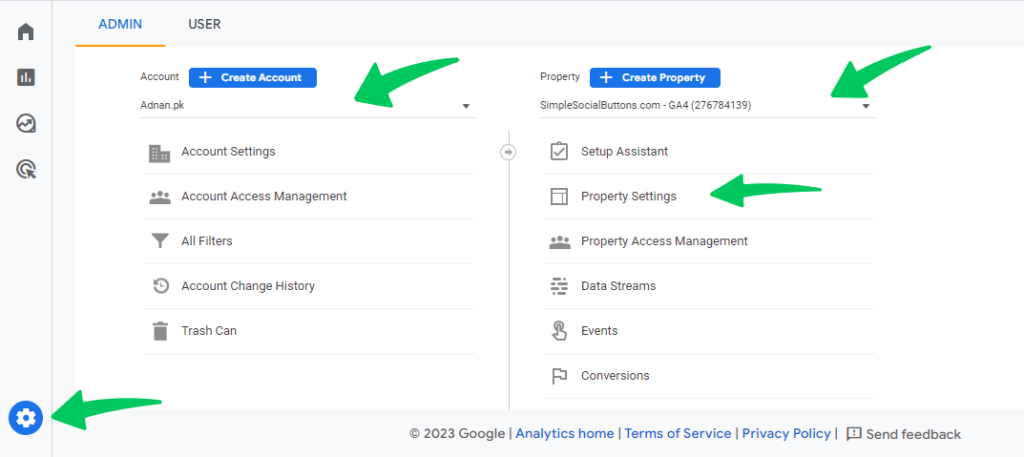
Go to Google Analytics account and click on Admin.
Go to Admin.
Choose the appropriate account from the account column, then choose the property that you want to move.
Then click on Property Settings.
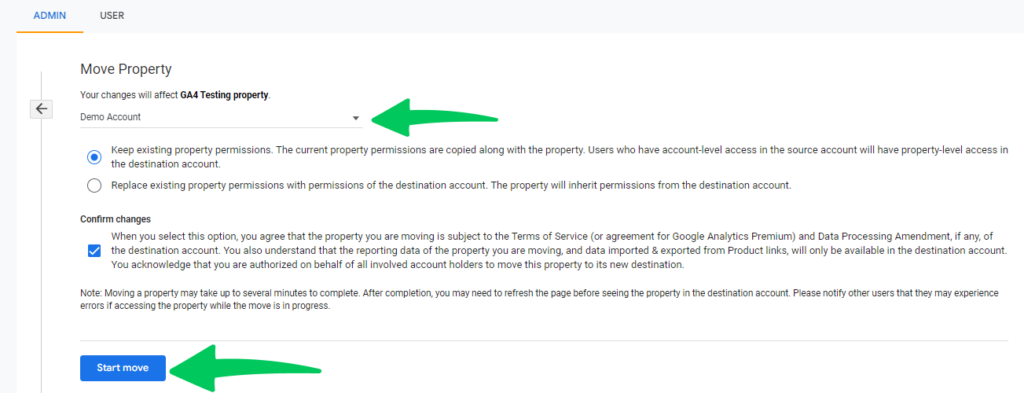
Choose the Destiny account where you want to move your analytics property. Select the permission settings and click on Start Move.
Confirm the handling of data, and then click Save.
Deleting Google Analytics Property
There are many reasons to delete a Google Analytics property. For example, you might want to get rid of old properties or switch to a new platform. No matter the reason, knowing that you can’t get it back once you delete a property is important. All the information about that property’s history will be gone permanently.
Let’s learn how to delete Google Analytics Property in simple steps.
How to Delete Google Analytics Property
Note: Ensure you have a copy of any important data from the property before deleting it. Once this info has been deleted, there is no way to get it back.
Follow the below steps:
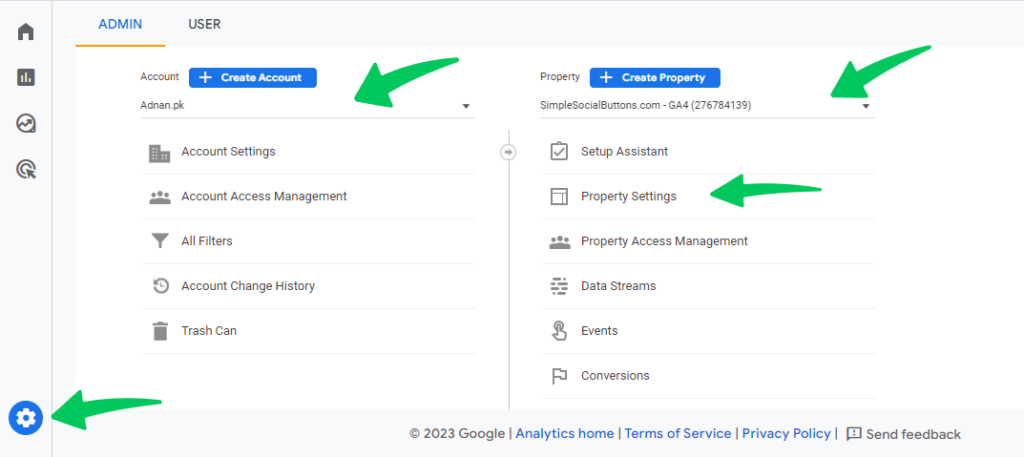
Go to your Google Analytics account.
Click Admin.
First, choose the appropriate Google Analytics account and then choose the property you want to delete.
Then click on Property Settings.
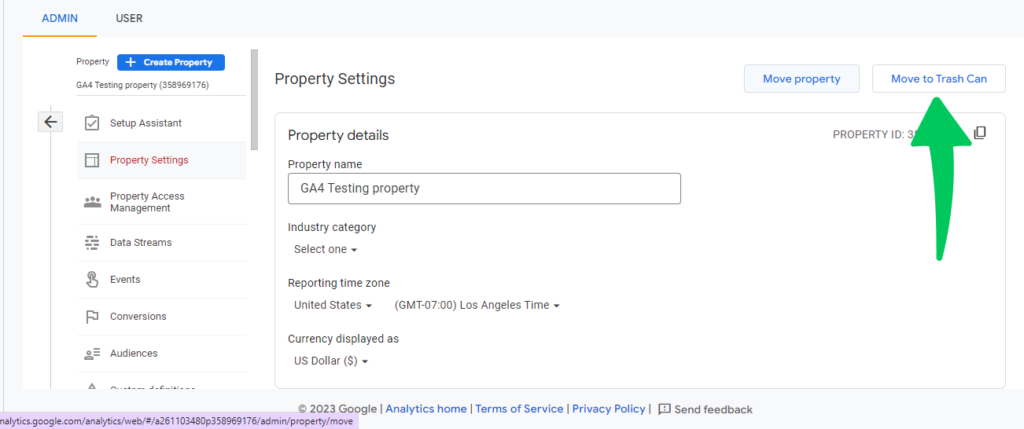
Finally click on Move to Trash Can.
On the approval screen, click Move to Trash.
That’s how you can successfully delete your Google Analytics property.
4 Bonus Tips to Set Up Google Analytics Property
- Ensure Right Access: Before you begin, make sure you have the right permissions to access the Google Analytics account and add a website. Usually, you need an editor role.
- Choose the Correct Tracking Code: Putting the tracking code on your website can be done in different ways. To avoid tracking code issues, you can choose Analytify to connect your WordPress site to Google Analytics.
- Filter out Internal Traffic: To get the correct data, consider applying filters that exclude IP addresses on your network. This ensures that your analytics aren’t messed up by your team’s visits or any site testing.
- Set up Conversions: Don’t just track how many people visit your site. Figure out what success for your website looks like. Set up custom dimensions to track these conversions, whether form fill-outs, product purchases, or email sign-ups. Read more: Everything You Need to Know About Custom Dimensions GA4.
Add Website to Google Analytics FAQs
What is Google Analytics 4 Property?
GA4 property is designed for the future of measurement in Google Analytics 4. It can be a website or app. It means, it collects both website and app data to better understand the customer journey.
How do I view traffic by channels in GA4?
To view traffic by channels in GA4, navigate to the “Acquisition” report in the left-hand menu in your Google Analytics account, and then click on “Traffic Acquisition”.
What are the data sampling thresholds in GA4?
GA4 uses a different data sampling approach than Universal Analytics. It relies more on Google’s machine learning and data modeling, which means data sampling thresholds may vary depending on the size of your dataset and the complexity of your queries.
How do I set up content grouping in GA4?
Content grouping is not available in GA4 as it was in Universal Analytics. However, you can use custom dimensions and events to categorize and analyze your content.
Can I add a second website to Google Analytics?
Yes, you can add a second website to Google Analytics 4. In fact, you can add multiple websites. For each new website, you would need to create a new GA4 property.
Google Analytics Account vs. Property – What’s the Difference?
A Google Analytics Account is a top-level entity and can contain multiple properties. A Property, on the other hand, represents a specific website or app. For example, a company might have one account but multiple properties for its main website, blog, and mobile app.
Can I Move my Google Analytics 4 Property to Another Account?
Yes, it’s possible to transfer a GA4 Property to another account, but ensure you have the necessary permission role in both the source and destination accounts.
Conclusion
It’s not hard to set up and run Google Analytics, especially the GA4 Property. Knowing how it works is vital to get the most out of all of its features. Now that you know how to create, add, move, and delete a GA4 property along with some helpful tips, you’re on the right track to help your website grow.
Don’t forget that analytics is about more than just numbers. It’s the story of your audience and how they connect with you, and it gives you the chance to make decisions based on data.
We hope this blog, helped you to understand how to add a website to Google Analytics.
Looking for more information related to GA4? Our detailed guide, How Google Analytics work? has got you covered.
We’d like to know how you plan to add GA4 to your content analytics strategy. Are there any particular GA4 features you are excited about? Share your ideas in the comments!

