Integrating Google Analytics 4 with Analytify can help businesses get more value from their analytics data. Analytify is the best WordPress Google Analytics dashboard plugin that offers powerful insights into website traffic, user engagement, and more.
The integration process is relatively straightforward and doesn’t require any coding knowledge.
In this knowledge base article, we’ll walk you through the steps to integrate Google Analytics 4 with Analytify.
Before beginning the integration process, log into your Google Analytics 4 account. If you don’t already have an account, you can create one by navigating to the Google Analytics website and clicking “Sign Up.”
Next, click on the Start Measuring button.

Once logged into your Google Analytics 4 account, you must complete the initial setup. This includes providing basic information about your website, such as the URL and the Industry you are in.
You need to add your Account Name and Data Sharing Settings as per your requirements.

Once done, click on the next button.
The next step is to configure your property settings. Here you need to enter the name of your website, the time zone, and other details.
Add your property name (again, typically your site name).

Choose your time zone and currency. These settings are important to ensure your reports are accurate.
Google will ask about your industry, business size, and goals (like increasing sales or getting more leads). Fill this out and click Next.
After configuring your property settings, you must provide basic business information about your website. This includes the website category and its purpose. Once you enter the required information, click the Create Property button to save your changes.

The last step is to accept the Google Analytics Terms of Service Agreement. Read through all the terms and conditions carefully before accepting them. Once you accept the terms, your Google Analytics 4 property will be created.

Now that your Google Analytics 4 Property has been created, it’s time to integrate it with Analytify. To do this, navigate to WordPress Admin Dashboard >> Plugins >> Add New.

Search Analytify and install the plugin.

Once the plugin is installed, go to Plugins >> Analytify and click on the Settings tab.
Now, Authenticate your WordPress website with Google Analytics Account. So it can connect the GA4 property of your site to Analytify without touching any code.
To do this, go to the admin dashboard of your WordPress website. Navigate, Analytify >> Settings >> Authentication tab, and click Log in with your Google Analytics Account.

After clicking “Log in with your Google Analytics Account,” you will be redirected to the Google Accounts Authentication page; you have to select the Google Account associated with your Google Analytics account.

Note: If you see the “This app is blocked” error while connecting, you must create a Client ID and Client Secret. Don’t worry. We have written a complete guide to how to get your Client ID and Client Secret From Google Developers Console.
In the next step, you will be asked to Allow the permissions. You have to click on the Continue button.

And that’s it! Your Google Analytics account is now successfully connected with Analytify.
You will be redirected back to Analytify >> Profiles. You must select “Profiles for posts” and “Profile for the dashboard.”

After selection, click “Save Changes.” For most users, both of these options will be the same.
Navigate to the Advanced tab and make sure that Data Stream and Measurement ID are auto-selected.
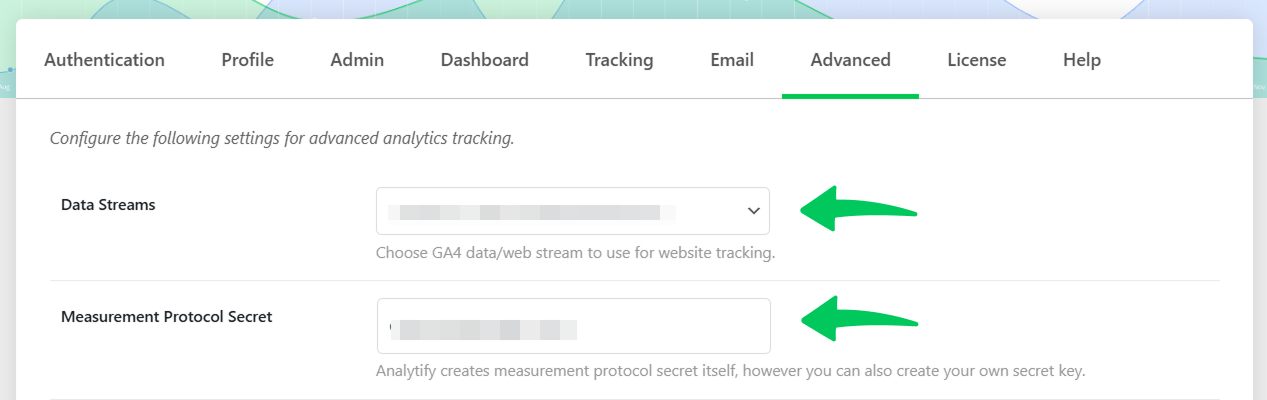
After it, click Save Changes. It’ll enable you to Select Profile.
Once you’ve integrated GA4, you might need a practical guide on How to Improve Google Analytics 4 Engagement Rate, which outlines clear methods to improve user engagement and interaction on your website.
Now, you can track and analyze valuable insights about your website’s performance within Anaytify Dashboard. To do that, Navigate to Analytify >> Dashboards.

It usually takes 24-48 hours for data to start appearing in the new GA4 setup. We recommend waiting for this average timeframe to allow the statistics to populate.
By following the simple steps outlined above, you can quickly and easily connect Google Analytics 4 with Analytify and start analyzing your website’s data. Try it out today and see how Analytify can help take your website’s performance to the next level.
Learn how to measure and interpret GA4 site speed metrics to improve load times and enhance user experience.
If you have any doubts or questions related to this matter, please don’t hesitate to contact our support team.