How to Setup Google Analytics for Shopify (4 Methods)
Did you know GA4 can transform the way you manage your Shopify store? Integrating Google Analytics into your Shopify setup gives you powerful tools to track customer behavior, optimize marketing strategies, and grow your business effectively.
This blog explores why Google Analytics for Shopify is essential and provides step-by-step instructions on how to install Google Analytics on Shopify. You’ll clearly understand how to add Google Analytics in Shopify to elevate your e-commerce tracking by the end.
Let’s get started!
Google Analytics for Shopify (TOC):
What is Shopify?
Shopify is a popular e-commerce platform that empowers individuals and businesses to create and manage online stores with ease, even without technical expertise. It provides a wide range of tools for building websites, managing products, handling payments, and tracking sales performance.
With its customizable themes, seamless app integrations, and built-in marketing features, Shopify caters to businesses of all sizes. Whether selling online, in physical stores, or through social media platforms, Shopify offers a versatile solution to help you launch and grow your e-commerce business efficiently.
Why Do You Need Google Analytics for Shopify?
Setting up Google Analytics for Shopify is essential for clearly understanding your store’s performance. You can track customer behavior, sales trends, and marketing effectiveness by Shopify GA4 integration. This detailed data helps improve and optimize your e-commerce strategies.
Whether you use the Shopify GA4 integration directly or the Google Analytics 4 Shopify connector, you can access powerful features that boost your store’s success.
Here are some key benefits of using Google Analytics on the Shopify store:
- Audience Analysis: Discover who your customers are by analyzing their preferences, demographics, and shopping habits. These insights help you align your offerings with their needs.
- Track Performance with Precision: Utilize Shopify GA4 ecommerce tracking in Shopify to measure essential metrics like sales revenue, traffic sources, average order value, and conversion rates, giving you a clear picture of your store’s performance.
- Refine Your Marketing Efforts: Pinpoint the marketing channels that bring in the most traffic and conversions. Allocate your budget wisely to amplify the success of high-performing campaigns.
- Improve the Customer Experience: Identify areas of friction, such as cart abandonment or confusing navigation, through user behavior analysis. Use these findings to create a smoother, more satisfying shopping experience.
- Smarter Business Strategies: Use valuable data to guide inventory planning, adjust pricing approaches, and design promotions that meet customers’ needs.
Google Analytics empowers you to control the performance of your Shopify store and provides the information you need to grow and succeed in the competitive e-commerce space.
How to Install Google Analytics on Shopify?
Adding Google Analytics on Shopify is essential for tracking store performance and understanding customer behavior. Four primary methods exist for integrating Google Analytics with your Shopify store: Google Tag Manager (GTM), the Google and YouTube Channel App, GTAG, and Shopify Analytics Apps.
Each method deals with different levels of technical expertise and business requirements. Here is a table comprising a brief overview of 4 methods :
| Method | Ease of Use | Features | Flexibility |
| Google & YouTube Channel App | Easy | Basic tracking, enhanced measurement | Moderate |
| Google Tag Manager (GTM) | Moderate | Advanced tracking, custom tags | High |
| GTAG | Moderate | Manual setup, advanced tracking | High |
| Shopify Analytics Apps | Very Easy | User-friendly, pre-built integrations | Limited customization |
Method 1: Install GA4 with Google & YouTube Channel App
Installing Google Analytics 4 (GA4) using the Google & YouTube Channel App is one of the easiest methods. Previously, Shopify had native Universal Analytics (UA) integration, but this has been replaced by the Google & YouTube Channel App for GA4. So you have to follow the following steps to install Google Analytics 4 on Shopify with the Google & YouTube channel app:
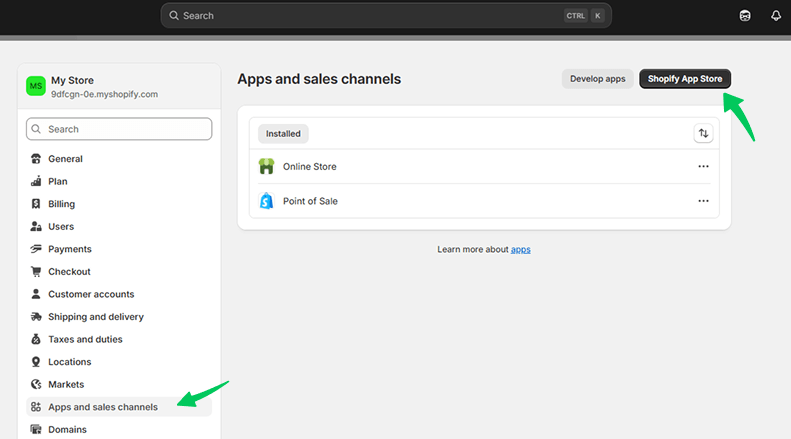
Step 1: Go to Shopify Admin and Open the App Store
- Log in to your Shopify Admin dashboard.
- From the left menu, click Apps >> Shopify App Store.
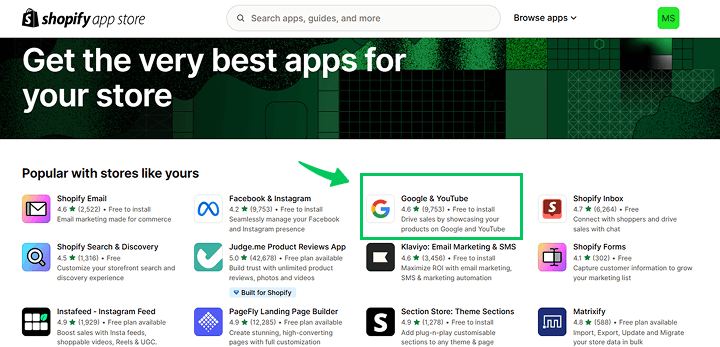
Step 2: Search and Install “Google & YouTube” App
- In the App Store, search for “Google & YouTube”.
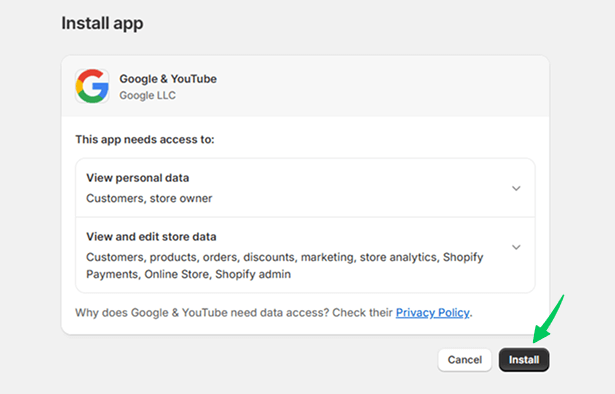
- Click the app and hit the “Install” button.
- Approve all the necessary permissions and finally install it.
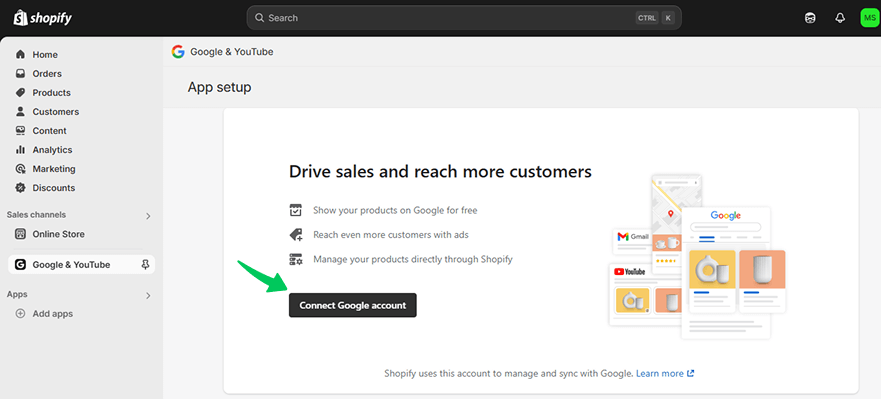
Step 3: Connect Your Google Account
- After installation, the app will prompt you to connect your Google account.
- Choose the Google account that manages your Google Analytics and Google Ads (if applicable).
- Grant the necessary access to link your Shopify store with Google.
Step 4: Connect Your Google Analytics 4 Property
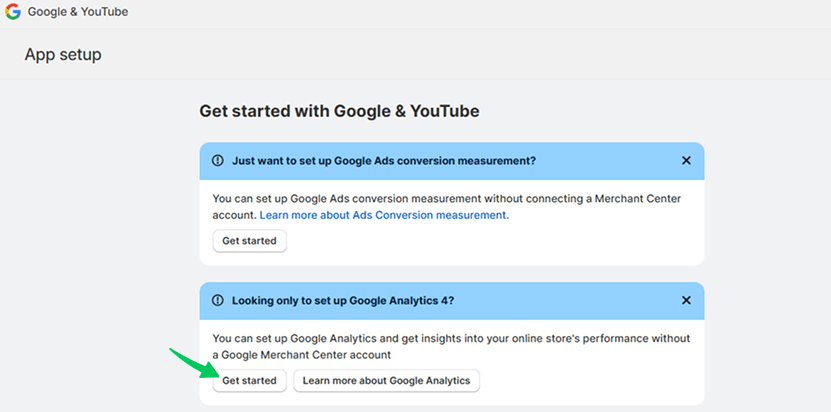
- After connecting with Google account , click on get started to connect it with Google Analytics.
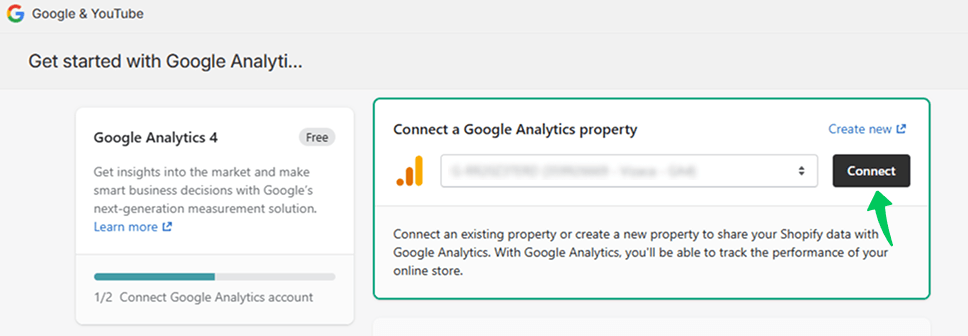
- If you already have a GA4 property, simply select it from the list and click on connect tab.The app will automatically connect it to your Shopify store.
- If you don’t have a GA4 property yet:
- Click “Create new” inside the app.
- Shopify will automatically help generate and connect your new GA4 property.
Step 6: Verify Tracking in GA4
- Open your Google Analytics dashboard.
- Go to Admin > Data Streams > Web, and click your stream.
- Confirm that Shopify’s data stream ID is active.
- Visit your Shopify store in a new tab and check Real-time reports in GA4 to see if your visit is tracked.
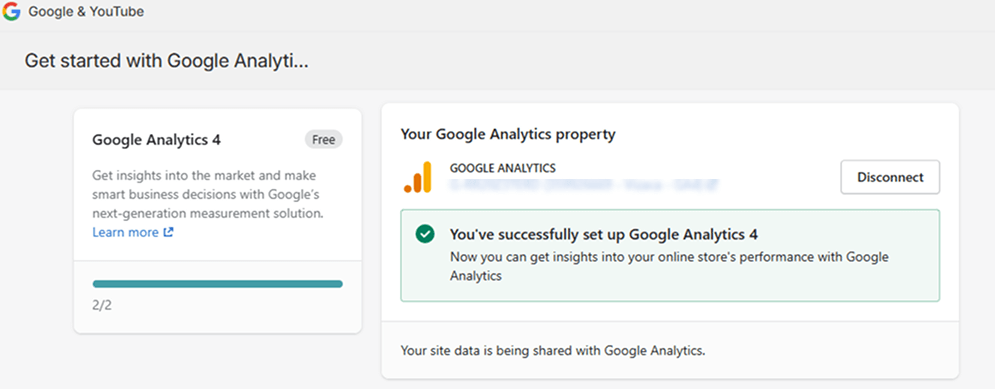
The setup is complete once you see your events populating and your Shopify store successfully connects to GA4.
After setting up the Google & YouTube Channel App, you can track general events like page views, clicks, video interactions, form submissions, and e-commerce events such as item views, add-to-cart actions, and purchases. These details help you understand user behavior and optimize your Shopify store’s performance effectively.
Method 2: Install GA4 in Shopify Using GTM
Integrating Google Analytics with Shopify via Google Tag Manager (GTM) enables efficient tracking of your store’s performance and user behavior. Here’s a detailed step-by-step guide:
Step 1: Set Up a Google Tag Manager Account
- Go to Google Tag Manager.
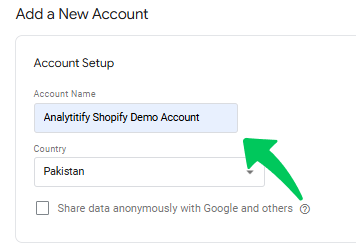
- Click Create Account and follow these steps:
- Account Name: Enter a name for your account (e.g., your business name).
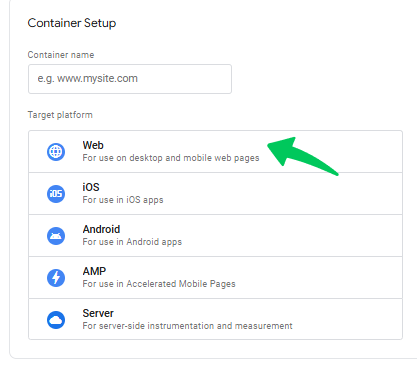
- Container Setup: Choose Web as the target platform.
- Once created, your GTM container is ready for use.
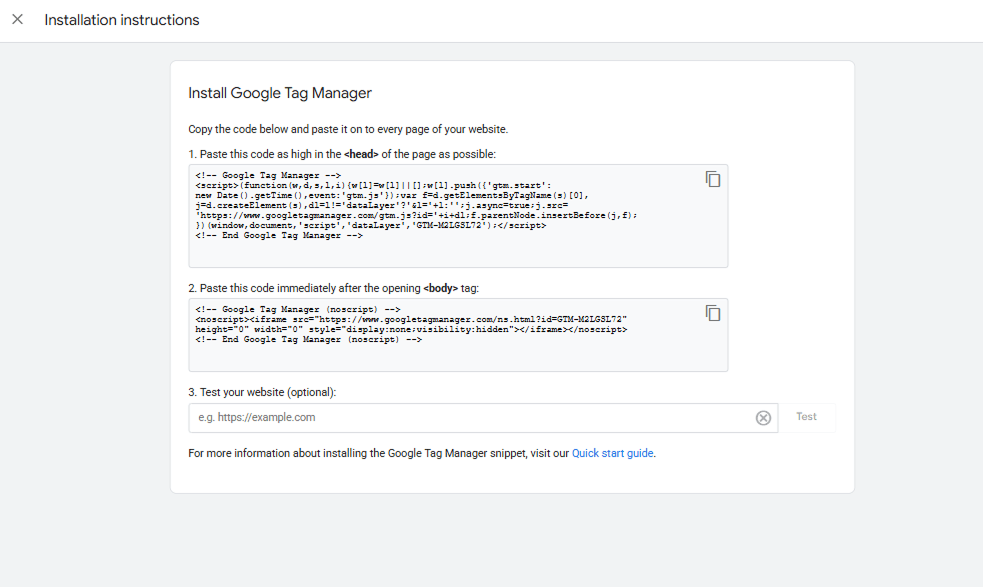
- GTM will provide two scripts to embed in your Shopify store.
Step 2: Upgrade to Checkout Extensibility
- Go to Settings >> Checkout in Shopify.
- Upgrade to Checkout Extensibility if you haven’t done so already.
Step 3: Insert GTM Scripts into Shopify
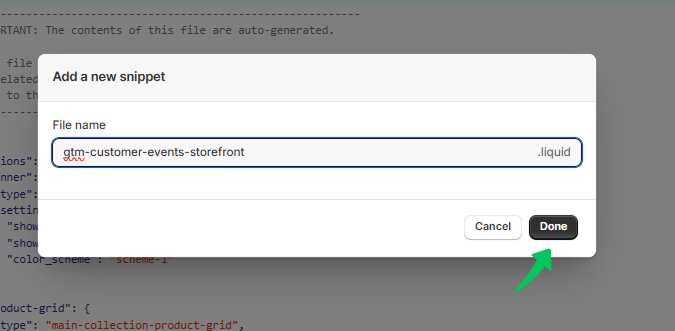
Script 1: gtm-customer-events-storefront
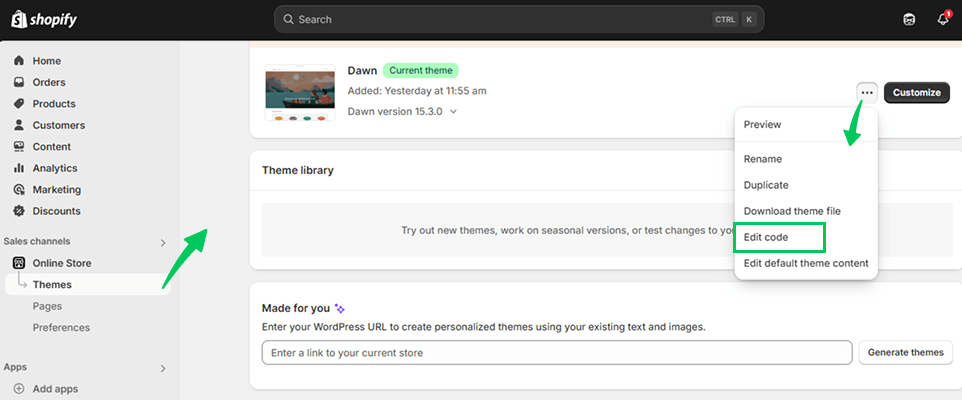
- Go to Online Store >> Themes >> Edit Code .
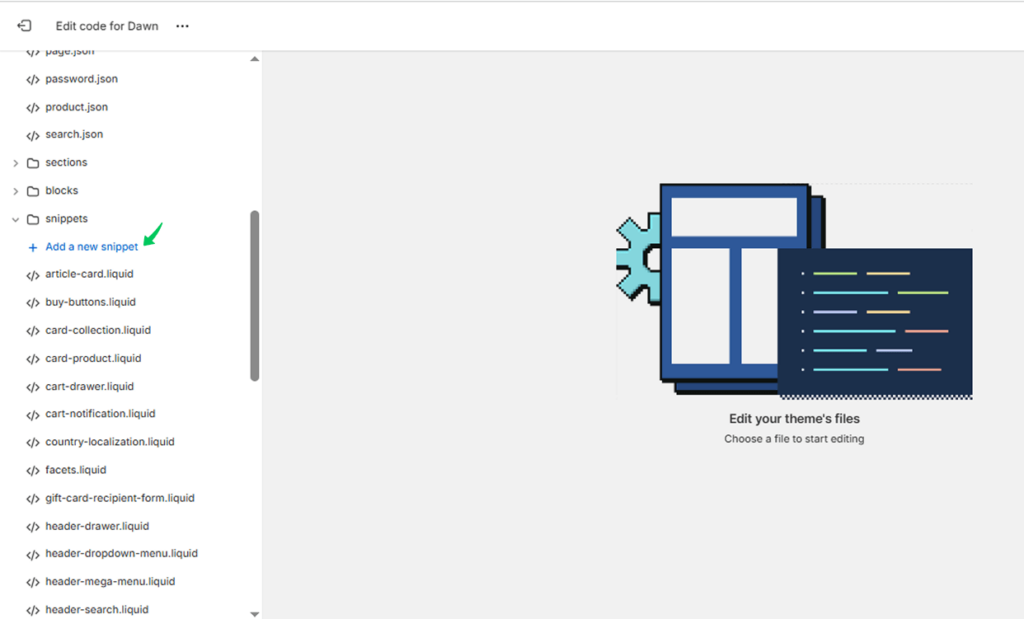
2. Choose the snippets option and click on the add a new snippet tab.
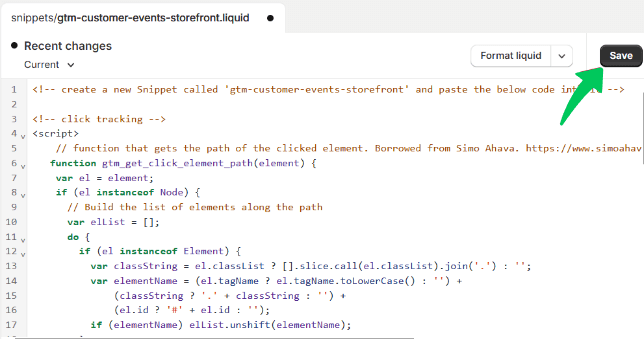
3. Create a new snippet named gtm-customer-events-storefront.
4. Paste the content of the gtm-customer-events-storefront script into this snippet.
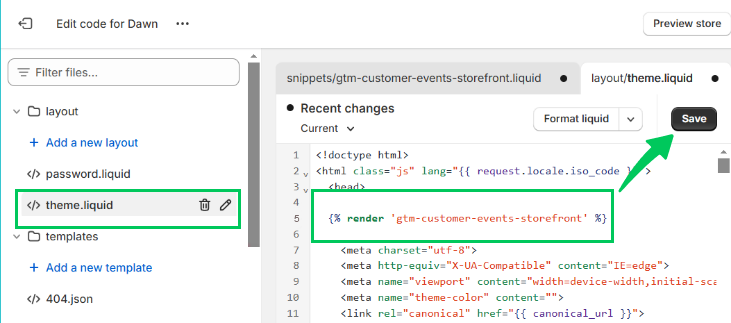
Script 2: Theme Script
- Open the theme. Liquid file in the Shopify code editor.
- Paste the theme script into the <head> section as high as possible.
- Include the gtm-customer-events-storefront snippet for clean code organization.
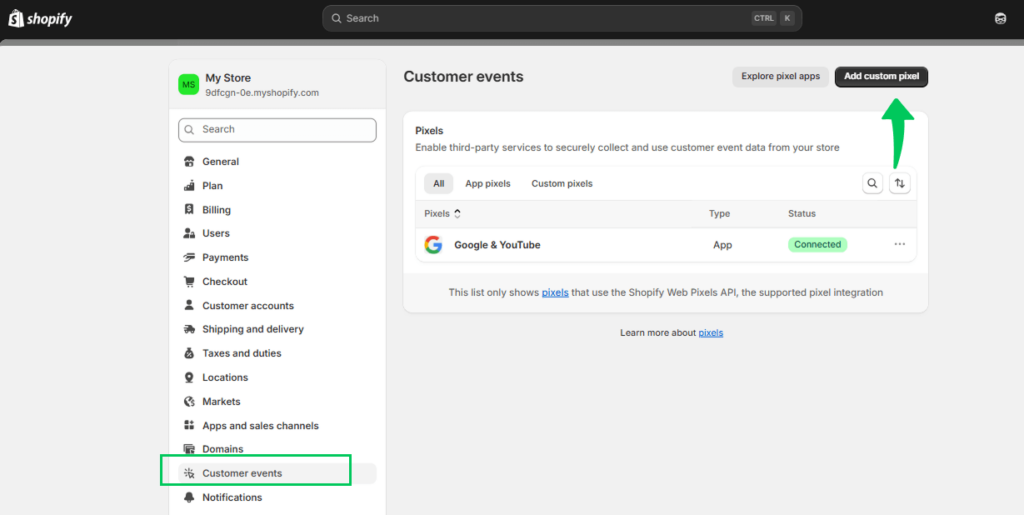
Script 3: Custom Pixel Script
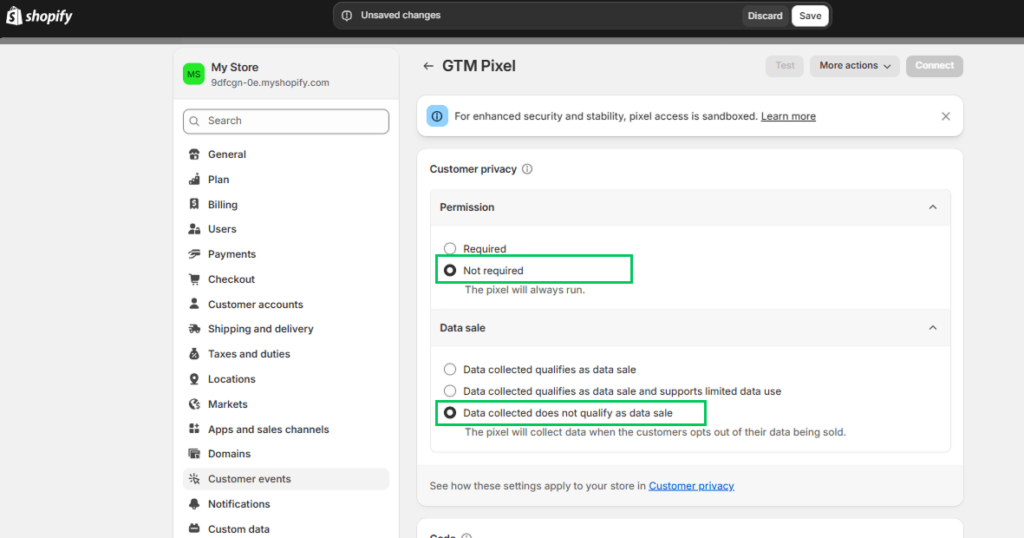
- Navigate to Settings >> Customer Events >> Add Custom Pixel.
- Name the pixel (e.g., “GTM Pixel”).
- Set these options:
- Permission: Not required.
- Data Sale: This does not qualify as a data sale.
- Replace the placeholder code in Shopify with the content of the custom pixel script.
Step 4: Configure Google Analytics in GTM
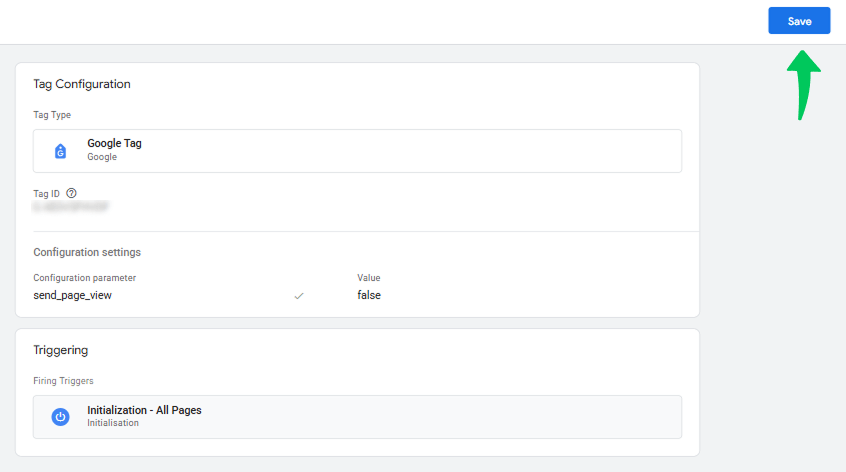
- Create a New Tag:
- Go to Tags >> New >>Tag Configuration.
- Select Google Analytics >>Google tag.
- Enter Your GA4 Measurement ID:
- Find your Measurement ID in your GA4 account under Admin >> Data Streams>> Web >> Measurement ID.
- Copy and paste this ID into the Tag Configuration.
- Disable Automatic Page View Tracking:
- Set the send_page_view parameter to false. By controlling when page views are sent to Google Analytics, you can disable automatic page view tracking and prevent duplicate or incorrect data.
- Set the Trigger: Choose All Pages as the trigger.
Step 5: Add Data Layer Variables
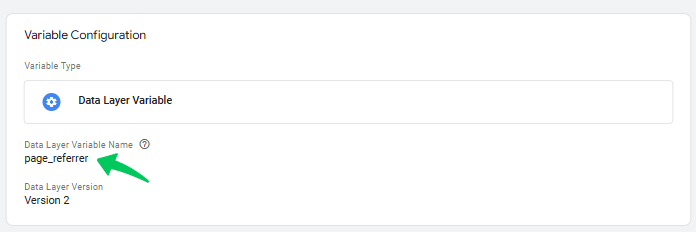
- Go to Variables >> New >> Variable Configuration> > Data Layer Variable.
- Create Variables:
- Create the following three variables one by one to capture clean page data:
- Page Location (page_location)
- Page Referrer (page_referrer)
- Page Title (page_title)
Step 6: Set Up an Event Settings Variable
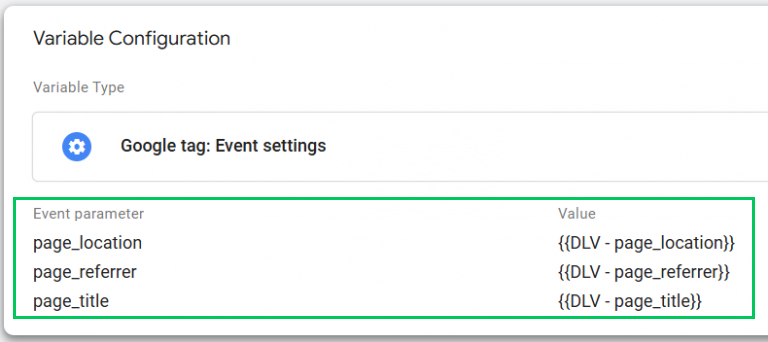
- Navigate to User-Defined Variables. Create a new variable with Google Tag: Event Settings Variable.
- Add Parameters
Include the page_location, page_referrer, and page_title parameters with their corresponding data layer variables.
Centralizing these parameters ensures they can be reused across multiple events.
Step 7: Create a GA4 Event Tag
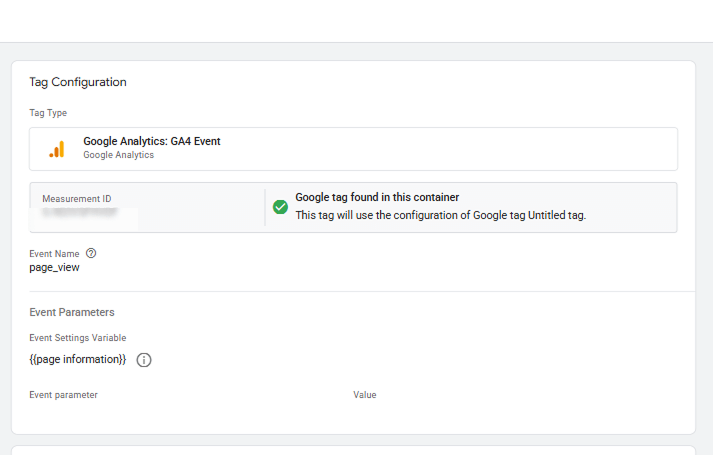
- Create a new GA4 Event Tag in GTM.
- Add Event Parameters
Use the Event Settings Variable you created earlier under Event Parameters.
This ensures the polluted page location is replaced with the clean data from the parent frame.
Step 8: Configure a Custom Event Trigger
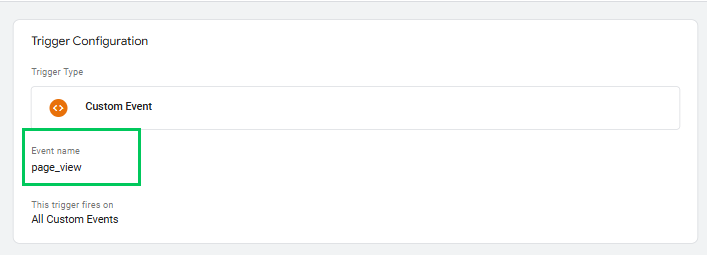
- Create a New Trigger
Add a Custom Event Trigger using the event name page_view.
This event name matches the custom pixel code, which pushes page_view data to the data layer.
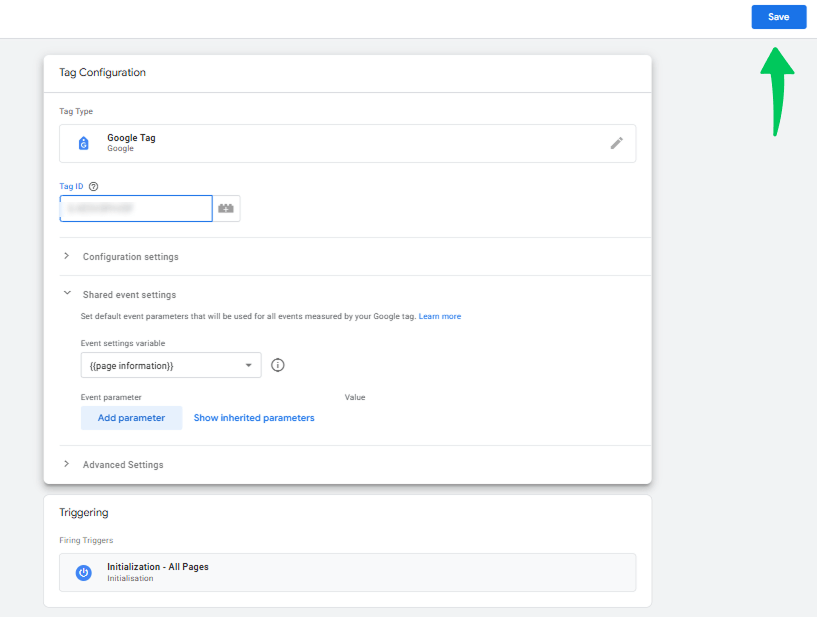
Step 9: Update the GA4 Configuration Tag
- Link the Event Settings Variable to the Google Tag in your GA4 configuration tag.
This step integrates clean page information into your GA4 tracking setup.
Step 10: Test the Integration
- Preview in GTM:
- Use GTM’s Preview Mode to verify that your tags fire correctly when navigating your Shopify store.
- Verify in Google Analytics:
- Check the real-time reports in GA4 to confirm data is being received.
Once testing is complete and working as expected, Publish the GTM Container. In GTM, click Submit to publish the container. Use Google Analytics reports to monitor your Shopify store’s user behavior and sales performance.
Following these steps, you’ll successfully integrate Google Analytics with GTM in Shopify, enabling powerful tracking capabilities and insightful analytics for your e-commerce store.
Method 3: Using GTAG
GTAG, short for Global Site Tag, is a JavaScript tagging framework provided by Google. It simplifies and standardizes the process of adding and managing tracking tags for various Google products, such as Google Analytics and Google Ads.
GTAG enables website owners to collect and send data about user interactions, such as page views, events, and e-commerce transactions, to their Google accounts for analytics or advertising purposes.
While GTAG offers a direct way to add tracking codes, it’s a traditional method that lacks the flexibility of Google Tag Manager (GTM). Follow these steps to setup Google Analytics for Shopify by using GTAG:
Step 1: Add GTAG to Your Shopify Theme
- Copy the GTAG Code:
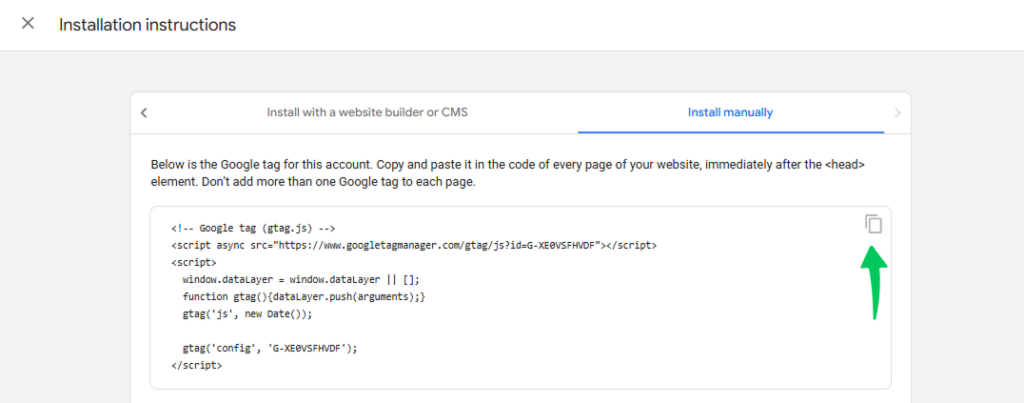
- Log in to your GA4 account and navigate to the installation instructions.
- Copy the GTAG code snippet provided. It will look something like this:
- Access the Shopify Theme Editor:
- Go to your Shopify admin section.
- Navigate to Online Store >> Themes.
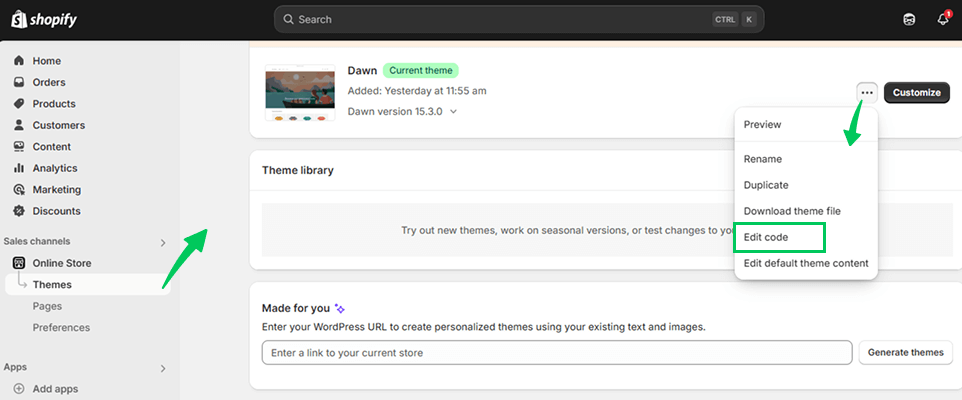
- Click the three dots next to the ‘Customize’ button and select Edit code.
- Edit the theme. Liquid File:
- Open the theme. liquid file from the list of available files.
- Locate the <head> section in the file.
- Paste the copied GTAG code right below the <meta> tags.
- Save the Changes:
- Click Save to ensure the GTAG is added successfully.
Step 2: Add GTAG with Purchase Tracking to the Thank You Page
- Go to Shopify Settings:
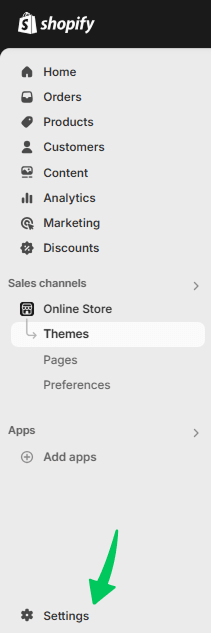
- Navigate to Settings in your Shopify admin.
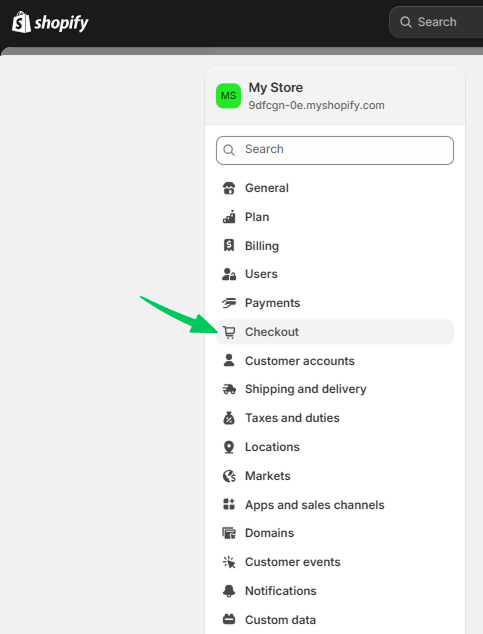
- Select the Checkout tab.
- Locate the Order Status Page Block:
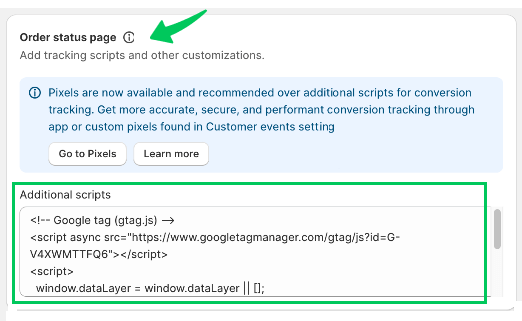
- Scroll down to the ‘Order status page’ section.
- Find the ‘Additional scripts’ field.
- Insert the Purchase Tracking Code:
- Copy and paste the tracking code into the ‘Additional scripts’ field, ensuring to replace G-XXXXXXXXX with your actual measurement ID.
- Save the Changes:
- Scroll down and click Save to finalize your setup.
Step 3: Test the Setup
- Use Debug View in GA4:
- In your GA4 property, navigate to Admin >> Debug View.
- Test Events:
- Visit your Shopify store with the Google Analytics Debugger enabled.
- Perform a test purchase.
- Check the Debug View in GA4 to verify if the events are being recorded correctly.
Following these steps, you can successfully integrate GA4 with Shopify using GTAG. However, consider using GTM for more flexibility and compatibility with other platforms, such as Meta and LinkedIn pixels.
Method 4: Using Shopify Analytics Apps
Shopify analytics apps are tools designed to help merchants track, analyze, and understand their store’s performance using metrics like sales, customer behavior, and marketing efforts. These apps integrate seamlessly with your Shopify store, providing detailed insights to help optimize business strategies.
Some popular Shopify analytics apps include Lifetimely, Conversific, Better Reports, Polar Analytics, and Supermetrics. Each offers unique features to help merchants track and analyze their store’s performance effectively.
Pro Tip: Simplified Analytics for WordPress Users
Join 50,000+ beginners & professionals who use Analytify to simplify their Google Analytics!
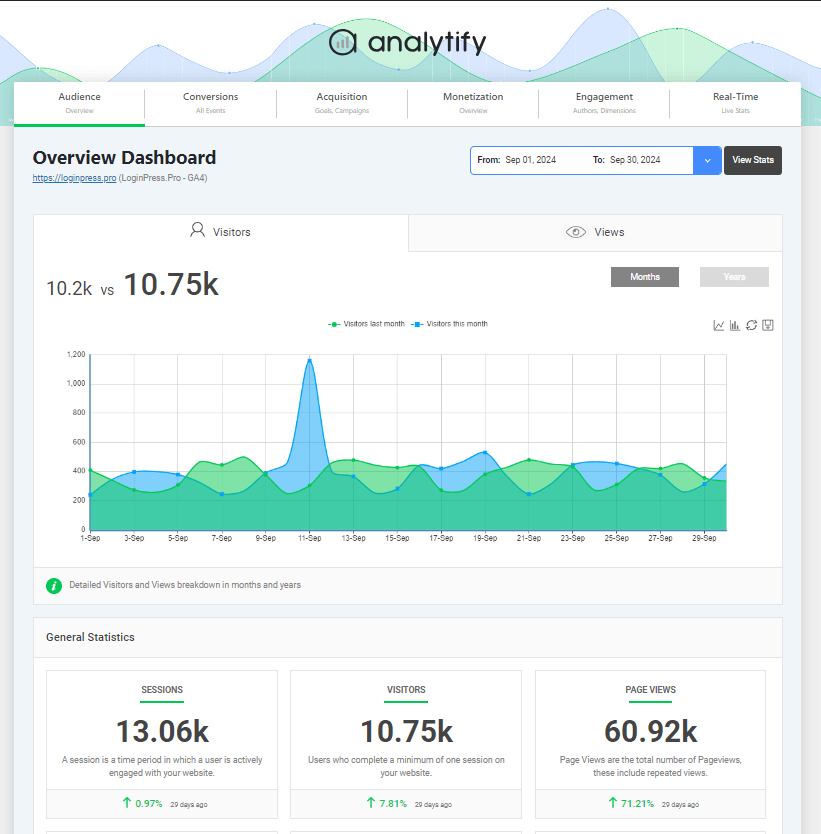
Analytify is a powerful WordPress plugin for any WordPress website owner, especially those running an e-commerce store. Its ease of use, user-friendly interface, comprehensive reporting, and dedicated WooCommerce add-ons make it a powerful solution for tracking website performance and gaining valuable details about your audience.
Key Features of Analytify:
There are the following key features of Analytify:
Effortless Google Analytics Integration: Seamlessly connects your WordPress site to your Google Analytics account and eliminates the need for manual code implementation or complex configurations.
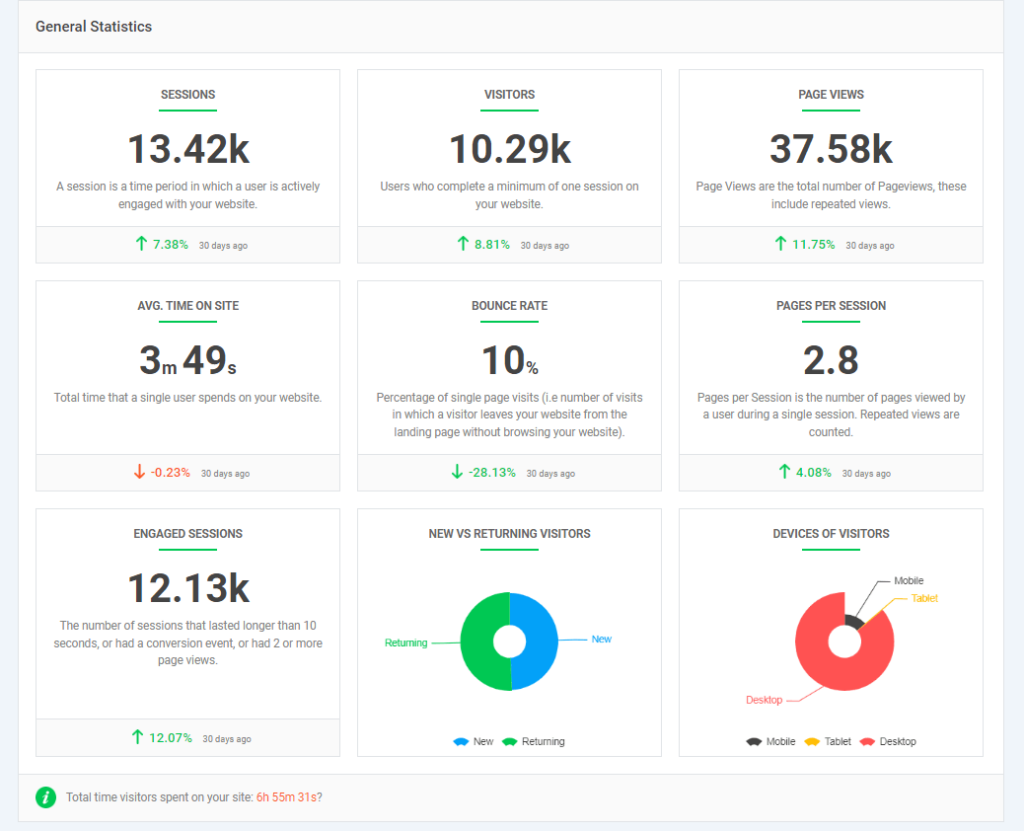
User-Friendly Interface: It presents data in a clear, concise, and visually appealing manner. It also provides easy navigation and filtering options to find the information you need quickly. Customizable dashboards allow you to monitor the most important metrics at a glance.
Enhanced Data Tracking: Tracks key events such as form submissions, button clicks, and scroll depth with its Event tracking add-on. Provides details about user engagement and content effectiveness.
Comprehensive Reporting: Provides a wide array of reports covering various aspects of website performance, including:
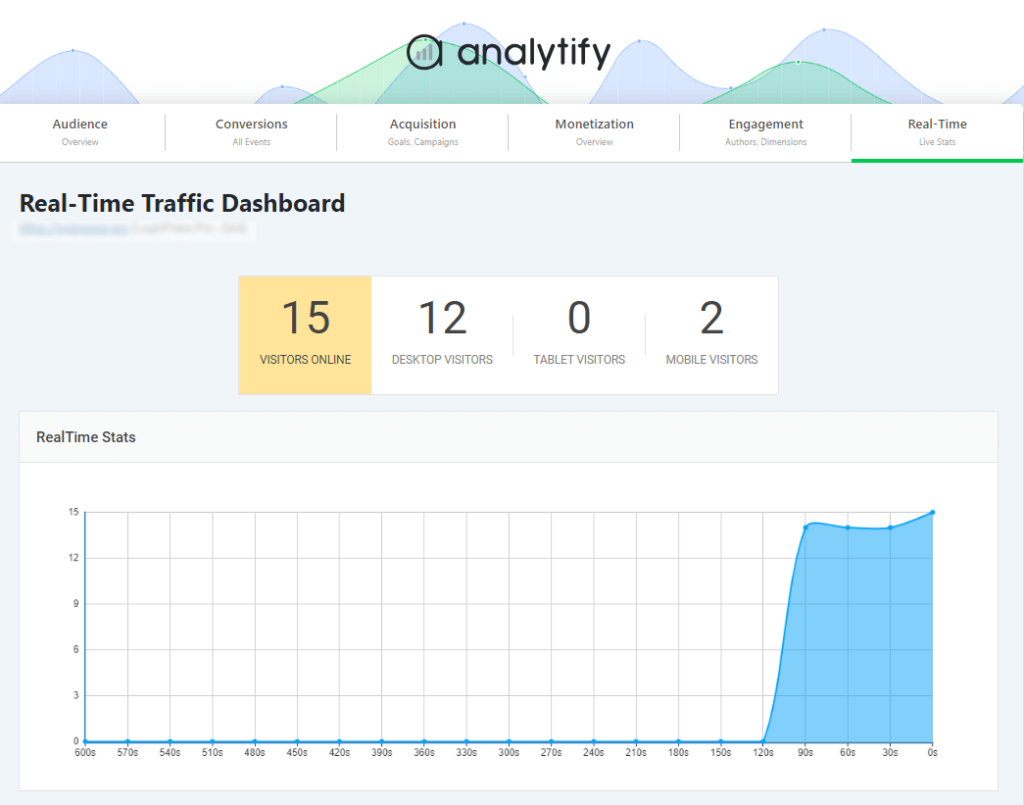
- Real-time Reports: Track website activity in real-time to understand current visitor behavior.
- Behavior Reports: Analyze how users interact with your content, including page views, bounce rates, exit pages, and more.
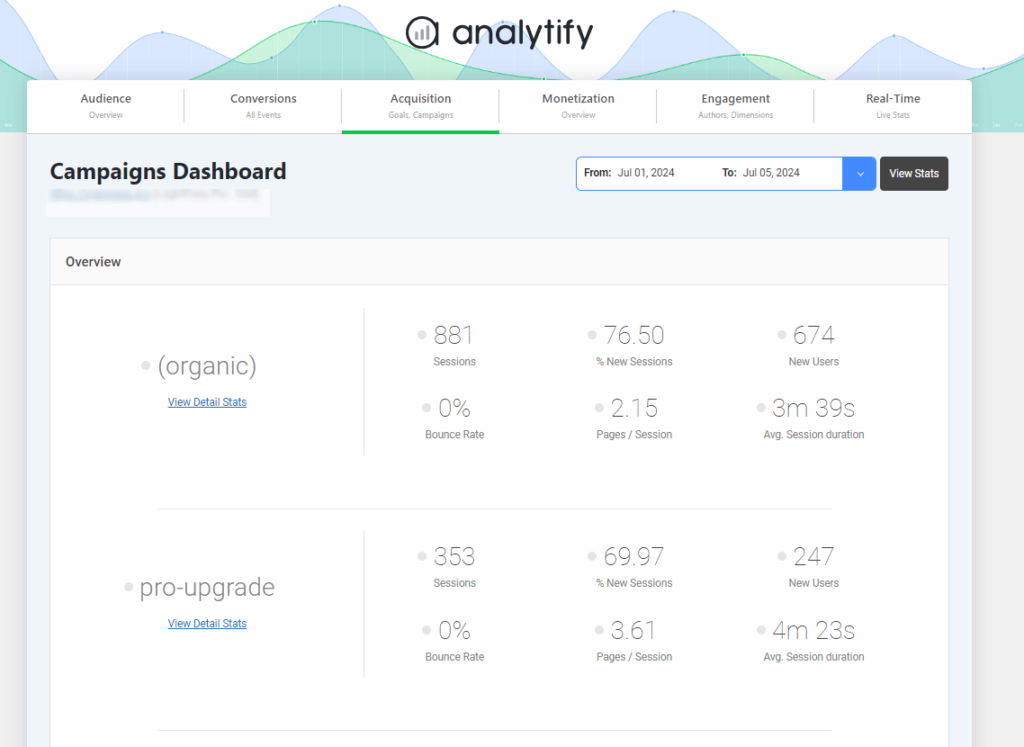
- Conversions Reports: Track goal conversions and monitor the effectiveness of your marketing campaigns.
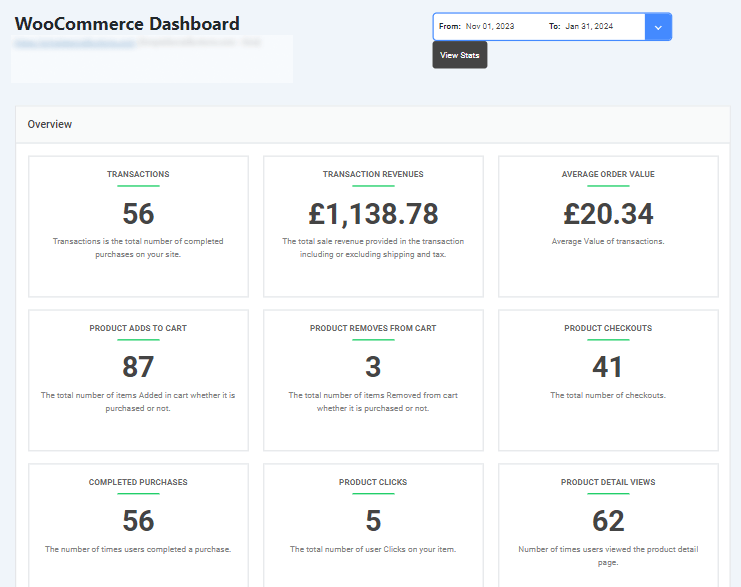
Analytify for WooCommerce:
For e-commerce businesses using WooCommerce, the Analytify plugin offers a dedicated WooCommerce addon that provides valuable knowledge about your online store’s performance. There are the following features of the woo-commerce add-on:
- Monitor key e-commerce metrics such as revenue, orders, conversion rates, and average order value.
- Identify top-selling products and understand customer purchasing behavior.
- Identify areas for improvement in your checkout process and reduce cart abandonment.
- Use this information to personalize marketing campaigns and improve customer satisfaction.
- Provides a comprehensive view of your e-commerce performance within the Analytify dashboard.
By utilizing the Analytify WooCommerce addon, you can better understand your e-commerce store’s performance, make data-driven decisions to optimize your sales strategies, and ultimately increase your revenue.
Google Analytics for Shopify FAQs
1. Can you use Google Analytics on Shopify?
Yes, you can integrate Google Analytics with Shopify to track customer behavior, analyze traffic, and optimize conversions.
2. Is Google Analytics worth it for Shopify?
Absolutely! It provides valuable information about customer journeys, marketing performance, and sales trends, helping you to enhance conversions.
3. How do you connect Google Analytics to Shopify?
To connect, get your GA4 Measurement ID, paste it into the Google Analytics section of your Shopify admin, and ensure enhanced eCommerce tracking is enabled.
4. What is the Google Analytics 4 Shopify connector?
The Google Analytics 4 Shopify connector is a third-party integration tool that simplifies connecting Shopify with GA4. These tools automate data tracking, such as e-commerce events, and ensure accurate reporting.
5. How do I track e-commerce activity on Shopify with GA4?
Enable enhanced e-commerce tracking in GA4 by:
Configuring GA4 settings to track events like add_to_cart, purchase, and view_item.
Using GTM to set up e-commerce tags and triggers.
6. How do I index my Shopify store on Google?
To index your Shopify store on Google:
Ensure your store is live and not password-protected.
Submit your sitemap (/sitemap.xml) to Google Search Console.
Optimize your site for SEO by adding unique titles, meta descriptions, and alt text for images.
Build backlinks and share your store link on social media.
7. How to setup Google Analytics 4 for Shopify?
Log into Shopify and navigate to Online Store > Themes > Actions > Edit Code.
Insert the GA4 tracking script with your Measurement ID in the <head> section of your theme’s code.
Alternatively, you can use Google Tag Manager to manage your GA4 tags efficiently.
Final Thoughts: Shopify GA4 Integration
Incorporating Google Analytics into your Shopify store is essential for gaining valuable details about customer behavior, optimizing marketing campaigns, and driving sales growth. This blog post explored various methods for integrating GA4 with Shopify, including the Google & YouTube Channel App, Google Tag Manager (GTM), GTAG, and Shopify Analytics Apps.
Remember to choose the best method for your technical expertise and business needs. Analytify is a user-friendly WordPress plugin that simplifies Google Analytics integration and offers comprehensive reporting tools to understand website performance and customer behavior.
Check out our dedicated guide on the Best e-commerce Digital Marketing Strategies & Tools for 2025 for details about essential tools and techniques to elevate your e-commerce tracking.
Do you have any questions? Feel free to share your experiences in the comments below!


