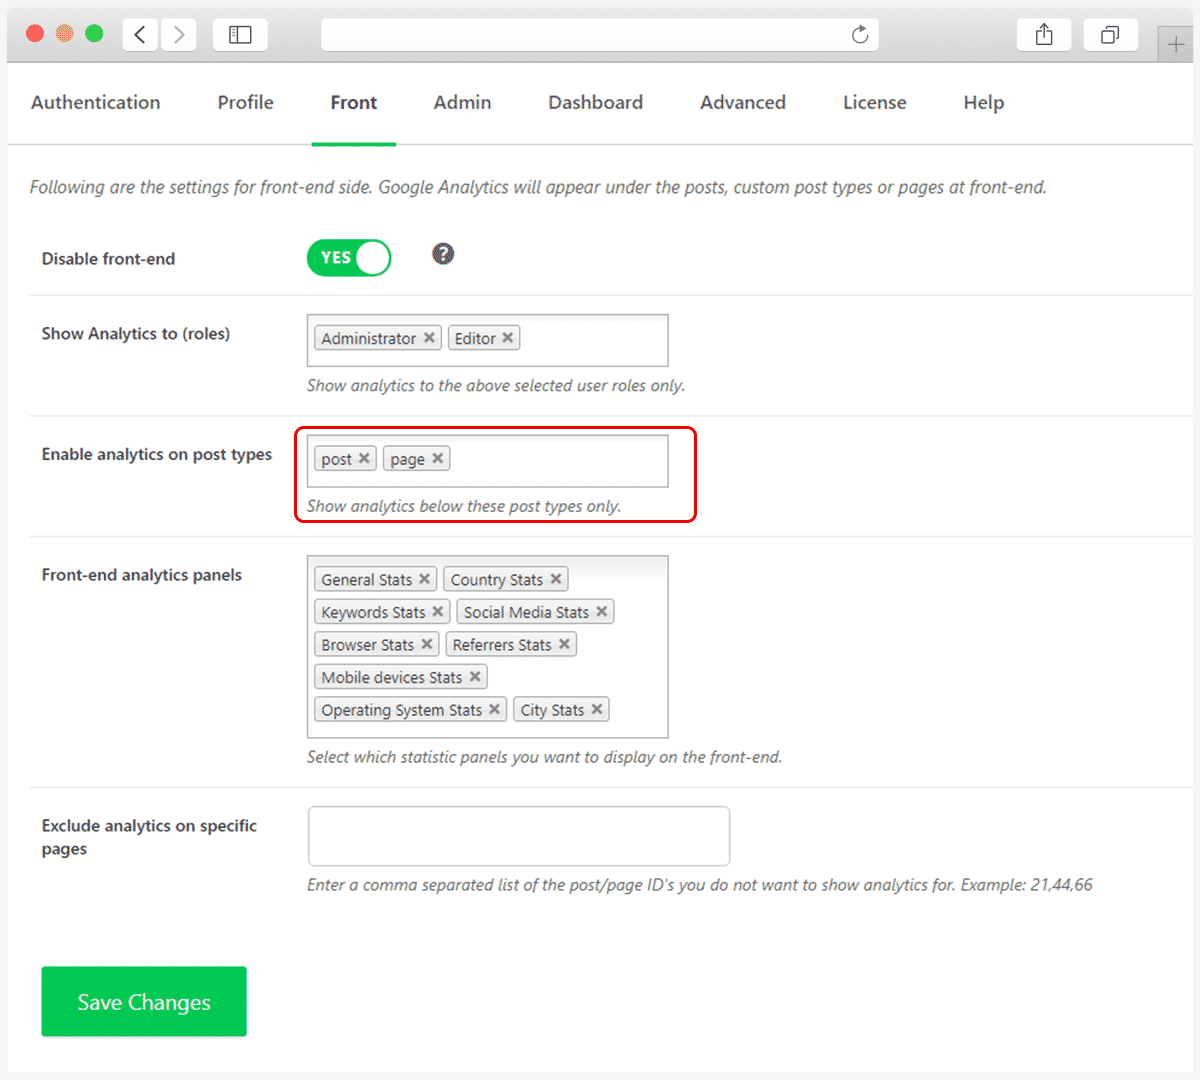
You can show the Analytics on specific post types for Front-End view in Analytify. For example, you have different post types on your website, Products, Testimonials, Portfolios you can show the Analytics on whatever post type you want for front-end view.
In order to show the Analytics at the front-end to specific roles
- Go to Analytify>Settings>Front
- Inside the Front tab see the Show Analytics to (roles) This will show you a Drop Down box, where you can select the different user roles.

Does your WordPress site has different post types, such as articles, properties, posts, pages, and products? If yes, you can show Analytics under all of them in your WordPress admin dashboard and you can customize Analytics panel for specific post type according to your preferences.
Let’s find out how to do this using Analytify.
Continue reading “How To Customize Analytics Panel under a Specific Post Type?” →
Are you concerned about securing your website’s analytics data, especially when your site is not HTTPS-enabled?
In the digital age, data security is paramount. For websites not using HTTPS, the concern often lies in whether their analytics data remains secure. Google Analytics, by default, encrypts data for HTTPS websites but not for those on HTTP. Fortunately, for users of the Analytify, there is a straightforward solution to enforce SSL encryption on analytics traffic, ensuring data security even on HTTP sites.
Continue reading “How to Force Analytics Traffic Over SSL Using Analytify?” →
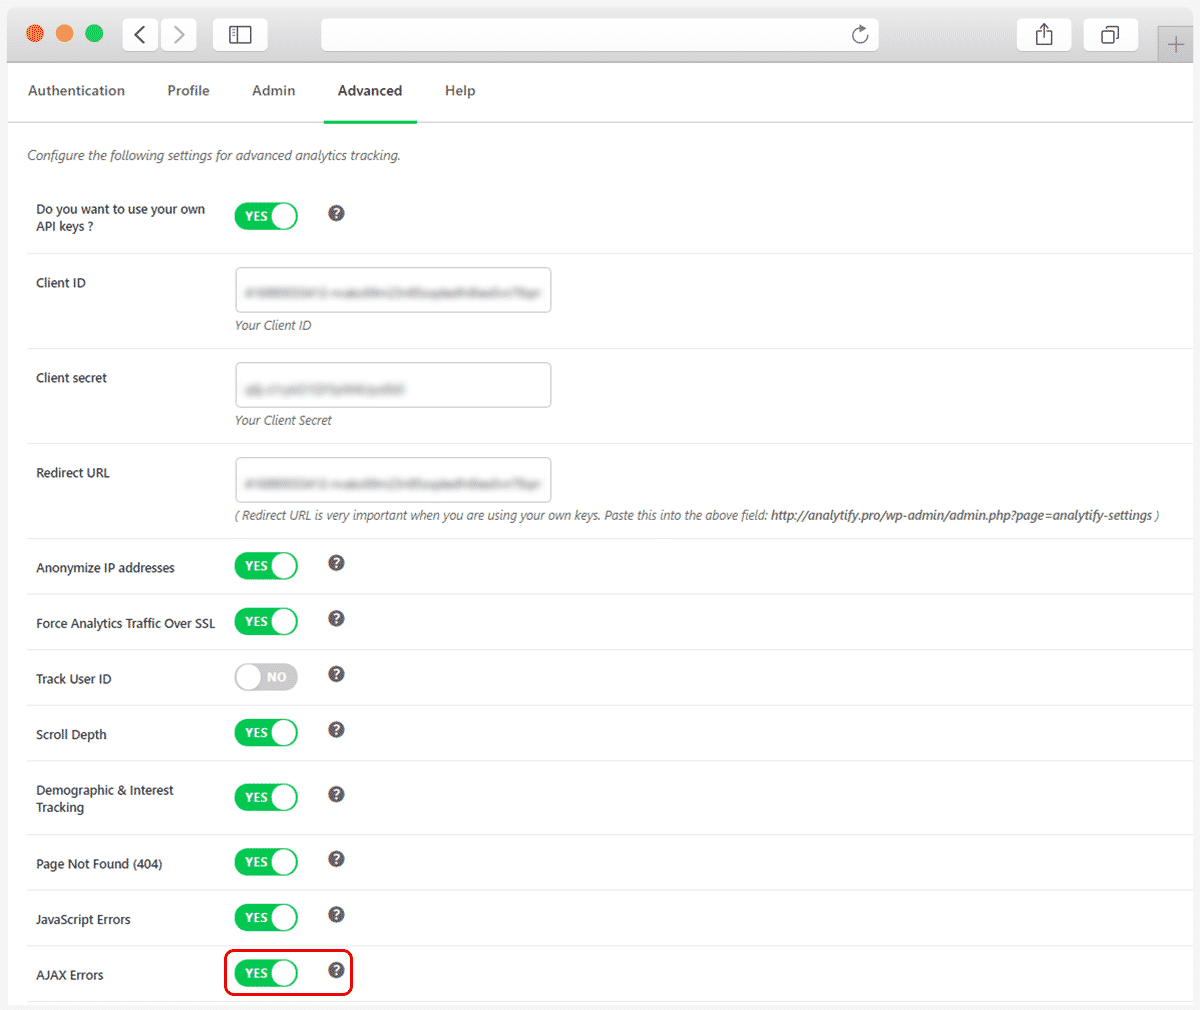
If you want to track all the AJAX Errors that are happening on your website. By tracking them you will be able to fix them easily. In Analytify you can easily track all website AJAX Errors by enabling the option of AJAX Error option.
In order to enable AJAX Errors tracking you need to follow the given steps
- Login to your WordPress dashboard
- Navigate for Analytify>Settings>Advanced
- Inside the Advanced look for the AJAX Errors
- Now enable the AJAX Errors option from No to Yes by click on the Toggle button.
- After enabling the AJAX Errors to click on save changes

That’s it!
This is how you can easily track and solve your website AJAX Errors with the Analytify plugin. Check our complete guide on how to track JS Error by using Analytify.
Are you looking for an efficient way to track JavaScript Errors and fix them on your WordPress website?
JavaScript (JS) errors can significantly hinder the functionality and user experience of a WordPress site. These errors can occur due to various reasons like coding mistakes, conflicts between plugins, or incompatibilities with different browsers. Identifying and resolving these errors is crucial for maintaining a smooth, error-free website experience for your users.
Continue reading “How to Track JavaScript Errors Using Analytify (Easy Way)” →
Tracking 404 pages, or error pages, is a necessary aspect of managing a website efficiently. When visitors face broken links or non-existent pages, it affects not only the user experience but also your site’s overall SEO health. Fortunately, with Analytify, enabling the tracking 404 pages is a straightforward process (Install and Activate Analytify). It provides valuable insights into broken links and missing content, enabling you to address these issues promptly. Here’s how you can activate 404 pages tracking in Analytify to keep your website running smoothly.
Continue reading “How to Enable Google Analytics 404 Pages Tracking?” →
Enabling the Google Analytics Demographics and Interest reporting is a game-changer for targeting your audience more effectively. With the Analytify plugin for WordPress, this process becomes very easy. Here’s a simple guide to help you activate this feature directly to enable demographics in google analytics from your Analytify’s WordPress dashboard.
Continue reading “How to Enable Google Analytics Demographics and Interest Reporting in Analytify” →
In the era of digital privacy, complying with regulations like the General Data Protection Regulation (GDPR) is crucial for website owners. A key aspect of GDPR compliance involves anonymizing visitor IP addresses in Google Analytics. If you’re using a WordPress website, the Analytify plugin simplifies this process. In this article, we will explain you how to anonymize IP addresses in Google Analytics using Analytify, ensuring GDPR compliance for your website.
Continue reading “How To Anonymize IP Addresses in Google Analytics for GDPR Compliance?” →
With the GA4 Scroll Depth feature, you can observe the scrolling activity of your users to see how far down they are scrolling your pages. You will be able to see the scroll percentage done by your visitors on your website. And you will have a better idea about the interaction of your visitors with your website. In this way, you will be able to improve your content layout and can find a better place for ads to display.
In this article, we’ll show how you can enable this feature in Analytify and track google analytics scroll depth for your WordPress site.
Continue reading “How to Enable GA4 Scroll Depth Tracking Inside Analytify?” →
Are you wondering how to manage the visibility of your website analytics? Whether you want to display analytics data on the front end of your WordPress site or keep it hidden, understanding how to toggle this feature in Analytify is essential. Here’s a straightforward guide to help you control the front-end analytics display with ease.
Continue reading “How to Enable and Disable the Analytics at Front-End?” →


