
GA4 Segments Explained: Beginner’s Guide (2026)

I still remember the first time I clicked “Explore” in GA4. I expected a report. I got a blank canvas instead, with no obvious place to start.
If your manager just asked you to “pull a segment” and you have no idea where that lives, you are not missing something obvious. GA4 moved segments out of the standard reports and buried them inside Explore, and nothing in the interface tells you that up front.
By the end of this guide, you will know exactly what a GA4 segment is, how to build one in under five minutes, and when to reach for a segment instead of an audience. I will walk you through the definition, the build steps, segments versus audiences, a worked new-vs-returning example, and where to check that comparison without reopening Explore every single time.
GA4 Segments (TOC):
What Is a GA4 Segment?
A GA4 segment — the short name analysts use for Google Analytics 4 segments — is a subset of your Google Analytics 4 data, isolated by user, session, or event conditions, that you can analyze inside an Explore report. Instead of looking at your entire audience as one block, a segment lets you pull out just the people, sessions, or actions that match a rule you set.
Segments matter because averages hide patterns. Your overall conversion rate might look flat, but a segment can show you that new visitors convert at half the rate of returning ones.
I use segments any time a blended number stops telling me anything useful. Once I split traffic into the right group, the actual problem usually shows up in a few minutes instead of a few hours of guessing.
For the official breakdown of how Google defines segment types and scopes, see Google’s GA4 segments documentation.
What Are the 3 Types of GA4 Segments?
Google Analytics 4 offers three segment types: user, session, and event, and each one filters a different slice of your data. Picking the right scope changes what the numbers actually mean.
| Segment Type | What It Filters | Example |
|---|---|---|
| User segment | All data from users who match the condition, across every session | Users who added a WooCommerce item to cart at any point |
| Session segment | Only the sessions where the condition happened | Sessions that included a cart add, but not the user’s other visits |
| Event segment | Only the individual events that match | Just the add-to-cart events themselves, isolated from the session |
A user segment follows someone across visits. A session segment isolates one visit. An event segment isolates one action. Mixing these up is the fastest way to misread your data.
How Do You Create a Segment in GA4?
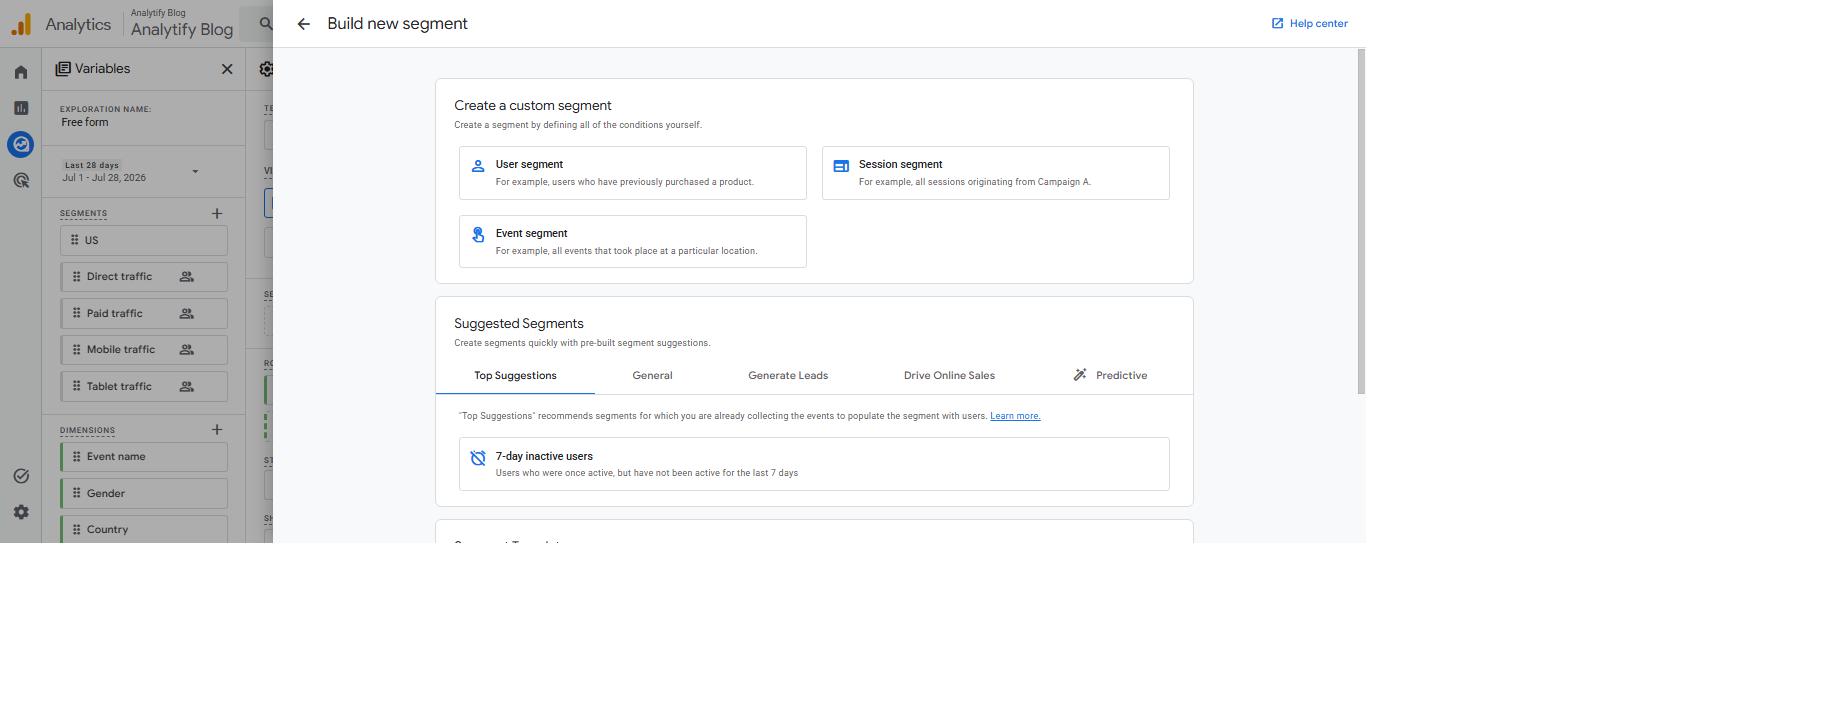
You create a GA4 segment inside an Explore report by opening the Segments panel and clicking the plus icon. Segments only exist inside Explore. They will not show up in your standard reports.
Here’s how to create a segment in GA4, step by step:
- Open Explore in the left navigation, then select Free Form.
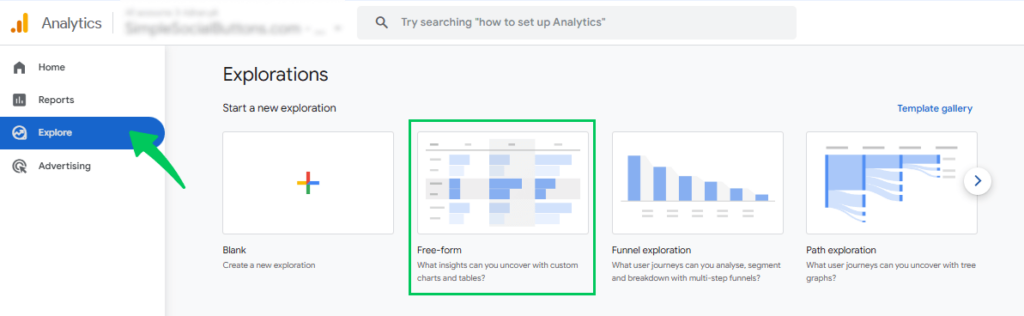
- Find the Segments panel on the left side of the exploration.
- Click the + icon next to Segments.

- Choose a segment type: User, Session, or Event.
- Set your conditions (for example, a specific page, event, or user property).
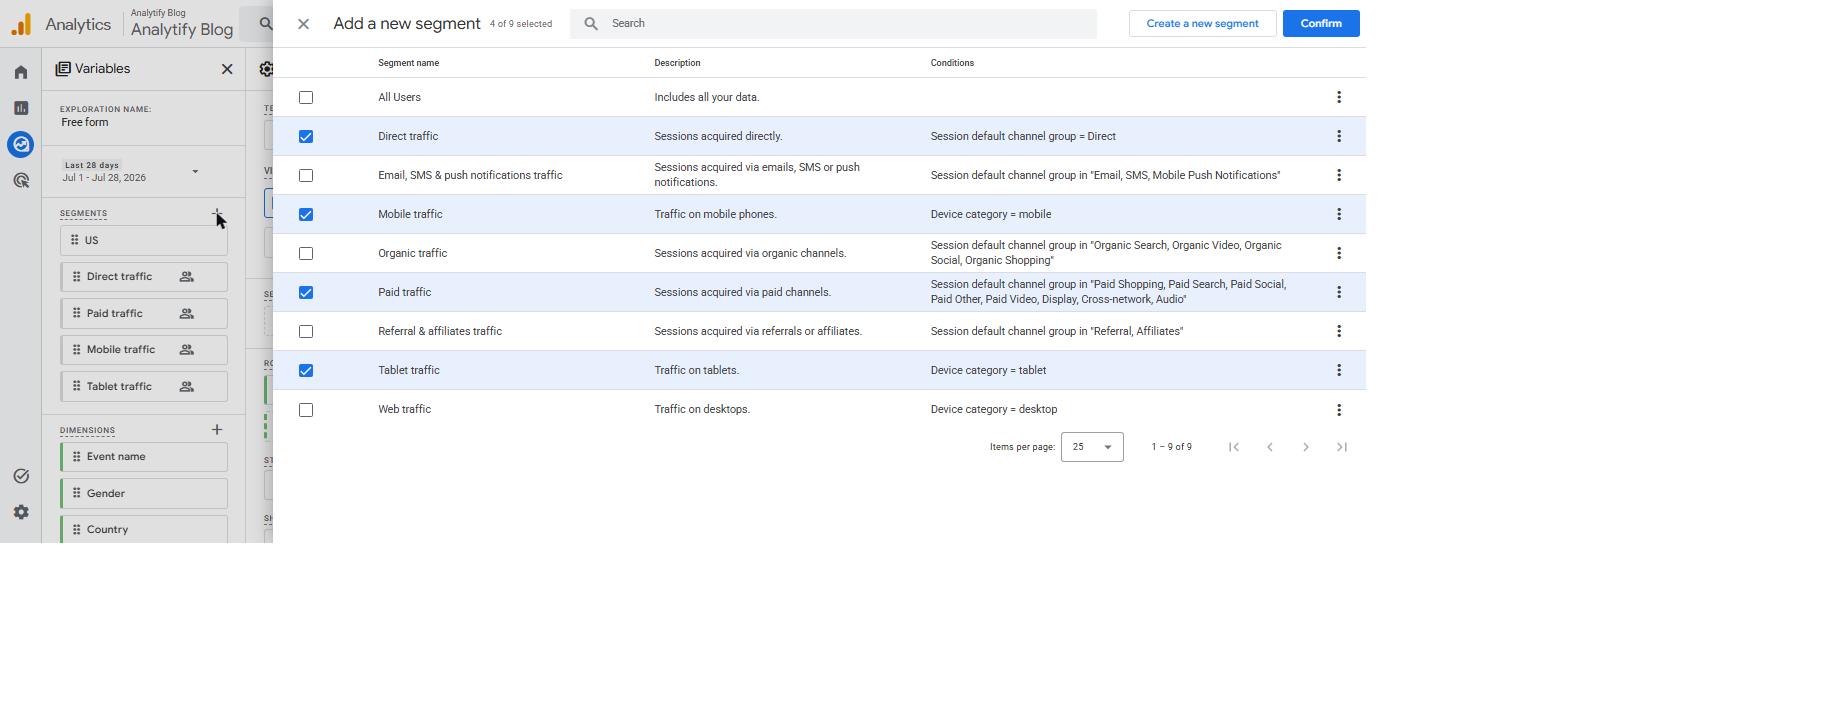
- Click Save and Apply to add the segment to your exploration.
Step-by-Step: Building Your First Segment
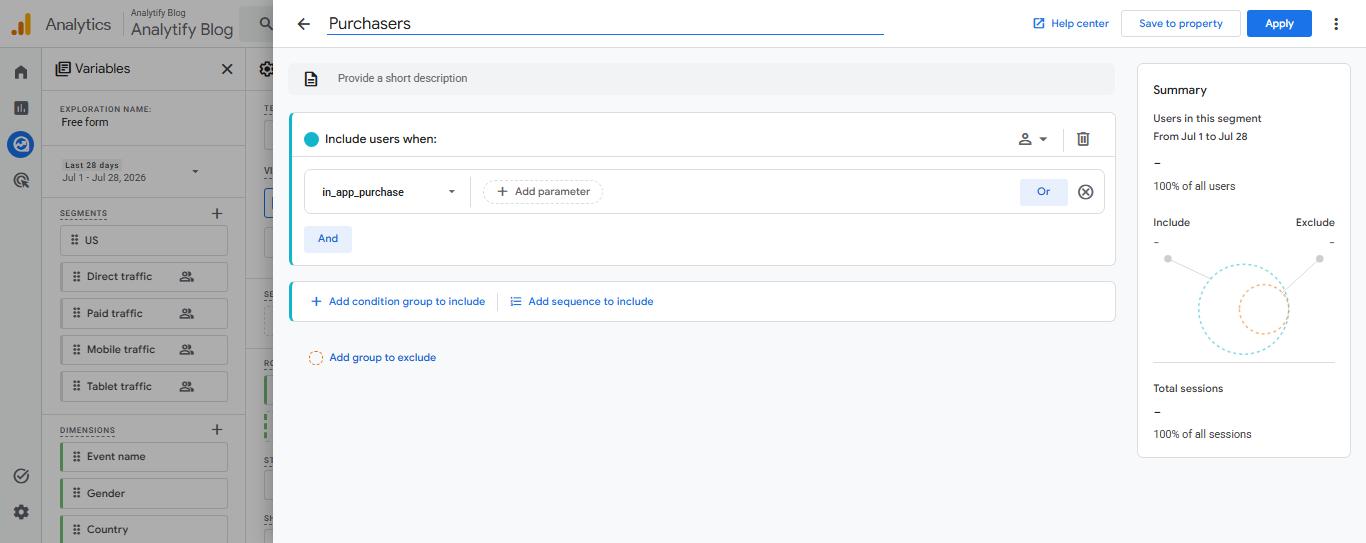
Say you run a WooCommerce store and want to compare buyers against all traffic. Build a User segment for people who completed a purchase, using the purchase event as your condition.
Name the segment something readable, like “Purchasers,” before you save it. Default names are hard to tell apart once you have built a few.
This segment only applies inside the exploration where you built it. It will not automatically appear anywhere else.
Common Mistakes When Creating a Segment
Three mistakes trip up most beginners.
The first is confusing segments with filters. A filter changes what data GA4 collects going forward, while a segment only changes what you see in the current exploration. If you want to control future data collection, that’s a filter job, not a segment job.
The second is expecting a segment to show up in standard reports. Segments live only in Explore. If you want to filter data in a standard report like Traffic Acquisition, use the Comparisons feature instead.
The third, and the one our team runs into most, is picking the wrong scope for the question you’re asking. A session segment won’t show all-time user totals, so the numbers can look smaller than expected even though nothing is broken. Match the scope- user, session, or event- to what you’re actually trying to measure, and this problem goes away.
GA4 Segments vs Audiences: What’s the Difference?
GA4 segments filter historical data for analysis inside Explore, while audiences are forward-looking user lists built for marketing and ad targeting. The two solve different problems even though they both group users by conditions.
| Feature | Segments | Audiences |
|---|---|---|
| Purpose | Analyze past data | Build lists for targeting |
| Where it’s used | Explore reports only | Standard reports, Google Ads, remarketing |
| Retroactive or not | Retroactive (looks at past data) | Prospective (starts collecting from creation date) |
| Shareable to Google Ads | No | Yes |
Use segments when you are analyzing behavior that already happened. Use audiences when you want to reach those users again through ads.
A quick way our team remembers the split: segments answer “what happened,” audiences answer “who do we talk to next.” Building both for the same group is common. You might segment purchasers to study their behavior, then build a matching audience to remarket to them.
How Do You Segment New vs Returning Users in GA4?
You segment new vs. returning users in GA4 by building two User segments on the New / returning dimension, one set to new and one set to returning. This new vs returning users segment is one of the most common segments beginners build first.
- Open a Free Form exploration and click the + icon in the Segments panel.
- Choose User segment.
- Set the condition to the New / returning dimension, value: new.

- Save this segment, then repeat the process for a second segment set to returning.
- Apply both segments in the same exploration.
- Add engagement or conversion metrics as columns to compare the two groups side by side.
If you just need a quick, no-setup version, GA4’s standard Acquisition report already shows a basic new-vs-returning split without building anything.

For more on reading this split, see our guide on new vs returning users in analytics.
Where Can You Check This Without Rebuilding It in Explore Every Time?
Analytify shows the New vs Returning Users breakdown directly on your WordPress dashboard, so you don’t have to reopen Explore and rebuild the segment each time you want to check it. If switching between WordPress and GA4 every day to check the same comparison is eating your time, this is built for exactly that.
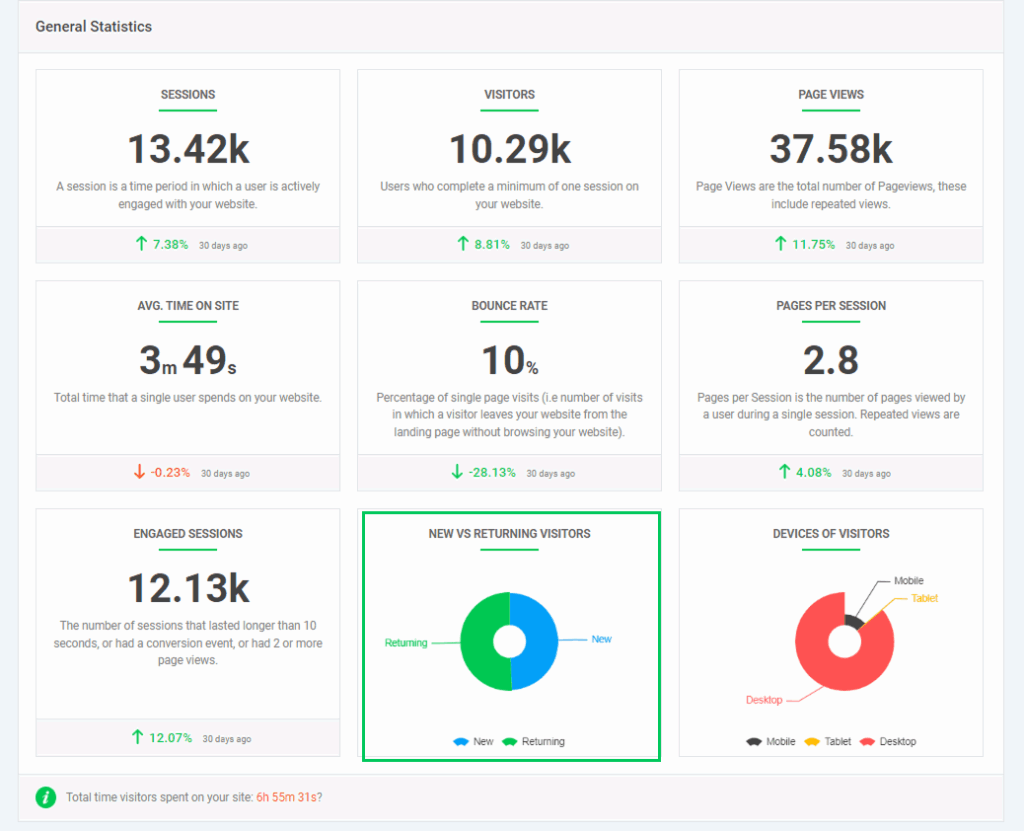
Once you connect GA4 to WordPress with Analytify, Analytify pulls pre-built comparisons like new vs returning users straight into your dashboard, so there’s no Explore report to open.
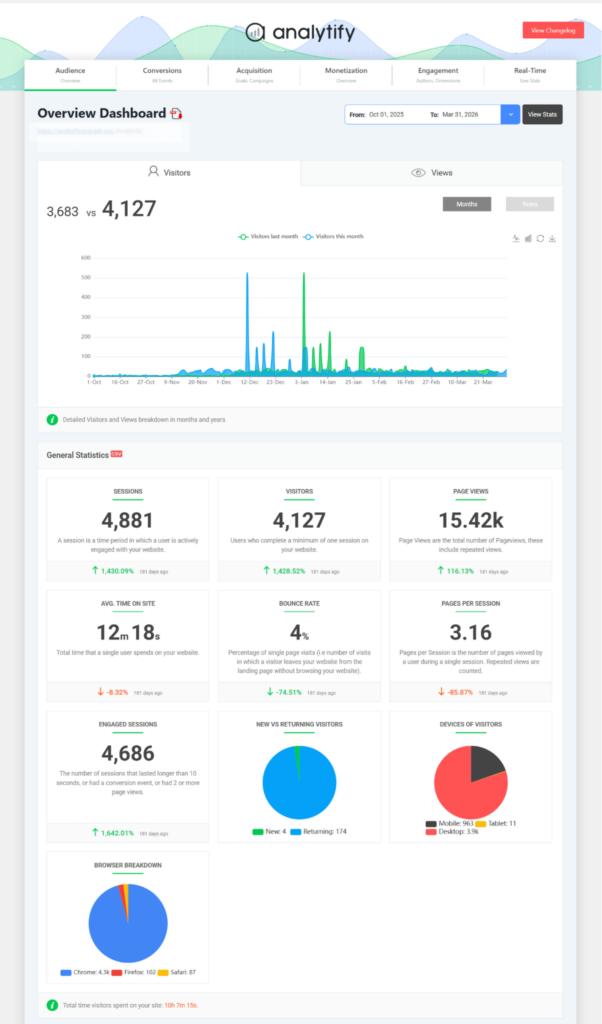
I want to be upfront about the limits here. Analytify presents GA4 data inside WordPress, but it can’t build custom segments for you. For advanced or one-off segment work beyond what Analytify already shows, you’ll still need to open Explore.
Common Questions About GA4 Segments
Here are the questions our team gets asked most often about GA4 segments.
1. How do I create a segment in GA4?
You create a GA4 segment inside an Explore report. Open Explore, select Free Form, then click the plus icon next to Segments. Choose User, Session, or Event, set your conditions, and click Save and Apply. The segment only works inside that exploration unless you rebuild it elsewhere.
2. What’s the difference between GA4 segments and audiences?
Segments filter data you’ve already collected, and they only work inside Explore reports. Audiences start collecting users from the moment you create them and can sync to Google Ads for remarketing. Use segments to analyze past behavior and audiences to target future campaigns.
3. How can I segment new vs returning users in GA4?
Build two User segments using the New / returning dimension. Set one segment’s condition to new and the other to returning, then apply both inside the same exploration to compare their behavior side by side. GA4’s standard Acquisition report also shows this split without any segment setup.
4. Why don’t my GA4 segments show up in standard reports?
Segments only work inside Explore reports, not standard reports like Traffic Acquisition or Engagement. If you need to filter data in a standard report, use the Comparisons feature instead, which pulls from a smaller set of pre-built dimensions.
5. Can you share a GA4 segment with another exploration or team member?
No. A segment created in one exploration stays in that exploration and can’t be copied to another automatically. You’d need to rebuild the same conditions manually in each new Explore report, or convert the logic into an audience if you need it to persist.
GA4 Segments: Conclusion
A GA4 segment lets you isolate a subset of users, sessions, or events inside Explore so you can see patterns that aggregate reports hide, starting with a simple new-vs-returning comparison. If your WordPress login page still looks like the default install, LoginPress gives it the same kind of polish your analytics dashboard already has.
Here’s what I would do next:
- Open Explore, create a Free Form report, and build your first User segment using the steps above.
- Compare new vs. returning users using the New/Returning dimension to see which group actually converts.
- Check whether Analytify already shows the comparison you need on your WordPress dashboard before rebuilding it in Explore again.
Further Readings: