Tracking Button Clicks with Google Tag Manager (2026 Guide)

To track button clicks in Google Tag Manager, turn on the built-in Click variables, create a Click trigger that matches your CTA, then build a GA4 event tag on that trigger. Test it in Preview mode and publish. Every click then lands in GA4 as an event, with no extra code.
Every “Sign Up,” “Buy Now,” or “Download” button is a conversion chance. Without tracking, you cannot tell which buttons work and which need fixing.
GTM captures these clicks and sends the data straight to Google Analytics. That gives marketers clear insight into CTA performance, engagement, and conversion rates.
In this guide, I will show you the GTM button click tracking setup, from enabling triggers and variables to sending events into GA4. We’ll also cover Debugging testing tips, best practices, and a simpler alternative with Analytify for WordPress users.
Let’s get started!
GTM Button Click Tracking (TOC):
What is Google Tag Manager and Why Use It for Button Click Tracking?
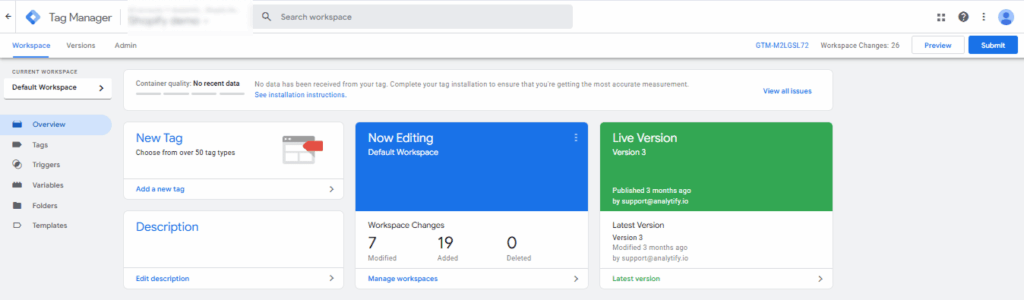
Google Tag Manager (GTM) is a free tool from Google that lets you manage all your website’s tracking codes, also called tags, in one place. Instead of adding separate code for things like Google Analytics, ads, or events, you just add GTM once to your site. From there, you can create and update tags directly in the GTM dashboard, no coding needed.
This means you don’t have to ask a developer every time you want to track something new, like button clicks or form submissions. GTM provides a simple, user-friendly interface for setting up and managing tracking independently.
How Does It Work?
Once the GTM container code is installed on your website, you can add different tags (like tracking button clicks, form submissions, or conversions) inside the GTM interface.
GTM then fires these tags when the right action happens on your site. For example, if someone clicks your “Sign Up” button, GTM can send that data straight to Google Analytics. This makes it much easier to track user interactions and keep everything organized without relying on a developer each time.
One of the most common uses of GTM is tracking button clicks. Every website relies on buttons like “Sign Up,” “Download,” or “Buy Now” to drive actions. Tracking these button clicks helps you see how users interact with your Calls to Action (CTAs). With GA4 button click tracking with GTM, you can capture these interactions and measure their impact more effectively.”
If people are clicking, you know your CTA is compelling. If they aren’t, it’s a sign that the button design, placement, or wording might need improvement.
Key Benefits for Marketers and Web Developers
Google Tag Manager button click tracking benefits marketers and developers in four ways: no-code setup, centralized control, clearer CTA insights, and fast flexibility to add new tags.
- No coding required: Marketers can set up tracking themselves without depending on developers.
- Centralized control: All tracking codes are managed from one place, reducing errors and clutter.
- Better insights: Button click event tracking GTM provides valuable insights on how users engage with CTAs, which helps in improving conversions.
- Flexibility: Easily add new tracking codes for analytics, ads, or testing tools anytime.
How to Set Up Google Tag Manager for Button Click Tracking (Step by Step)
Setting up GTM button click tracking takes six steps: confirm prerequisites, turn on click variables, create a trigger, build the GA4 event tag, test it, then publish.
Prerequisites
Before setting up Google Tag Manager button click tracking, ensure you have the following things ready for a smooth setup.
- A Google Tag Manager account and container: GTM must already be installed on your website, with the container snippets added to every page.
- Google Analytics 4 access: Either your GA4 measurement ID or an existing GA4 Configuration tag set up in GTM so that events can be sent to Analytics.
- Editor-level access in GTM: You’ll need permission to create and edit variables, triggers, and tags within your GTM account.
Turn on Click Variables
- Open GTM and click on Variables.
- Click Configure (in Built-In Variables).
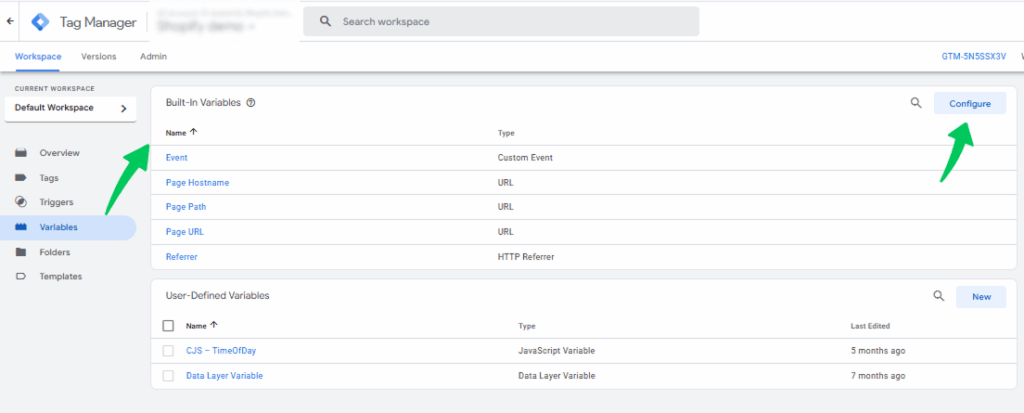
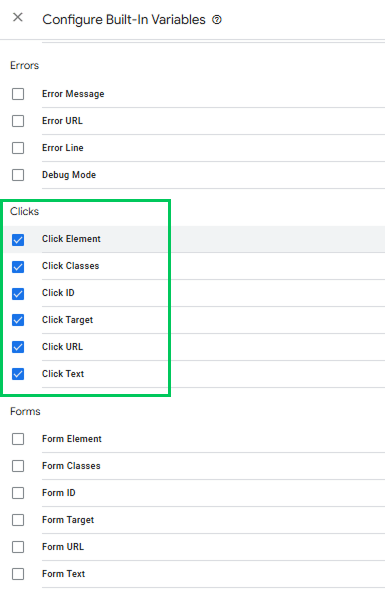
- Enable all the built-in click variables such as Click ID, Click Classes, Click Text, Click URL, and Click Element. These GTM click variables explained what was clicked.
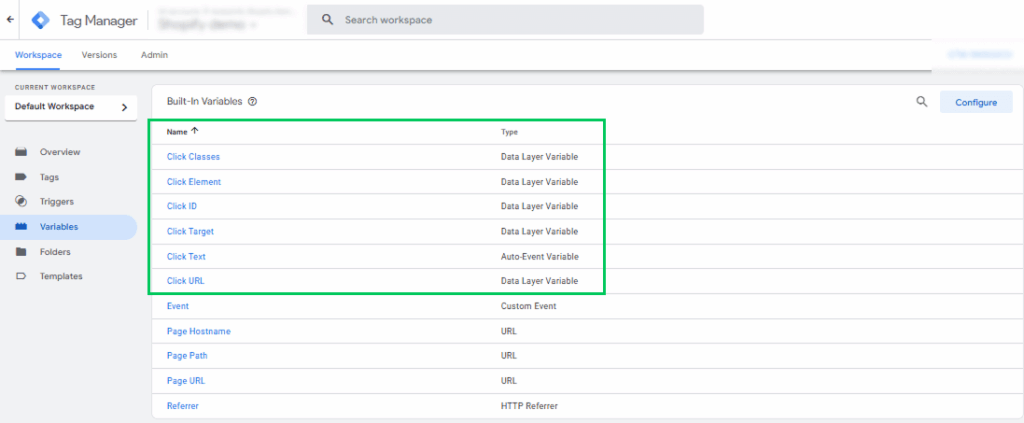
- Once enabled, they’ll appear in your active variables list, ready to be used for button click tracking.
Create a Trigger for Button Clicks
Triggers decide when a tag should fire.
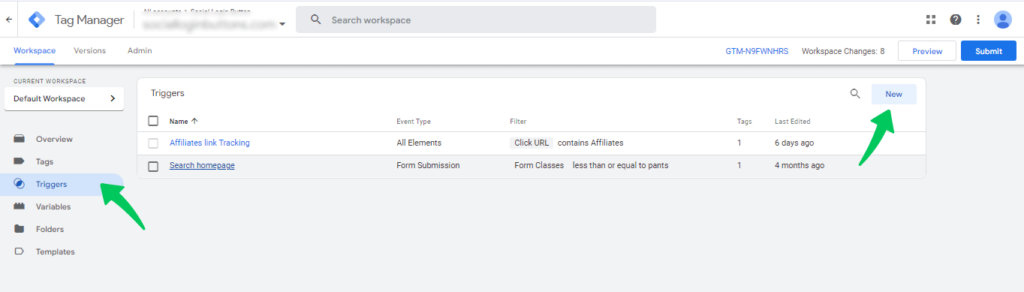
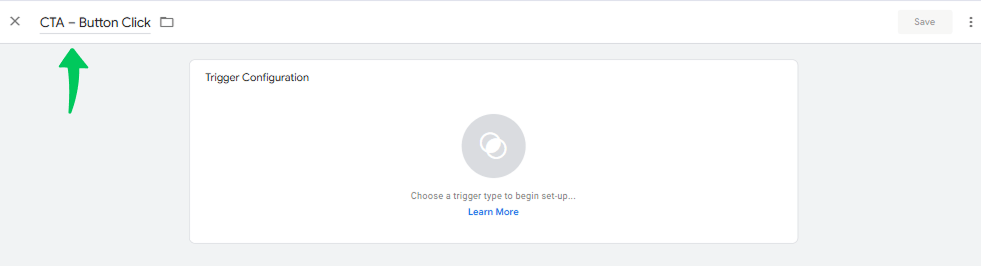
- To create one, open the Triggers section in Google Tag Manager and click New.
- Give it a clear name, such as CTA – Button Click.
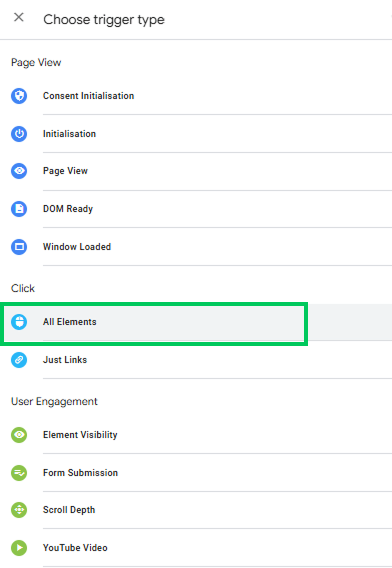
- Next, choose the trigger type. If you want to track clicks on any button or element, select Click – All Elements. If you only want to track anchor links (<a> tags), choose Click – Just Links.
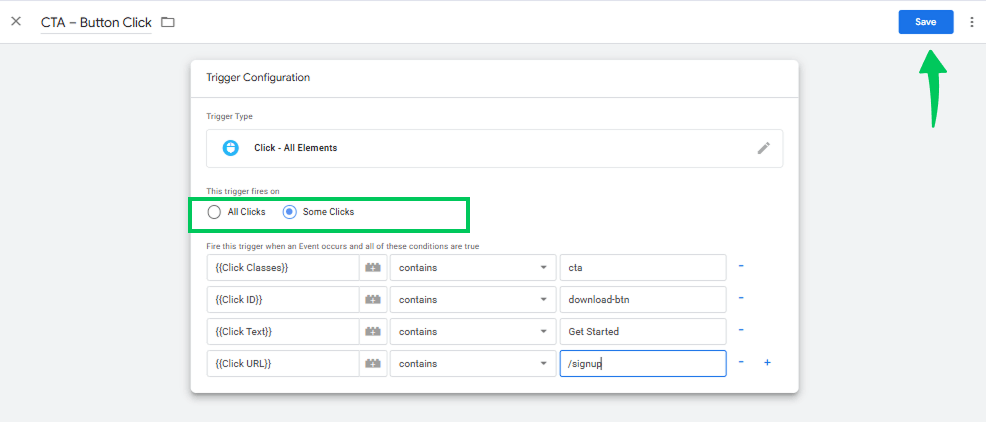
- Set it to fire on Some Clicks and add a rule that matches your CTA. Examples:
- Save the trigger.
Tip: If possible, add a clear class or ID to your CTA (like class=”btn-cta” or id=”cta-download”), which makes rules reliable.
Create the Tag (Send the Event to GA4)
To send button click data to Google Analytics, you need to create a new tag in GTM.
- Start by opening the Tags section and creating a new tag.
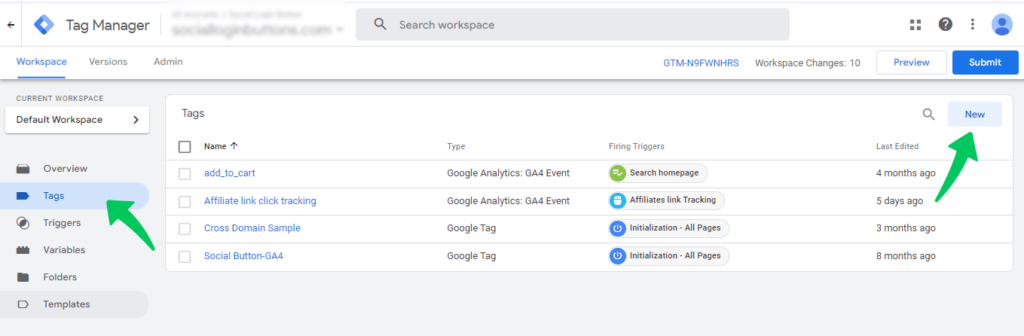
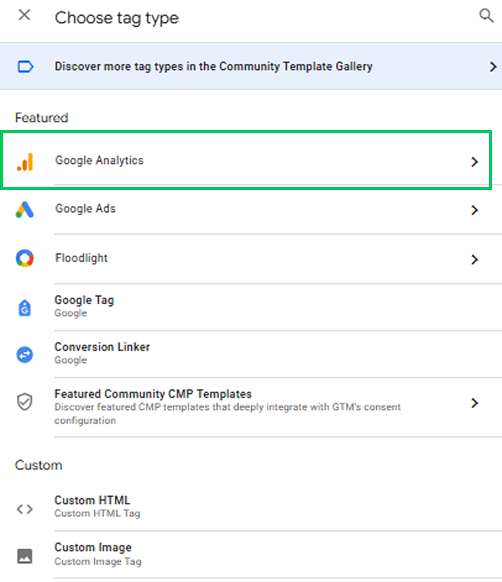
- Choose Google Analytics as the tag type.
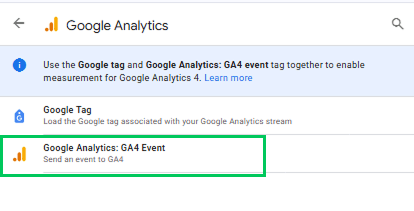
- Then, choose the GA4 event.
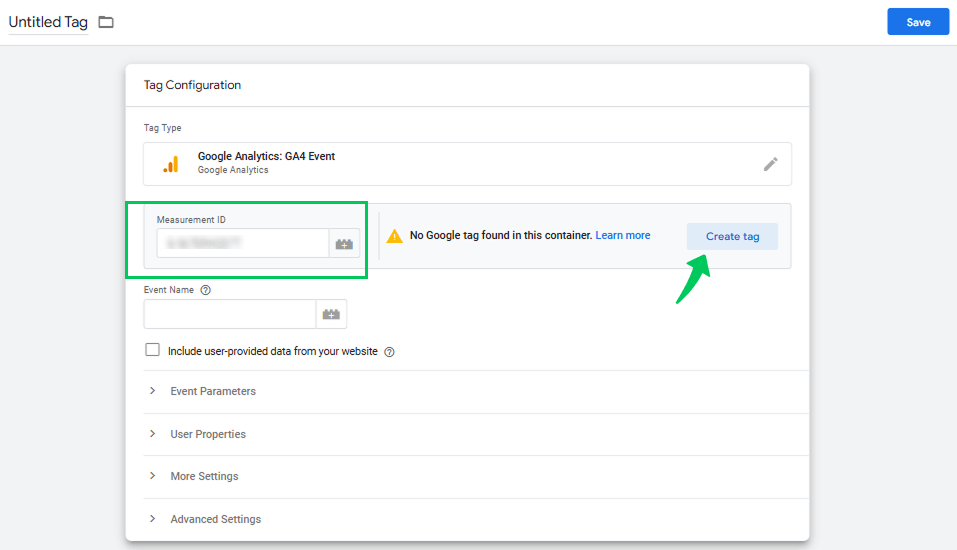
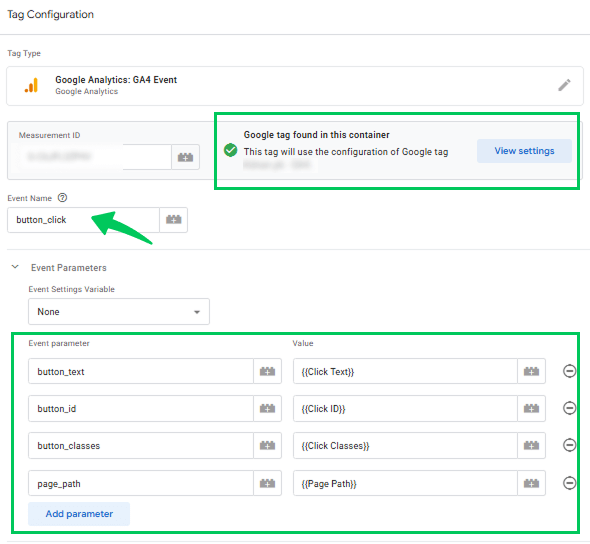
- For the configuration, enter your GA4 measurement ID. If you see a yellow warning icon with the message No Google tag found in this container, it means you don’t have a GA4 configuration tag yet. In that case, click on Create Tag.
- Set up the Google Tag configuration first before proceeding.
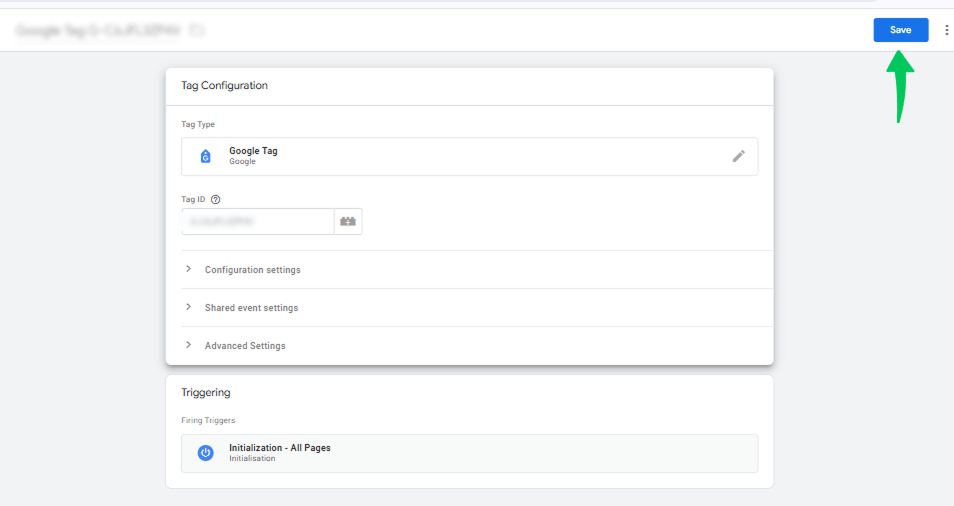
- Then, after its configuration, the icon will turn green with the label Google tag found in this container.
- Next, define the event name. Use something simple and descriptive like cta_click or button_click. Stick to lowercase letters, and use underscores if needed.
- Add useful parameters so you capture extra details in GA4, for example:
- button_text → {{Click Text}}
- button_id → {{Click ID}}
- button_classes → {{Click Classes}}
- page_path → {{Page Path}}
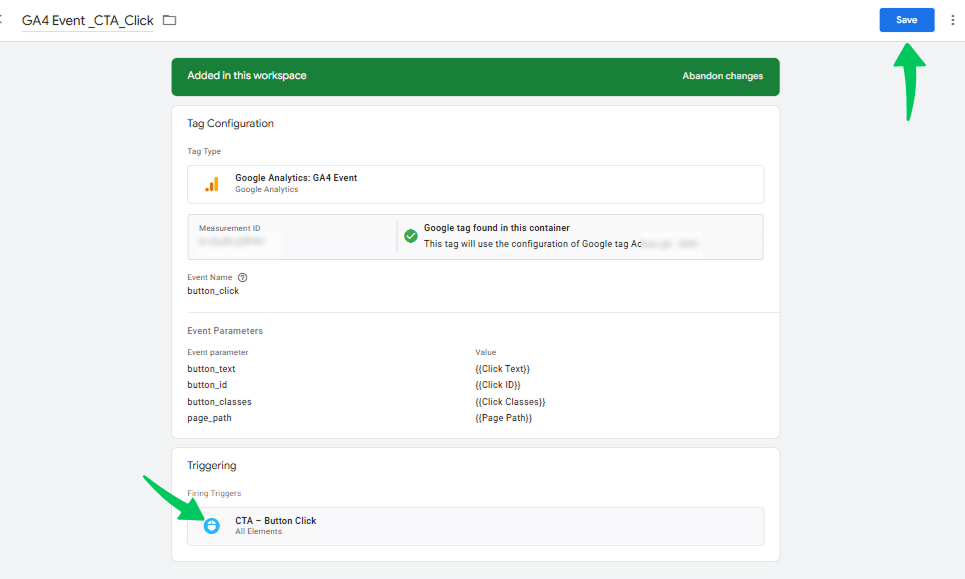
- Assign the click trigger you created earlier (the CTA trigger) so the tag fires when the button is clicked.
- Give the tag a clear name, such as GA4 Event – cta_click.
- Then, save your tag configuration.
Test the Setup
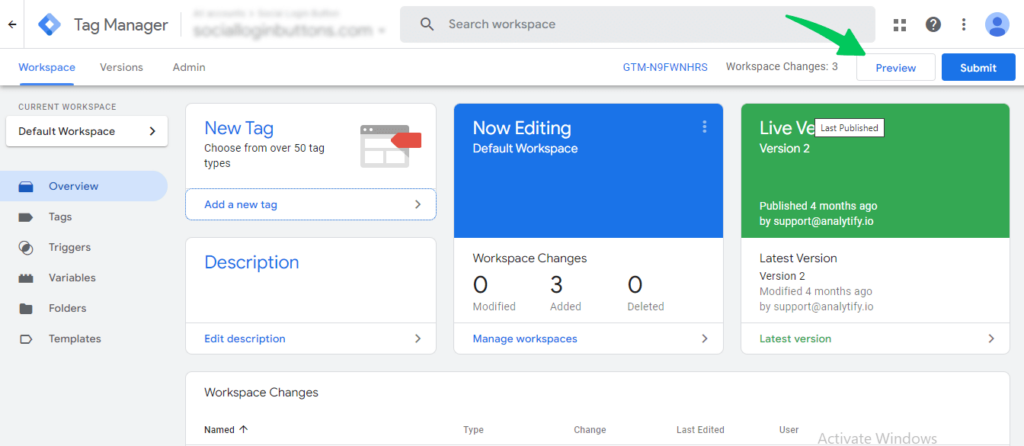
- Go to your Google Tag Manager dashboard and click Preview.
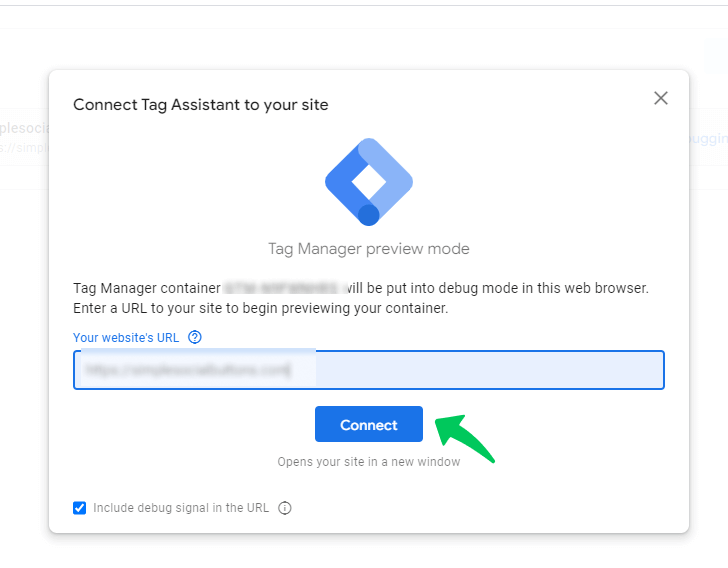
- Enter your website URL in the Tag Assistant window and click Connect. This will open your site in a new tab with GTM debug mode enabled.
- While the preview mode is active, go to your site and click the button (e.g., Get Started or Download).
- In Tag Assistant, confirm the trigger fired and the GA4 Event tag ran.
- Then, open your GA4 property, go to Admin >> DebugView or Reports >> Realtime to see the event appear and check the event parameters.
Publish
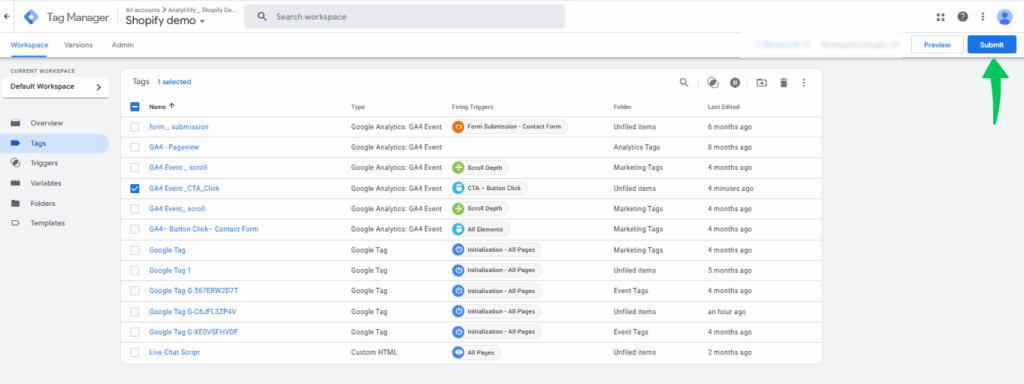
Once your testing is complete, publish the setup to go live.
- In GTM, click Submit.
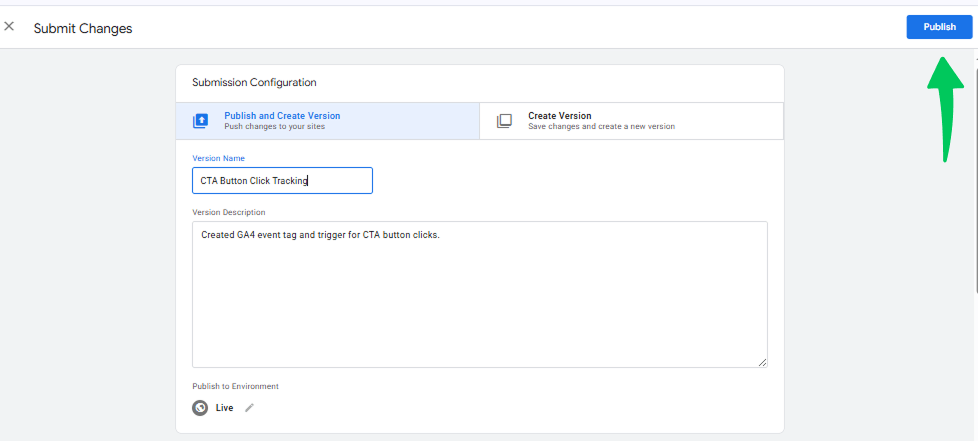
- Add a name for the version, for example: CTA Button Click Tracking.
- Add a short description such as: Created GA4 event tag and trigger for CTA button clicks.
- Click Publish to make the changes active on your site.
| Click Variable | What It Captures | Example |
|---|---|---|
| Click Text | The visible text of the clicked element | “Buy Now” |
| Click ID | The element’s HTML id attribute | download-btn |
| Click Classes | The element’s CSS class list | btn-cta |
| Click URL | The href of a clicked link | /signup |
| Click Element | The full clicked DOM element | button.btn-cta |
Best Practices for CTA Buttons
The best practice for CTA tracking is to give every button a distinct ID or class, then keep event names and parameters consistent across pages.
- Give CTAs distinct IDs or classes (id=”cta-buy”, class=”btn-cta”).
- Use a descriptive event name and parameter values (e.g., cta_click, cta_name: “download_pdf”).
- Track only meaningful CTAs to avoid noisy data.
- Keep naming consistent across pages (same class or data attribute for similar CTAs).
Understanding GTM Click Triggers and Variables
Triggers and variables are the two parts that make GTM click tracking work. Triggers decide when a tag fires; variables supply the click details, like button text or ID.
- Click triggers tell GTM when to fire a tag. For example, a Google Tag Manager click trigger can be set to fire whenever someone clicks on a specific CTA button, a download link, or any other element on your page.
- Click variables provide the details about what was clicked. These include information like the button text, the button’s ID, or the page URL. With GTM click variables explained, it becomes clear how enabling these variables helps you create precise conditions for your triggers.
In simple terms, triggers decide when tracking should happen, while variables provide the what and where details. Together, they make button click tracking accurate and reliable.
| Trigger Type | Best For |
|---|---|
| Click – All Elements | Any clickable element: buttons, divs, spans |
| Click – Just Links | Anchor (<a>) tags only |
| Some Clicks (with a rule) | Firing on one specific CTA instead of every click |
Debugging and Testing GTM Button Click Tracking
Debug GTM button click tracking with Preview mode before you publish, so you can confirm triggers and tags fire correctly and the data reaches Google Analytics.
1. Use GTM Preview Mode
Open your GTM workspace and click Preview. Enter your website URL and connect. This will load your site in debug mode, showing a Tag Assistant panel where you can see which triggers and tags fire when you click a button.
2. Check Click Variables
While testing, click your CTA button and look at the variables in the debug panel. Make sure values like Click Text, Click ID, or Click Classes match what you set in your trigger conditions. If they don’t, adjust your trigger to accurately track CTA clicks with GTM.
3. Verify Tag Firing
In the debug panel, check if your tag fired when the button was clicked. If it didn’t, review your trigger setup to ensure conditions are correct.
4. Confirm in Google Analytics
Open GA4 and use Realtime or DebugView to confirm that the event appears there. Look for the event name (for example, cta_click) and any parameters you added, such as button text or page path.
5. Troubleshoot Common Issues
- If nothing shows up, make sure GTM is installed properly on your site.
- If the wrong clicks are being tracked, refine your trigger conditions with a more specific ID, class, or text.
- If tags fire in GTM but not in GA4, double-check your GA4 configuration tag or measurement ID.
| Symptom | Likely Cause | Fix |
|---|---|---|
| Nothing shows up | GTM container not installed correctly | Verify the GTM snippet is on every page |
| Wrong clicks tracked | Trigger rule is too broad | Use a more specific ID, class, or text match |
| Tag fires in GTM but not GA4 | GA4 configuration tag or measurement ID misconfigured | Double-check the GA4 config tag and measurement ID |
Testing helps you catch errors early and ensures that your button click tracking is accurate before it goes live.
Tracking Button Clicks in WordPress with Analytify
Join 50,000+ beginners & professionals who use Analytify to simplify their Google Analytics!
The fastest way to track button clicks in WordPress is the Analytify Event Tracking Addon, which skips manual GTM setup entirely. Setting up tags and triggers by hand in Google Tag Manager takes time; that is where Analytify comes in.
Analytify is the best Google Analytics plugin for WordPress. It seamlessly integrates with Google Analytics, bringing all your essential data directly into the WordPress dashboard.
From real-time statistics to traffic sources and engagement insights, Analytify provides a complete view of your website’s performance in one place. With its Event Tracking Addon, you can easily track button clicks without touching any code.
The Event Tracking Addon automatically captures user interactions like button clicks, outbound link clicks, file downloads, and more, sending them straight into Google Analytics as events. This makes it simple to measure how often visitors engage with your call-to-action (CTA) buttons.
How to Track Button Clicks with Analytify
- Go to your WordPress dashboard.
- Navigate to Plugins >> Add New.
- Search for “Analytify” and install the plugin.
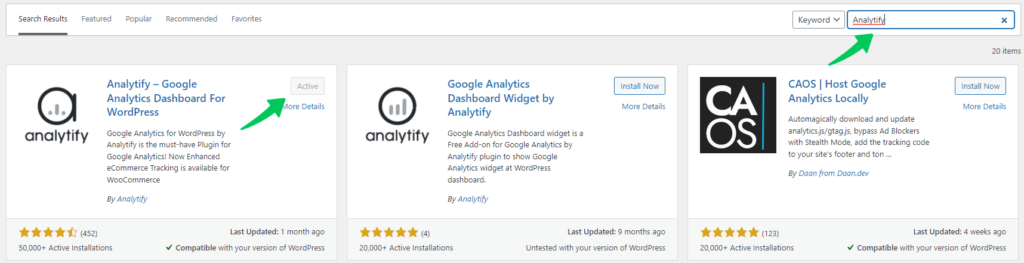
- Install Analytify and activate it.
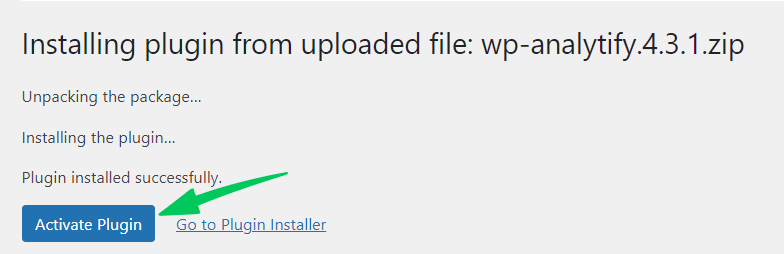
- Enable the Event Tracking Addon (available in the premium plan).
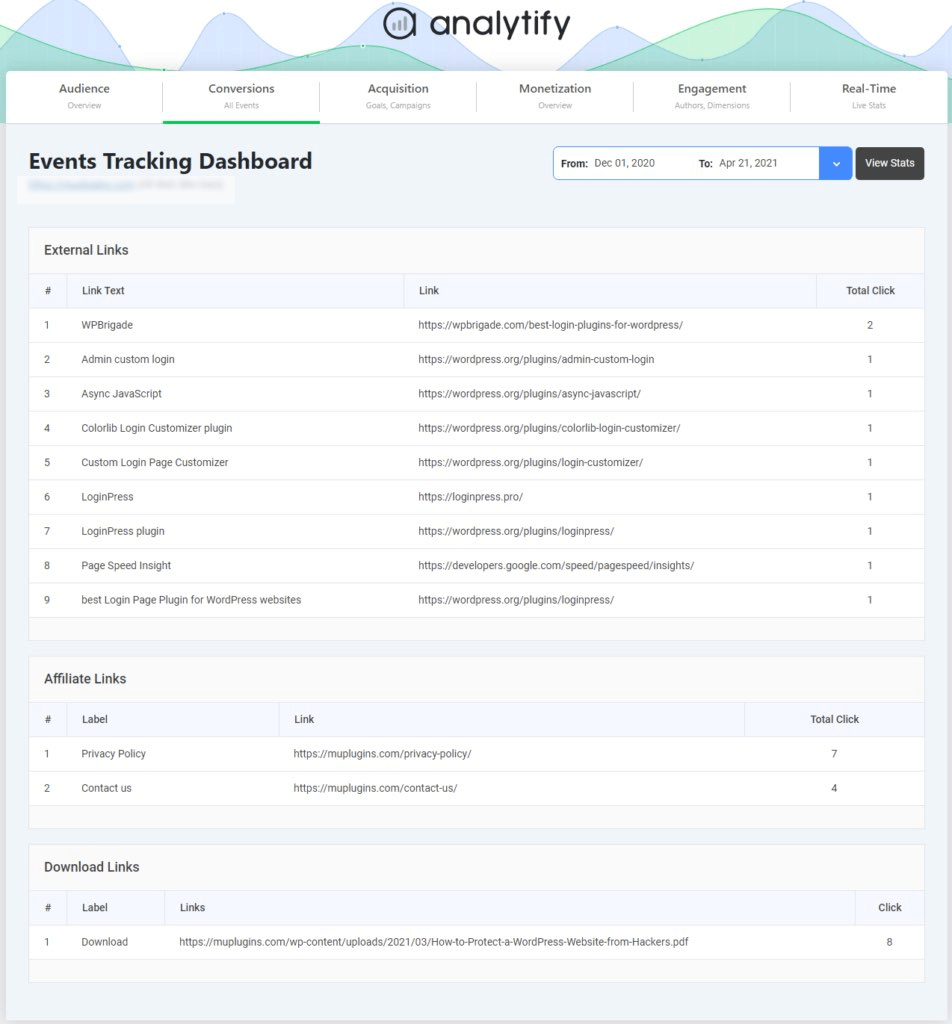
- Analytify will automatically track and show them in the events tracking dashboard. You can check detailed reports by navigating to Analytify Dashboard >> Tracking >> Events Tracking.
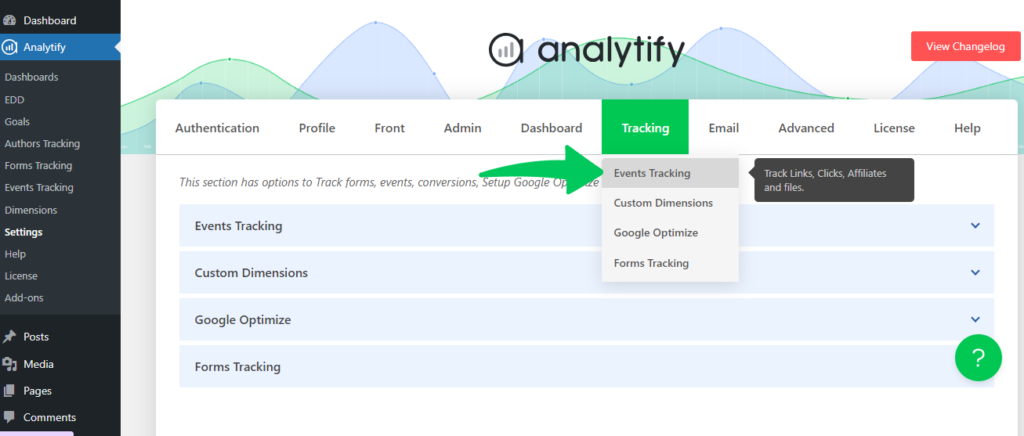
Here, you can easily track key button clicks, such as Contact Us, Download, or Privacy Policy, along with their total clicks and engagement details.
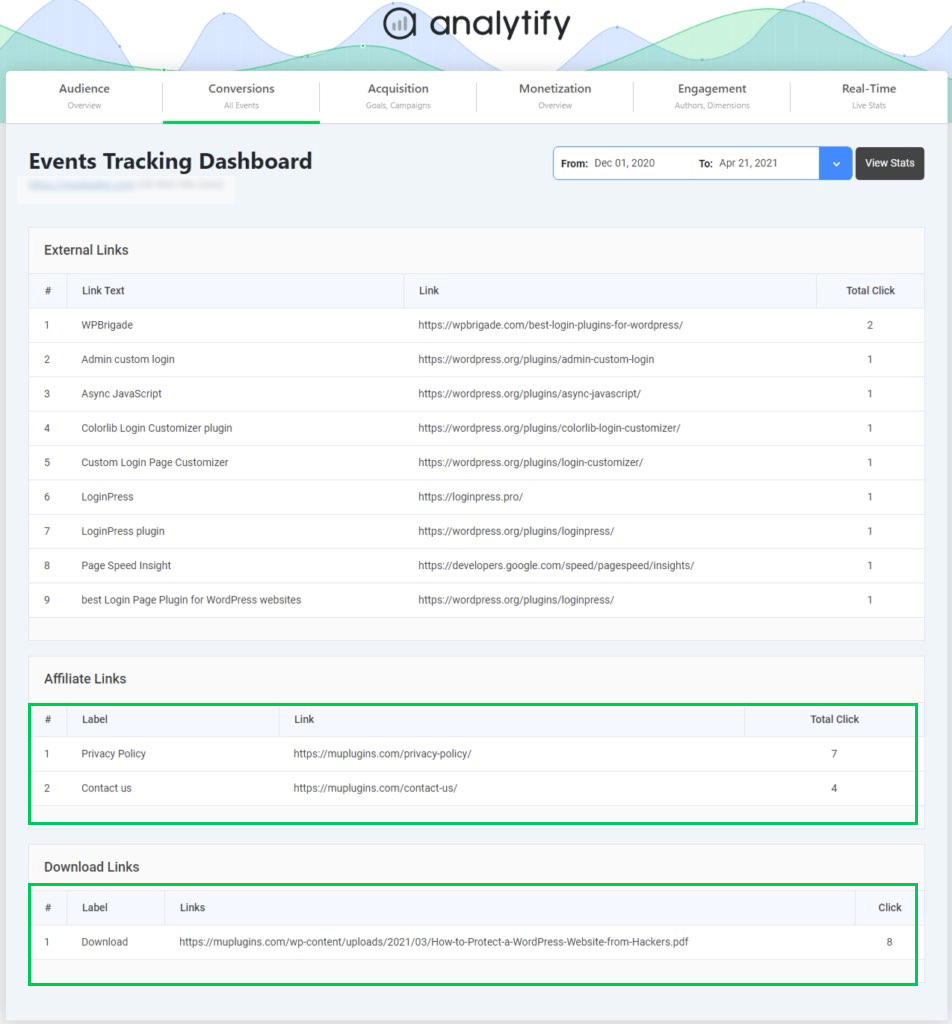
With this setup, Analytify removes the technicalities of Google Tag Manager while giving you accurate and actionable insights about your CTA performance.
Frequently Asked Questions About How to Track Button Clicks in Google Tag Manager
1. How to track button clicks in Google Tag Manager?
In GTM, you first enable click variables, then create a click trigger (for example, when someone clicks a CTA button), and finally set up a GA4 event tag that fires on that trigger. This event is then sent to Google Analytics, where you can see and analyze button click activity.
2. How to track a button click in Google Ads?
You can track button clicks as conversions in Google Ads. One way is by using GTM: create a trigger for the button, then set up a Google Ads conversion tag that fires when the button is clicked. This sends the conversion data directly to your Google Ads account so you can measure campaign performance.
3. How to track button clicks in Google Analytics without GTM?
If you’re not using GTM, you can add an onClick event directly to your button’s code that pushes the event to Google Analytics. For example, in GA4 you can use gtag(‘event’, ‘button_click’, { ‘button_name’: ‘signup’ });. This requires adding code manually, so you’ll likely need a developer’s help.
4. Does Google Analytics track link clicks?
By default, GA4 automatically tracks outbound link clicks (links that send users to another website). If you want to track internal link clicks or clicks on specific buttons, you’ll need to set up custom events, either with GTM or by adding code.
5. Can I track clicks with Google Tag Manager on CTA buttons?
Yes. You can track CTA clicks with GTM by creating a specific trigger that fires only when users interact with your call-to-action button. This helps you measure how effective your CTAs are in driving conversions.
Why isn’t my GTM button click tag firing?
Usually it’s one of three things: the trigger rule doesn’t match the actual element (test the exact Click ID or Click Classes value in Preview mode), an ad blocker is stripping the GTM container in your test browser, or the GA4 configuration tag isn’t attached to the event tag. Check Tag Assistant’s variable values first; they show you exactly what GTM saw on click.
Final Thoughts: Google Tag Manager Button Click Tracking
In this guide, we explored everything you need to know about Google Tag Manager button click tracking and why it matters for marketers and developers.
We learned that GTM is a free tool that lets you manage all tracking codes in one place, without touching website code. It makes it simple to set up things like button click tracking.
Since CTAs like Sign Up or Buy Now drive conversions, tracking clicks shows how users interact with your website and helps improve performance. We explored prerequisites, enabling click variables, creating triggers, building a GA4 event tag, testing, and publishing to start capturing clicks as events.
Using clear IDs or classes, consistent naming, and focusing on meaningful CTAs makes tracking more reliable and data more useful. Triggers decide when an event should fire, while variables provide details such as button text or ID. Together, they make tracking precise.
Before publishing, preview mode, tag assistant, and GA4 Debug View help ensure everything is firing correctly. By following these steps and best practices, you can confidently set up GA4 button click tracking with GTM and send accurate data to GA4.
For Further guidance, you can read:
What type of buttons or CTAs are you planning to track first with GTM? Share your thoughts or questions in the comments. I’d love to hear how you’ll apply this guide!