How to Track WooCommerce Cart Abandonment Rate in Google Analytics 4

Your WooCommerce admin shows 120 abandoned carts this month. Your GA4 shows 40. Both are looking at the same store, the same shoppers, the same timeframe. You stopped trusting either number weeks ago.
This guide covers four things. The formula for WooCommerce cart abandonment rate in Google Analytics 4. How to set up the funnel that reveals it. Why GA4 and WooCommerce never report the same number. What to do about the stage with the highest drop-off.
Analytify’s WooCommerce dashboard shows your abandonment rate per funnel stage directly in WordPress, no GA4 login needed. Use GA4 for the one-time setup. Use Analytify for daily monitoring. This is powered by Analytify’s enhanced ecommerce tracking add-on.
Table of Contents
To track WooCommerce cart abandonment rate in GA4, open the Checkout journey report. It sits under Reports, then Monetization. You can also build a custom Funnel Exploration. Use the add_to_cart, begin_checkout, and purchase events. Both methods need active eCommerce tracking on your WooCommerce store.
What is WooCommerce Cart Abandonment Rate and Why Does It Matter?
WooCommerce cart abandonment rate is the percentage of shoppers who never buy. They add a product to the cart. They leave without completing the purchase.

The formula:
Cart Abandonment Rate = (Add to Cart events − Purchase events) ÷ Add to Cart events × 100
Example: 500 add_to_cart events. 150 purchase events. Rate = (500 − 150) ÷ 500 × 100 = 70%.
This is different from the checkout abandonment rate. Checkout abandonment measures drop-off after a shopper clicks “Proceed to Checkout.”
Checkout Abandonment Rate = (begin_checkout events − Purchase events) ÷ begin_checkout events × 100
Cart abandonment means the shopper left before checkout started. Checkout abandonment means the shopper started checkout but did not finish. These two points lead to a different problem on a different page.
Abandonment rate: formula and benchmark comparison
| Metric | Formula | What It Measures |
| Cart Abandonment Rate | (Add to Cart − Purchase) ÷ Add to Cart × 100 | Drop-off before checkout begins |
| Checkout Abandonment Rate | (begin_checkout − Purchase) ÷ begin_checkout × 100 | Drop-off after checkout starts |
| Global Average | 70.19% (Baymard Institute, 2025) | eCommerce benchmark across 49 studies |
The global average cart abandonment rate is 70.19%. That figure comes from 49 studies compiled by the Baymard Institute. If your GA4 funnel shows much higher, check your tracking first. Fix the data before you optimize the checkout flow.
WooCommerce cart abandonment rate measures shoppers who leave without buying. They add at least one product to the cart. They never complete the purchase in that session. The formula is straightforward. Subtract purchase events from add-to-cart events. Divide that by total add-to-cart events. Then multiply by 100. This differs from checkout abandonment rate. Checkout abandonment measures drop-off after checkout begins. GA4 tracks both using eCommerce event data.
Which GA4 Events Track WooCommerce Cart Abandonment?
GA4 tracks WooCommerce cart abandonment using four eCommerce events. Those events are add_to_cart, begin_checkout, remove_from_cart, and purchase.
Understanding what each event means is essential before building any report. Here is the full reference:
| GA4 Event | When It Fires | What It Tells You |
| add_to_cart | Shopper adds product to cart | Start of the abandonment window |
| remove_from_cart | Shopper removes product from cart | Signals price or product hesitation |
| begin_checkout | Shopper clicks “Proceed to Checkout” | Starts checkout abandonment window |
| purchase | Order confirmed on thank-you page | Closes both windows. No abandonment recorded. |
Before building any funnel, verify these events are actually firing on your store.
How to verify your events are active:
- In GA4, go to Reports >> Engagement >> Events.
- Search for “add_to_cart”. Confirm the event count is above zero.
- Search for “purchase”. Confirm event counts are present.
- If add_to_cart shows zero: WooCommerce eCommerce tracking is not configured. Install Analytify Pro with the WooCommerce Addon to set this up automatically, without GTM or custom code.
Analytify Pro with the WooCommerce Addon configures all four events the moment you activate it. No developer needed. WooCommerce event tracking requires a Pro plan and is not included in the free version.
The GA4 eCommerce event reference covers how these events are structured. Read it for the full technical parameter list.

How Do You Set Up a GA4 Funnel for WooCommerce Cart Abandonment?
Set up a GA4 funnel that shows exactly where WooCommerce shoppers drop off.
Confirm GA4 eCommerce tracking is live
Open GA4 DebugView on your store. Add a product to the cart. You should see the add_to_cart event fire.
Open the Checkout journey report
In GA4, go to Reports, then Monetization, then Checkout journey. This report needs no setup.
Read the built-in abandonment percentages
Each column shows the drop-off to the next step. Note which gap is widest.
Create a Funnel Exploration for more control
Go to Explore, then choose Funnel exploration. Name it WooCommerce cart abandonment.
Add your four funnel steps
Use view_item, add_to_cart, begin_checkout, and purchase. Set the funnel to open, not closed.
Add breakdowns and filters
Break down by device category. Filter by traffic source to see which channel abandons most.
Calculate your abandonment rate
Subtract purchase events from add_to_cart events. Divide by add_to_cart events. Multiply by 100.
Fix the widest gap and re-measure
Apply the fix for that one stage. Compare the same funnel 30 days later.
GA4 Funnel Exploration is the most detailed abandonment tracking method. It shows exact drop-off percentages between every checkout step.
GA4 gives you two options: a pre-built report that takes zero setup, and a custom funnel that takes 10-15 minutes. Start with the pre-built report.
Use the Pre-Built Checkout Journey Report First
GA4’s built-in checkout journey report shows your GA4 eCommerce funnel with abandonment rates already calculated. No setup required.
Steps to access the Checkout journey report:
- In GA4, go to Reports in the left sidebar.
- Click Monetization, then Checkout journey.
- Read the abandonment rate shown between each funnel step.
- Use the date range picker (top right) to set at least 30 days for stable data.
This report uses session scope, not user scope. It counts sessions where the event fired, not unique users. One shopper visiting twice counts as two sessions.

Build a Custom Funnel Exploration for Deeper WooCommerce Analysis
The GA4 Funnel Exploration gives you more control. You can add or remove steps. You can filter by device type or traffic source. You can switch between standard and trended views.
Steps to build a custom WooCommerce funnel in GA4:
- In GA4, click Explore in the left sidebar.
- Click Funnel exploration to open a new report.
- Click the pencil icon next to Steps. Remove any default steps.
- Add Step 1: Event name = add_to_cart. Label it “Add to Cart.”
- Add Step 2: Event name = begin_checkout. Label it “Begin Checkout.”
- Add Step 3: Event name = purchase. Label it “Purchase.”
- Click Apply. The funnel bar chart appears immediately.
- Read the Abandonment Rate column between each step.
The step with the highest drop-off is your first fix.
Add add_shipping_info and add_payment_info between begin_checkout and purchase. Those two events pinpoint which checkout form step loses shoppers. They fire automatically with Analytify Pro and the WooCommerce Addon active.
The GA4 eCommerce checkout funnel in WordPress guide walks through every funnel step. It also covers the abandonment metrics in detail.
Which method is right for you?
| Method | Setup Time | Best For |
| Checkout journey report | Zero (built-in to GA4) | Quick abandonment rate snapshot by funnel step |
| Funnel Exploration | 10-15 minutes | Custom step analysis, device or source filtering, trended view |
| Analytify WooCommerce Funnel | Zero (pre-built inside WordPress) | Ongoing daily monitoring without logging into GA4 |
How Do You See WooCommerce Abandoned Carts Inside WordPress?
Analytify shows WooCommerce abandoned cart analytics inside your WordPress dashboard. The WooCommerce Addon supplies the funnel data. You never have to log into GA4 to check it.
Every other tracking approach requires you to work inside GA4. Analytify removes that friction entirely. Use the GA4 Funnel Exploration once to understand your funnel. Then use Analytify every day to watch it.
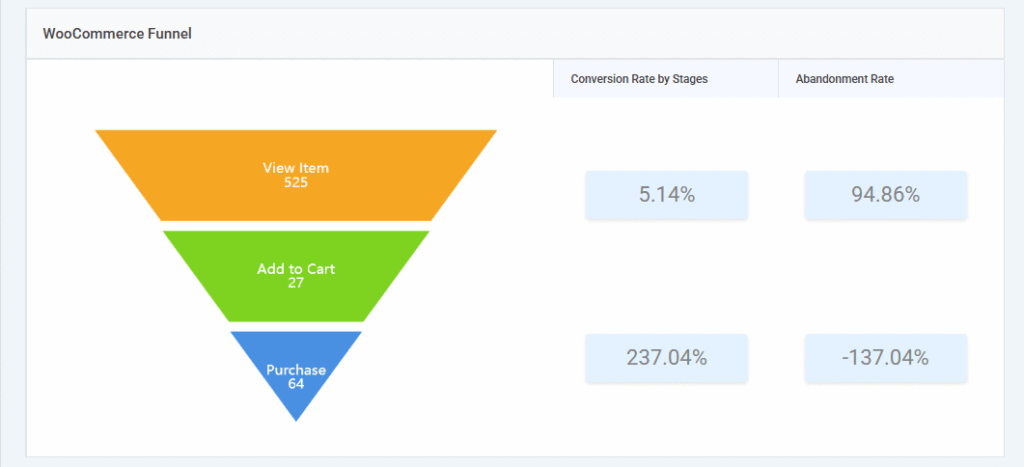
Analytify is a WordPress plugin for Google Analytics 4. It displays WooCommerce eCommerce data inside the WordPress dashboard. Activate the WooCommerce Addon to unlock the checkout funnel. The funnel covers View Item, Add to Cart, and Purchase. Each stage shows its own abandonment rate percentage. Analytify also reports event counts in one place. Those events are add_to_cart, remove_from_cart, begin_checkout, and purchase. No GA4 login is needed after the first connection.
What Analytify shows in the WooCommerce section:
- Abandonment Rate per funnel step: View Item, Add to Cart, and Purchase, each with a clear percentage. A high rate between View Item and Add to Cart signals a product page problem. A high rate between Add to Cart and Purchase signals checkout friction.
- eCommerce overview: conversion rate, revenue, transactions, and average order value, visible at a glance in the same dashboard.
- Event-level counts: add_to_cart and remove_from_cart event totals, visible without building any custom report.
Switching between WordPress and GA4 every day costs you time. Analytify surfaces your full WooCommerce funnel inside your dashboard. The data updates from GA4 with no tab-switching.
How to access the WooCommerce funnel in Analytify:
- Install Analytify Pro and activate the WooCommerce Addon: go to Analytify > Add-ons > WooCommerce > Activate.

- Connect Analytify to your GA4 property if you haven’t already.
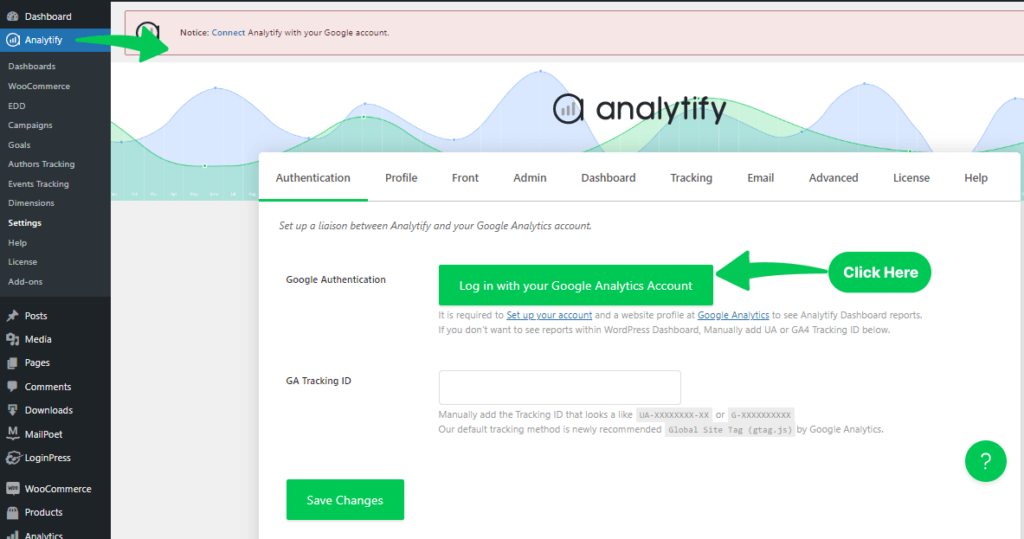
- Go to Analytify > WooCommerce from the WordPress left sidebar.

- Scroll to the WooCommerce Funnel section.
- Read the Abandonment Rate column for each step. The highest percentage is your first fix.
That is how to see abandoned carts in WooCommerce. The Analytify WooCommerce analytics dashboard shows them directly.
The GA4 eCommerce funnel for WooCommerce appears in the same place. Open the Analytify WooCommerce dashboard to see it.
Why Does GA4 Show a Different Number Than WooCommerce?
GA4 cart abandonment numbers are always lower than WooCommerce admin numbers. GA4 only counts sessions where JavaScript ran successfully. Ad blockers and declined consent stop the tracking script.
This mismatch is not a bug. It is a structural difference between how GA4 tracks and how WooCommerce stores data.
Here is why the numbers never match:
- Ad blockers suppress GA4 events. A shopper using a browser extension adds a product to cart and abandons. WooCommerce records the cart in its database. GA4 never receives the add_to_cart event. Ad blockers suppress 30-40% of GA4 eCommerce events on average.
- Consent Mode V2 refusals. Shoppers who decline non-essential cookies may generate zero GA4 tracking, even if they complete a purchase recorded in WooCommerce.
- Payment gateway redirects. Stores redirecting to external payment pages may lose the purchase event if the GA4 tag does not fire on the thank-you redirect. The order completes in WooCommerce. GA4 records no purchase.
- Session scope vs. WooCommerce database. GA4 counts sessions where events fired. WooCommerce records every cart action directly in its database, regardless of browser state or ad-blocker status.
GA4’s abandonment funnel shows your rate among trackable sessions only. Your actual abandoned cart volume is higher. Ad-blocked and consent-declined sessions live in your WooCommerce admin. A recovery plugin will also hold them.
Use GA4 funnel data to assess trend direction and diagnose friction. Use your WooCommerce admin or a dedicated recovery plugin for the true total cart count. Neither is wrong. They measure different things.
How Do You Reduce WooCommerce Cart Abandonment Using GA4 Data?
WooCommerce abandoned cart recovery starts with finding the funnel stage with the highest drop-off rate. Fix that stage first, it gives you the biggest recovery gain.
The fix for a View Item drop-off is not the same fix as a checkout form drop-off. Match the action to the stage.
Quick reference: stage, symptom, and primary fix
| Funnel Stage | Drop-Off Symptom | Primary Fix |
| View Item → Add to Cart | Shoppers browse but do not add products | Improve images, show total price upfront, add trust signals above the fold |
| Add to Cart → Begin Checkout | Shoppers add products but do not start checkout | Show taxes and shipping on cart page, enable guest checkout |
| Begin Checkout → Purchase | Shoppers start checkout but do not finish | Reduce form fields, add express payment options, show progress indicator |
High Abandonment Between View Item and Add to Cart
Drop-off between View Item and Add to Cart means one thing. Shoppers are not convinced by the product page. Fix the page, not the checkout.
Fixes for product page drop-off:
- Add more product images (multiple angles, lifestyle shots, zoom functionality).
- Show the total price including estimated shipping early on the product page, before the shopper has to ask.
- Display trust signals (review count, return policy, security badges) above the fold.
- Check product page load speed. Every additional second of load time reduces conversions by approximately 7% (Google/Deloitte, 2019).
High Abandonment Between Add to Cart and Begin Checkout
Drop-off between Add to Cart and Begin Checkout means something different. Shoppers add products but never start checkout. The cart page is introducing friction or doubt.
Fixes for cart page drop-off:
- Show the total order value, including taxes and shipping, on the cart page, before checkout begins.
- Add a “Continue Shopping” link so shoppers do not feel locked in the moment they view their cart.
- Display security badges and accepted payment icons prominently on the cart page.
- Remove forced account creation from the checkout entry point. Guest checkout reduces abandonment by up to 24% (Baymard Institute, 2025).
High Abandonment Between Begin Checkout and Purchase
A high abandonment rate between Begin Checkout and Purchase means shoppers start the checkout form but do not finish it. The checkout process itself is the problem.
Fixes for checkout form drop-off:
- Reduce checkout form fields to the minimum required (8 fields or fewer).
- Add express payment options (Apple Pay, Google Pay) to let shoppers skip form entry entirely.
- Show a progress indicator so shoppers know exactly how many steps remain.
- Check the add_shipping_info and add_payment_info event drop-offs in GA4 Funnel Exploration to find the exact form step losing the most shoppers.
FAQs on WooCommerce Cart Abandonment Rate
1. How do I see WooCommerce Abandoned Carts in Google Analytics 4?
GA4 shows WooCommerce cart abandonment through two built-in paths. The quickest is Reports, then Monetization, then Checkout journey. That report shows a pre-built funnel with abandonment percentages at each step. For more control, open Explore, then Funnel exploration. Build a custom funnel using add_to_cart, begin_checkout, and purchase as steps. Both methods need eCommerce tracking active on your WooCommerce store.
2. What is a good WooCommerce Cart Abandonment Rate?
The global average cart abandonment rate is 70.19% (Baymard Institute, 2025). A WooCommerce store at 60 to 65% is above average. Below 60% is strong. Chasing benchmarks is the wrong goal. Improve your own baseline instead. On a store with 1,000 monthly carts, a 5-point reduction adds 50 purchases per month.
3. Why is my GA4 Cart Abandonment Rate different from my WooCommerce plugin?
GA4 only tracks sessions where its tag ran successfully. Ad blockers, declined consent, and gateway redirects all break that. Those carts create WooCommerce database records but no GA4 events. So GA4’s funnel shows a subset of actual abandoned carts. Use GA4 for trend analysis and friction diagnosis. Use your WooCommerce admin or recovery plugin for total volume.
4. How can Analytify help monitor and reduce WooCommerce Cart Abandonment?
Analytify Pro with the WooCommerce Addon shows a pre-built checkout funnel. It sits inside your WordPress dashboard. It displays the abandonment rate at each stage. Those stages are View Item, Add to Cart, and Purchase. No GA4 login is required. The eCommerce report also counts add_to_cart, remove_from_cart, and purchase events. Revenue and conversion rate appear alongside them. You can monitor cart abandonment daily without building GA4 reports.
5. Can I track WooCommerce Cart Abandonment by device type in GA4?
GA4 Funnel Exploration segments abandonment data by device category. Open your funnel report and click the Breakdown field. Select Device category. The funnel splits into mobile, desktop, and tablet columns. Mobile abandonment usually runs 10 to 15 points higher than desktop. Form friction on small screens is the cause. If mobile is much higher, add express payment options first. Apple Pay and Google Pay are the usual picks. Then cut checkout form fields.
6. How do you calculate WooCommerce Cart Abandonment Rate?
The formula is simple. Divide sessions that added to cart but did not purchase by all sessions that added to cart. Then multiply by 100. Say 1,000 sessions added a product and 300 bought. Your abandonment rate is 70%. GA4 gives you these numbers in the Checkout journey report. No manual calculation is needed.
7. Which GA4 Events track WooCommerce Cart Abandonment?
Four GA4 ecommerce events map the WooCommerce abandonment funnel. They are view_item, add_to_cart, begin_checkout, and purchase. View_item means the product page was viewed. Add_to_cart means an item entered the cart. Begin_checkout means the checkout page opened. Purchase means the order completed. Cart abandonment happens in the gap between add_to_cart and purchase. WooCommerce fires these events automatically once GA4 ecommerce tracking is connected.
8. How do I set up a GA4 Funnel for WooCommerce Cart Abandonment?
GA4 has a pre-built Checkout journey report under Reports, then Monetization. It requires no setup. It shows drop-off at each step automatically. For a custom funnel, open Explore, then Funnel exploration. Add steps using view_item, add_to_cart, begin_checkout, and purchase. You can then segment by device, traffic source, or user type. That is how you find where your specific audience drops off.
9. Why is my WooCommerce cart abandonment data not showing in GA4?
Four causes explain almost every case. First, eCommerce events are not firing. Check add_to_cart and begin_checkout in GA4 DebugView. Second, the data is still processing. GA4 eCommerce reports can lag 24 to 48 hours. Third, a consent banner is blocking the tag. Denied analytics consent stops events before they send. Fourth, your date range predates the tracking setup. Reports show nothing before the events existed. Analytify Pro users should also confirm the WooCommerce Addon is active. That addon supplies the eCommerce events the funnel depends on.
WooCommerce Cart Abandonment Rate: Final Verdict
Tracking WooCommerce cart abandonment rate in GA4 is not a single report. It is a funnel with three distinct drop-off points. Each point signals a different problem. Find the biggest leak first. Apply the fix that matches that stage. Then measure the change over 30 days.
Drop-off can also start before checkout. LoginPress gives you full control over your WordPress login experience. A clean login page keeps customers moving toward the cart.
Next steps:
- Open GA4 > Reports > Monetization > Checkout journey. Note the abandonment rate between each step. The highest percentage is your first fix.
- If your GA4 number is much lower than your WooCommerce abandoned cart count, set up the GA4 Funnel Exploration for trend direction and use your WooCommerce admin for total cart volume.
- Install Analytify Pro with the WooCommerce Addon to monitor your funnel abandonment rate from WordPress daily, without logging into GA4.
You may like to read about the Best WooCommerce Plugins for WordPress.