How to Set Up WooCommerce Conversion Tracking (Complete Guide 2025)
Are you running an online store and wondering how to set up WooCommerce Conversion tracking? If so, you’re in the right place.
Running an online store comes with many exciting challenges, such as tracking sales, understanding what your customers like, and optimizing your website to grow your revenue. With the help of eCommerce conversion tracking, you can learn what’s working and what’s not.
WooCommerce conversion tracking lets you track the actions people take on your online store, such as purchases, subscriptions, and even abandoned carts. For WordPress users, setting this up can be a breeze with the Analytify plugin and its Woocommerce tracking addon.
In this article, we’ll guide you through the process of setting up WooCommerce conversion tracking on your WordPress website using Analytify.
Let’s get started!
eCommerce Conversion Tracking (TOC):
What is eCommerce Conversion Tracking?
eCommerce conversion tracking is the process of monitoring and recording specific user actions on your website. These actions, called conversions, can include:
- Purchases are the most obvious and important conversion.
- Sign-ups for newsletters or accounts.
- Adding products to a cart or wish list.
- Checkout actions, like entering payment information.
When you set up eCommerce conversion tracking on your site, you can gather data on these key actions, helping you understand what’s working and what’s not in your sales funnel.
Why is eCommerce Conversion Tracking Important?
Understanding your customers’ behavior is important for growing your business. By using Google Analytics 4, you can track not only sales but also how users navigate through your site and interact with products.
Here’s why you should care about setting this up:
- Optimize marketing efforts: By knowing which campaigns lead to sales, you can double down on what works and cut back on what doesn’t.
- Track customer behavior: You’ll know where customers abandon the cart or where they drop off during the checkout process.
- Improve website performance: You’ll spot areas for improvement, such as long page load times or complicated forms that drive customers away.
If you’re running an online store, missing out on this data means flying blind. With GA4 eCommerce tracking and Enhanced eCommerce GA4 setup, you’ll have clear insights into every aspect of your customer’s journey.
Tracking leads in GA4 is essential for understanding which marketing efforts are driving conversions. To ensure accurate reporting and insights, follow this detailed guide on how to track leads in GA4 and optimize your lead generation strategy.
Types of Conversions You Can Track
There are several eCommerce conversion events you’ll want to track, including:
- Purchases: When a customer completes a transaction.
- Add to Cart: When someone adds an item to their shopping cart.
- Product Views: Monitoring how often a product is viewed.
- Checkout: Tracking different stages of the checkout process.
Each of these events can be set up using GA4 eCommerce events, which provide detailed information on how users interact with your website.
Enabling GA4 eCommerce tracking will allow you to set up these conversions and access rich data to help grow your business.
In the next section, we’ll look at why Analytify is the perfect tool for setting this up on your WordPress site.
Why Use Analytify for eCommerce Conversion Tracking in WordPress?
If you’re running an online store on WordPress, you’ve likely come across multiple plugins and tools to help you track your performance. So, why choose Analytify? Let’s see what makes it such a great choice for setting up eCommerce conversion tracking.
What Makes Analytify Stand Out?
Analytify is a powerful yet user-friendly analytics plugin for WordPress that makes connecting your site with Google Analytics a breeze. Instead of logging into Google Analytics and navigating through complex reports, Analytify brings all that important data right to your WordPress dashboard in a clear and understandable way.
Here’s why Analytify is a top choice for WordPress users:
- Easy Integration: It easily connects to Google Analytics (including GA4), so you can start tracking key metrics without dealing with complicated setups.
- Real-Time Data: You can see live stats on conversions, traffic sources, and user behavior directly from your WordPress dashboard.
- eCommerce Specific Reports: With Analytify, you can track detailed GA4 eCommerce events like purchases, product views, and cart abandonment rates.
- Enhanced eCommerce GA4 Support: The plugin supports GA4 enhanced eCommerce tracking, which helps you monitor everything from the first product view to the completed sale.
How to Set Up eCommerce Conversion Tracking
Many WordPress users, particularly those running eCommerce stores, appreciate Analytify for its simplicity and effectiveness. It provides all the important data you need, while sparing you the frustration of wading through the more technical aspects of Google Analytics.
Analytify’s integration with GA4 eCommerce parameters allows you to track specific actions taken by users on your site, providing you with actionable insights for improving your conversions and sales.
Prerequisites
Before you begin, make sure you have the following in place:
- A WordPress website with WooCommerce installed and configured. If you haven’t set up your WooCommerce store yet, you’ll need to do that first.
- A Google Analytics account to collect data from your website.
- The Analytify plugin installed and activated on your WordPress site. You can find and install it from the WordPress plugin repository.
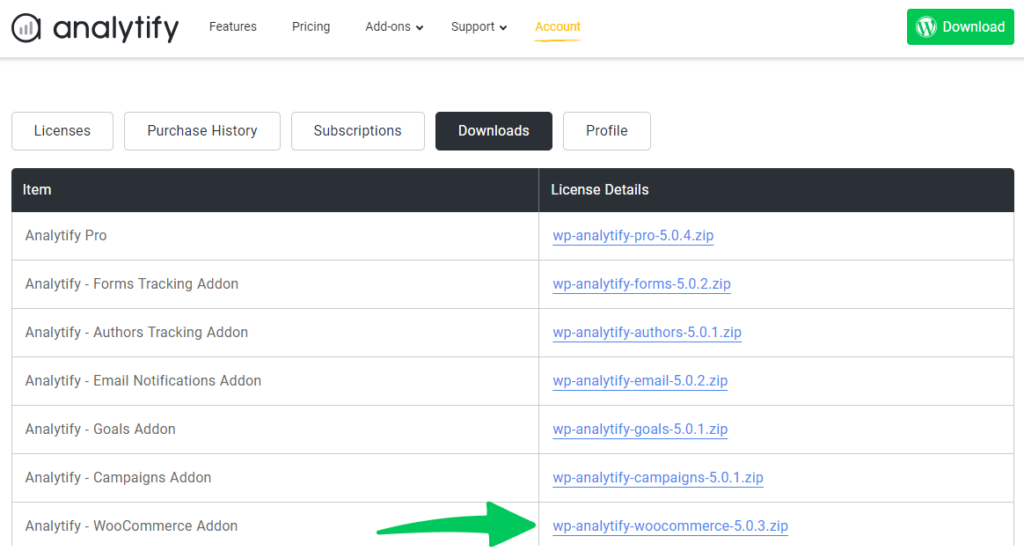
- The Analytify WooCommerce addon is installed and set up correctly.
Once you have everything installed, it’s time to connect Analytify to your Google Analytics account and configure it for WooCommerce tracking.
1. Connecting Analytify to Google Analytics
To connect Analytify to Google Analytics, follow these steps:
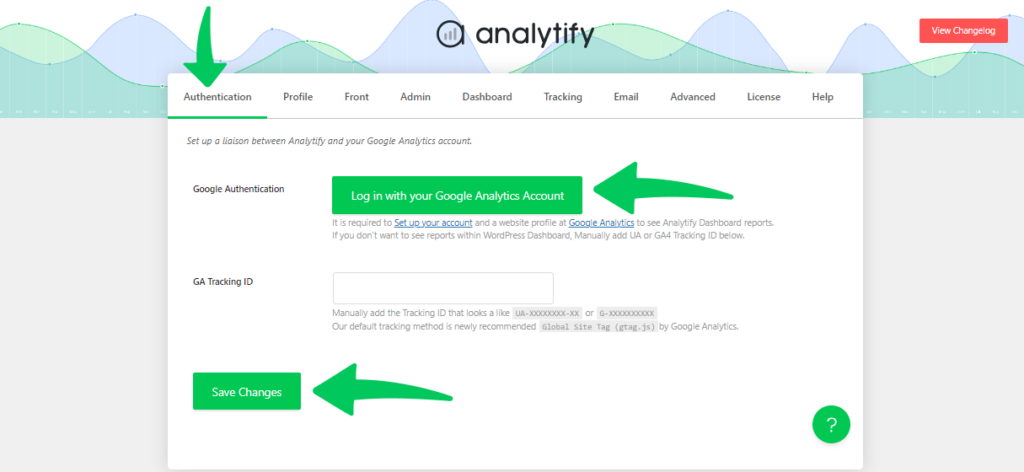
- Log in to your WordPress dashboard and go to Analytify >> Settings.
- Click the Authenticate with Google button.
- Select the Google account that’s linked to your Google Analytics property.
- Grant the required permissions for Analytify to access your Google Analytics data.
- Choose the Google Analytics property (your website) you want to connect to Analytify.
- Click Save Changes to complete the connection.
If you need more details, you can find additional instructions on how to connect your site with Analytify in the documentation.
2. Configuring WooCommerce Tracking in Analytify
Now that Analytify is connected to Google Analytics, let’s set up WooCommerce tracking.
Note: Ensure that the Analytify WooCommerce addon is installed and activated.
Once the WooCommerce addon is activated, Analytify automatically starts tracking WooCommerce conversions—there’s no need for any additional configuration. Analytify will take care of everything for you!
Analyzing WooCommerce Conversions in the Analytify Dashboard
After successfully setting up WooCommerce conversion tracking, you can view your store’s performance data directly from the Analytify dashboard in WordPress.
To access your WooCommerce conversion data:
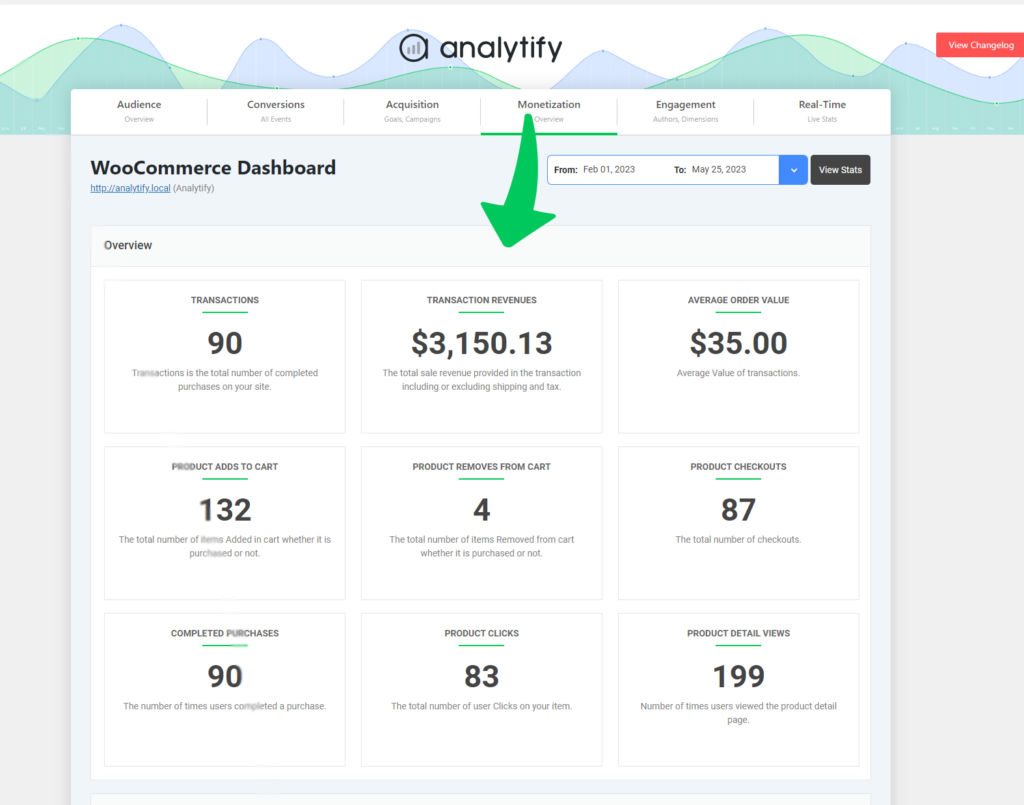
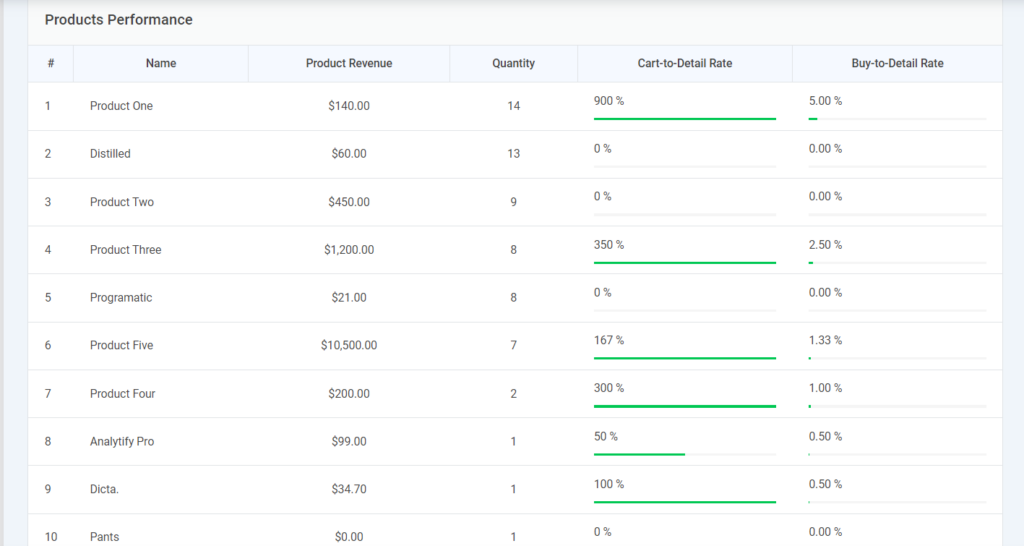
- Go to Analytify >> Dashboard >> Monetization >> WooCommerce.
- You’ll see a dashboard with key metrics such as revenue, transactions, and conversion rate.
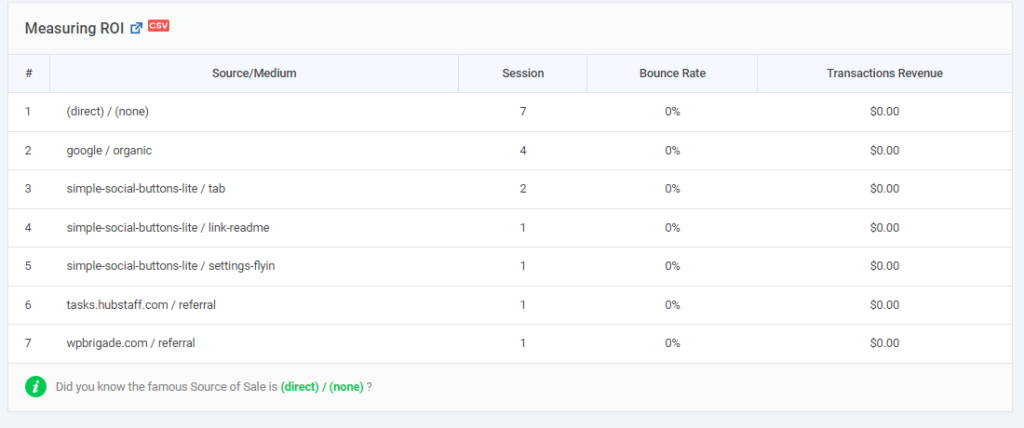
- You can also analyze your Return on Investment (ROI) in detail.
Here’s a breakdown of what you can monitor:
- Product Performance: See how well individual products are selling.
- Product List Analysis: Track how your product categories or lists are performing.
By regularly reviewing these metrics, you can gain valuable insights into your store’s performance and pinpoint areas for improvement.
If you’re wondering how to enable ecommerce conversion tracking in Google Analytics 4, you don’t need to woryy. Analytify will automatically help you to set up ecommerce conversion tracking in Google Analytics 4. All you need to install Analytify and you can see all the data of your eCommerce store tracked by GA4 in your GA4 reports.
Tracking eCommerce Conversions in Google Analytics 4
If you want to track eCommerce purchases and conversions in Google Analytics (GA4), here’s how:
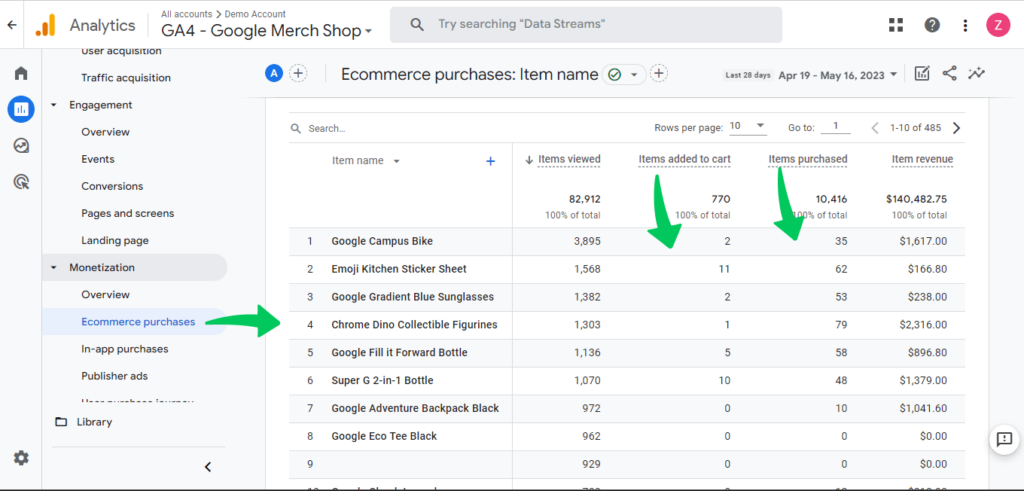
- Navigate to Monetization >> eCommerce Purchases in Google Analytics.
- You’ll find metrics such as Items Viewed, Items Purchased, and Item Revenue.
Additionally, you can explore your customer’s purchase journey:
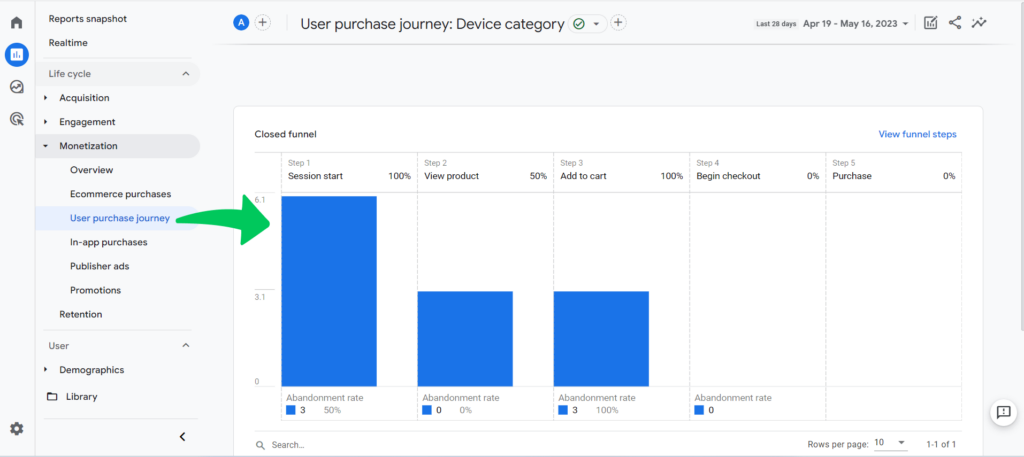
- In GA4, go to Reports >> Monetization >> User Purchase Journey.
- Here, you’ll see a funnel that automatically tracks each step of the purchase journey, from session start to completed purchase.
By following these steps, you’ll be able to set up and monitor WooCommerce conversion tracking with Analytify and Google Analytics, giving you valuable insights to optimize your online store.
Benefits of Using Analytify for eCommerce Conversion Tracking
Here are a few key benefits of using Analytify to set up and manage your eCommerce conversion tracking:
1. Simplified Setup
For many store owners, setting up Google Analytics (especially GA4 eCommerce tracking) can seem daunting. With Analytify, you don’t need to be a tech expert to set everything up. It guides you through the process, making the integration with GA4 smooth and hassle-free.
2. Detailed eCommerce Data
When you enable eCommerce tracking using Analytify, you’ll have access to all the key metrics needed to grow your online store, including:
- Transactions
- Revenue
- Average order value
- Top-performing products
All of this information is available right within your WordPress dashboard, so you don’t have to jump back and forth between different platforms.
3. User-Friendly Reports
You don’t need to be a data scientist to interpret the insights from Analytify. It presents the data in easy-to-understand reports. Plus, it supports GA4 Enhanced eCommerce events, giving you valuable insights into the customer journey—from product view to purchase.
4. Integration with WooCommerce
If you’re using WooCommerce to power your eCommerce site, Analytify offers seamless integration with it. It supports GA4 eCommerce DataLayer, allowing you to track WooCommerce-specific events such as product impressions, cart actions, and completed transactions.
eCommerce Conversion Tracking FAQs
1. What is eCommerce conversion tracking, and why is it important?
eCommerce conversion tracking monitors specific actions (like purchases, add-to-cart, and product views) that users take on your website. It’s essential because it provides valuable data on customer behavior, helping you understand what works in your sales funnel, where customers drop off, and how to optimize your site to increase sales and improve marketing efforts.
2. Do I need any coding skills to set up eCommerce conversion tracking with Analytify?
No, you don’t need coding skills to set up eCommerce conversion tracking with Analytify. The plugin is user-friendly and simplifies the process of connecting Google Analytics (GA4) to your WordPress site. Most configurations are handled through the plugin’s settings, making it accessible for non-technical users.
3. Can I track WooCommerce conversions using Analytify?
Yes, Analytify supports WooCommerce integration, allowing you to track important eCommerce events like product views, add-to-cart actions, and completed purchases. By installing the Analytify WooCommerce addon, these events will be automatically tracked, giving you access to detailed reports on your store’s performance.
4. How do I access my eCommerce conversion data in Analytify?
You can access your eCommerce data directly from your WordPress dashboard. Navigate to Analytify > Dashboard > Monetization > WooCommerce, where you can view key metrics such as transactions, revenue, product performance, and conversion rate. These reports provide a detailed overview of how your online store is performing.
5. Is Google Analytics (GA4) required for eCommerce tracking with Analytify?
Yes, Google Analytics (GA4) is required to track eCommerce conversions with Analytify. Analytify connects to your GA4 account and provides a simplified interface for viewing your website’s performance data directly within your WordPress dashboard.
6. How long does it take for eCommerce conversion data to appear in Analytify?
It can take up to 24-48 hours for eCommerce conversion data to appear in both Google Analytics and Analytify after setup. If you’ve just configured tracking, be sure to wait for this time window before assuming there are any issues.
Final Thoughts
In this guide, we covered how to set up eCommerce conversion tracking on your WordPress site using Analytify. We began by outlining the necessary prerequisites, including having a Google Analytics (GA4) account and the Analytify WooCommerce addon installed. Then, we connected Analytify to Google Analytics, configured WooCommerce tracking, and analyzed your conversion data through the Analytify dashboard and GA4.
We also highlighted the importance of tracking key eCommerce metrics like transactions, revenue, and product performance to help you optimize your online store. Ongoing analysis and regular monitoring allow you to make data-driven decisions that enhance your site’s performance and boost sales.
We hope this guide helped you understand how to set up eCommerce conversion tracking.
You may also like to read How to Track Email Marketing with Google Analytics (2024).

