Google Ads Conversion Tracking with GTM (Explained)
Are you struggling to measure the impact of your Google Ads campaigns effectively? Google Ads conversion tracking is crucial for understanding whether they drive valuable actions like sales, leads, or sign-ups. Without accurate data, it’s difficult to optimize campaigns and achieve the best return on investment.
In this guide, we’ll learn how to set up Google Ads Conversion Tracking using Google Tag Manager (GTM) with some advanced tips. We’ll also show you how Analytify makes tracking easier for WordPress users.
Let’s get started!
Google Ads Conversion Tracking (TOC)
What is Google Ads Conversion Tracking?
Google Ads Conversion Tracking is a feature of Google Ads that allows advertisers to measure the effectiveness of their Google Ads campaigns by tracking specific user actions taken after interacting with their ads. These actions are called conversions. Include purchasing, signing up for a newsletter, filling out a form, downloading an app, or any other goal that aligns with the advertiser’s business objectives.
Not all user actions directly lead to a purchase or a final goal. Micro Conversions, for instance, are smaller, preliminary actions users take that indicate engagement and interest, such as newsletter sign-ups. These interactions often pave the way for larger conversions and help businesses understand user behavior better. Macro conversions are the primary objectives of a website or app, like completing a purchase or submitting a contact form, which directly contributes to business goals.
Micro conversions reflect intermediate steps in the user journey, while macro conversions represent the ultimate success or goal achievement for a business.
How Google Ads Conversion Tracking Works?
Implementing a tracking code, also known as a Google Ads conversion tracking tag. When a user clicks on an ad and takes a desired action, such as purchasing or signing up for a newsletter, the tag records this action and sends the data back to Google Ads.
This data is then used to assess the performance of campaigns, optimize ad targeting, and allocate budgets more effectively. This process uses cookies or device IDs to attribute the conversion to the corresponding ad interaction.
Why is Google Ads Conversion Tracking Important?
Google Ads Conversion Tracking is vital for businesses to evaluate the effectiveness of their advertising campaigns. It provides actionable insights into which ads, keywords, and targeting strategies lead to desired user actions. By understanding these patterns, advertisers can enhance performance and maximize their return on investment (ROI).
- Performance Measurement: Conversion tracking helps businesses identify what works by showing which campaigns, ads, and keywords drive the most conversions.
- Optimization Opportunities: Advertisers can use conversion data to refine their bidding strategies and maximize Conversions.
- Budget Allocation: By understanding which campaigns deliver the best results, businesses can allocate their budgets to the most impactful ads and strategies.
- Measure App Success: Use the Google Ads conversion tracking app to monitor in-app conversions, such as installs or purchases, ensuring optimized mobile campaigns.
- Set Clear Goals: Tracking lets you align your ads with specific objectives, like boosting sales or generating leads, and see progress toward those goals.
- Improved Audience Targeting: Conversion tracking reveals details about user behavior, such as which devices or locations yield the highest conversions, enabling better targeting.
- ROI Analysis: With a comprehensive Google Ads conversion tracking setup, businesses can calculate the revenue generated from their campaigns and determine their ROI, ensuring effective spending.
When setting up conversion tracking for your Google Ads campaigns via GTM, ensuring that your container is firing correctly is a crucial first step.
Before you start tracking conversions, it’s a good idea to check if Google Tag Manager is working. This troubleshooting guide walks you through verifying that your tags are firing as expected, helping you avoid data discrepancies, and ensuring your ad performance is accurately measured.
How to Set Up Google Ads Conversion Tracking?
There are multiple ways to set up Google Ads Conversion Tracking, but two of the most popular methods are through Google Tag Manager (GTM) and Analytify. Each method simplifies the process while dealing with different needs.
Method 1: Setting Up Conversion Tracking with Google Tag Manager (GTM)
Google Tag Manager (GTM) is a free tool that helps you manage and deploy marketing tags (like conversion tracking codes) without modifying your website’s code directly. It’s a user-friendly solution for marketers and developers alike.
Step 1: Create a Conversion in Google Ads
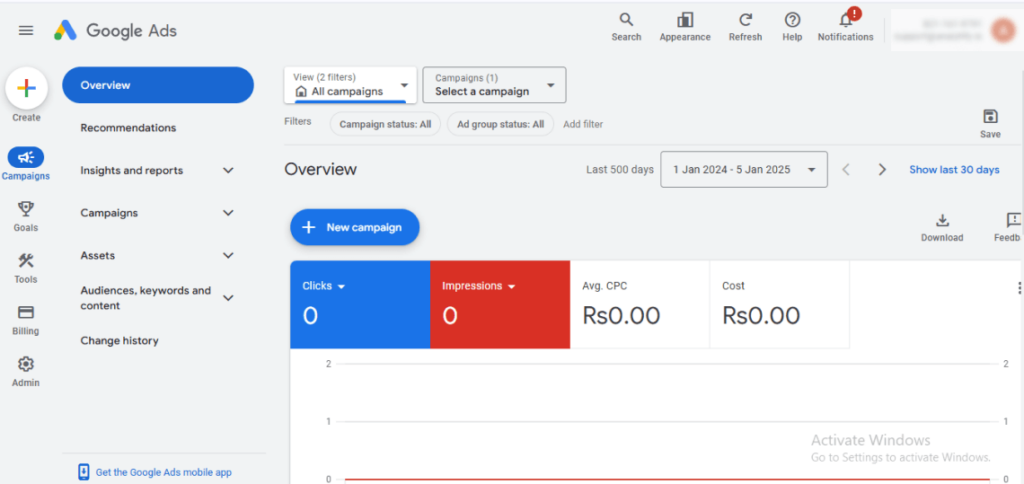
- Log into your Google Ads account.
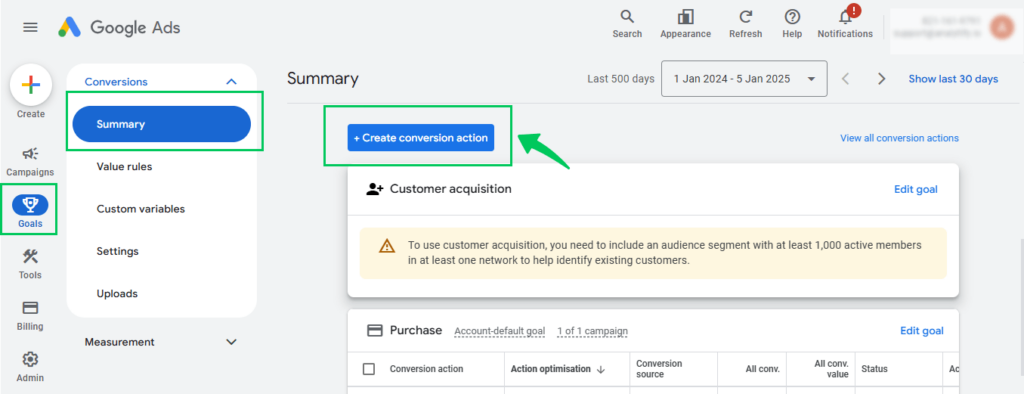
- Navigate to Goals >> Summary in the left-hand sidebar.
- Click the Create conversion action button.
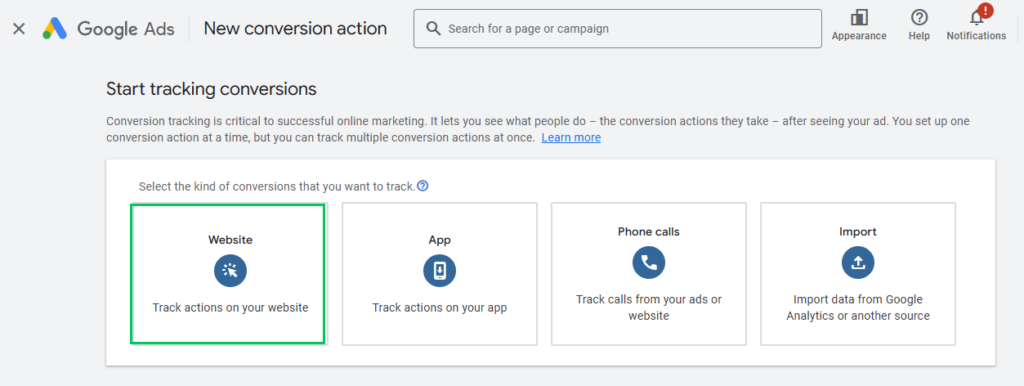
- Select the type of conversion to track (e.g., “Website”).
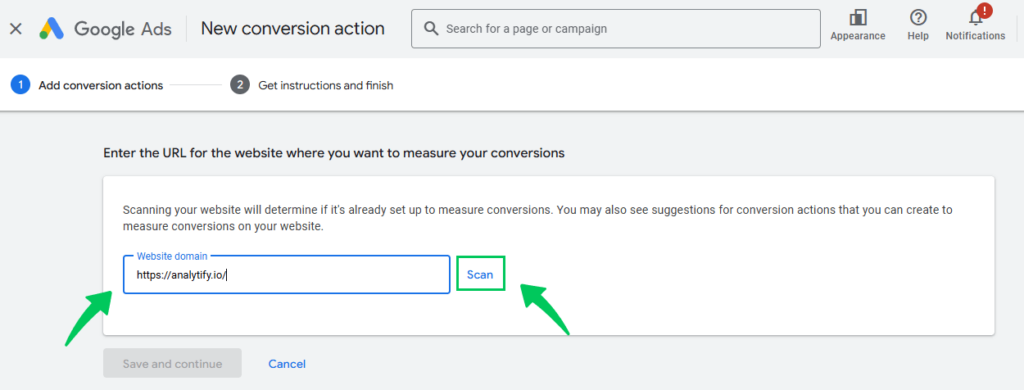
- Enter your website’s URL and click “Scan” to analyze your site setup.
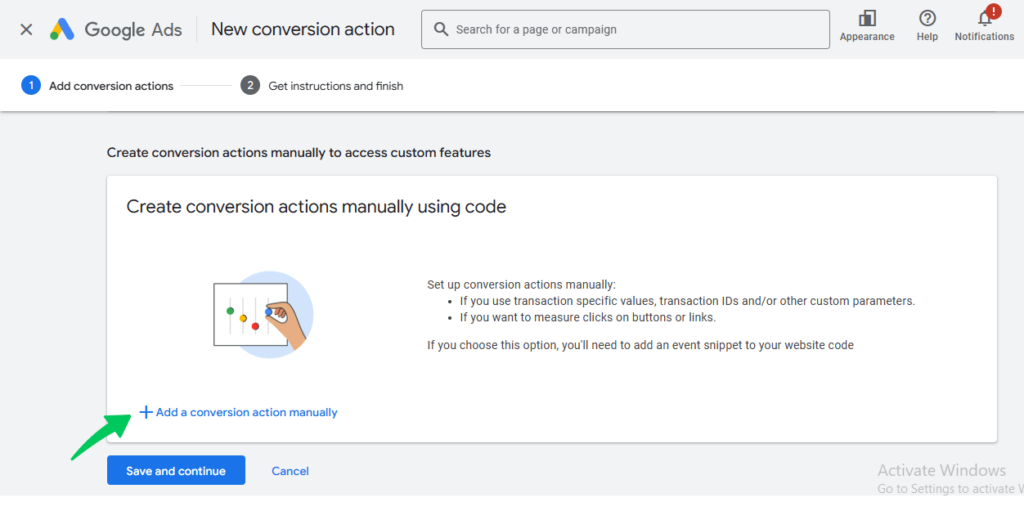
- Choose to add a conversion action manually if automatic import is unavailable.
Step 2: Configure Conversion Action Settings
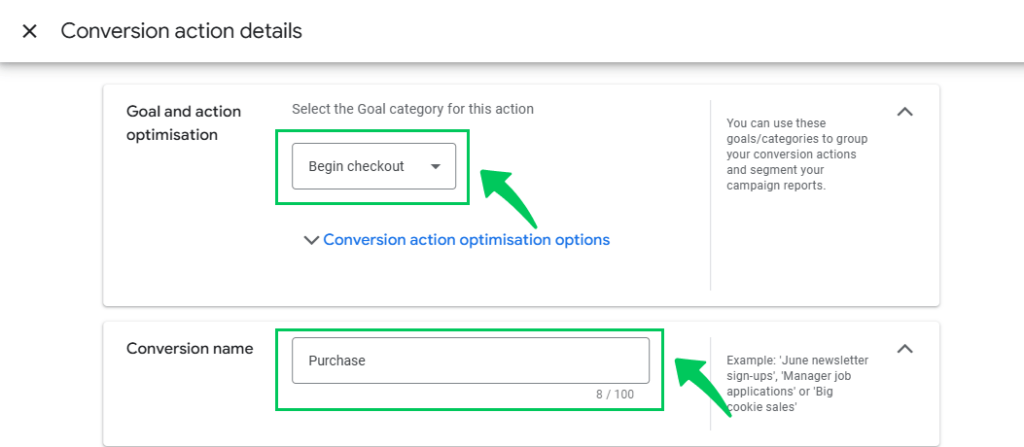
- Under Goal and Action Optimization, select the appropriate action (e.g., “Begin Checkout”).
- Assign a Conversion Name (e.g., “Purchase”).
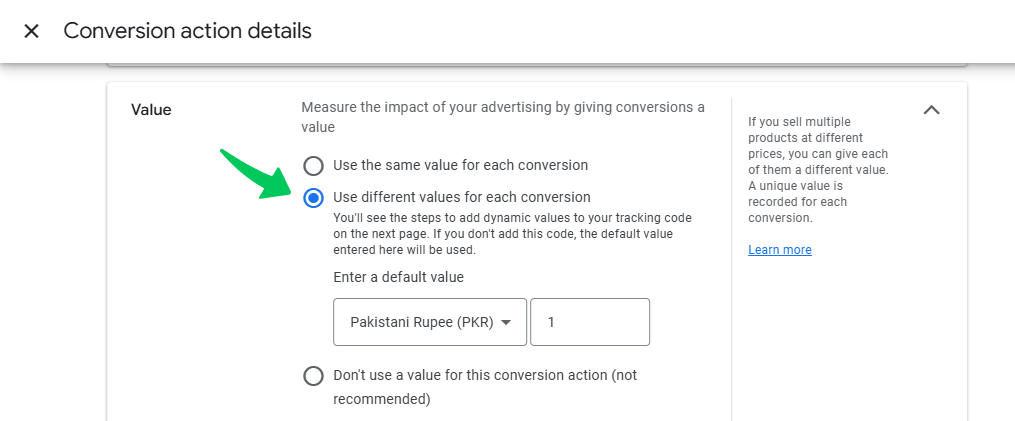
- Set a conversion value, if applicable (e.g., 1 rupee).
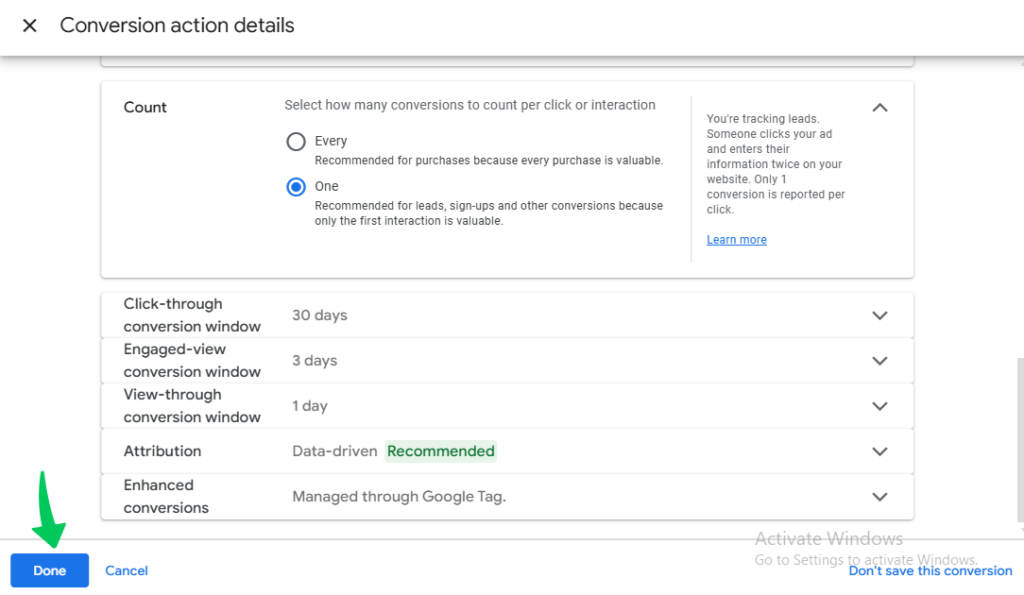
- For Count, choose:
- One: For actions like subscriptions, one user counts as one conversion.
- Every: For actions like purchases where each instance matters.
- Finalize other settings as needed and click “Done.”
Step 3: Get Conversion ID and Label
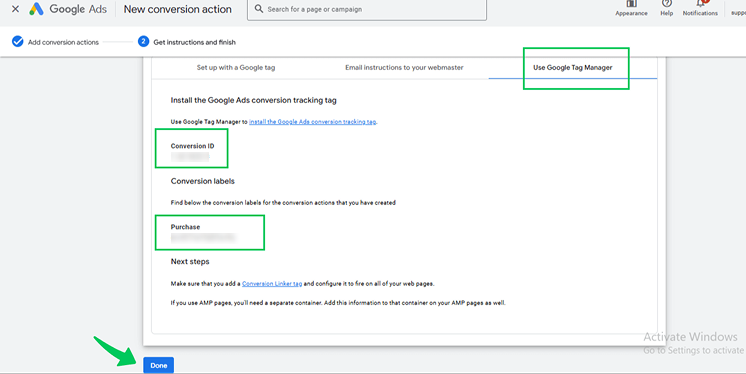
- After saving the conversion action, Google Ads will display the Conversion ID and Conversion Label.
- Select “Use Google Tag Manager” as the implementation method.
Step 4: Create a Tag in Google Tag Manager
- Open Google Tag Manager and go to Tags > New.
- Click on the pencil icon to start tag configuration.
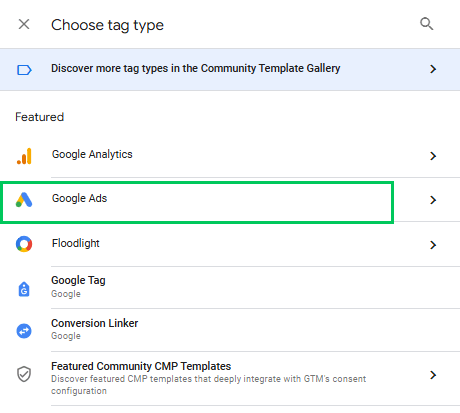
- In Tag Configuration, choose the Google Ads option.
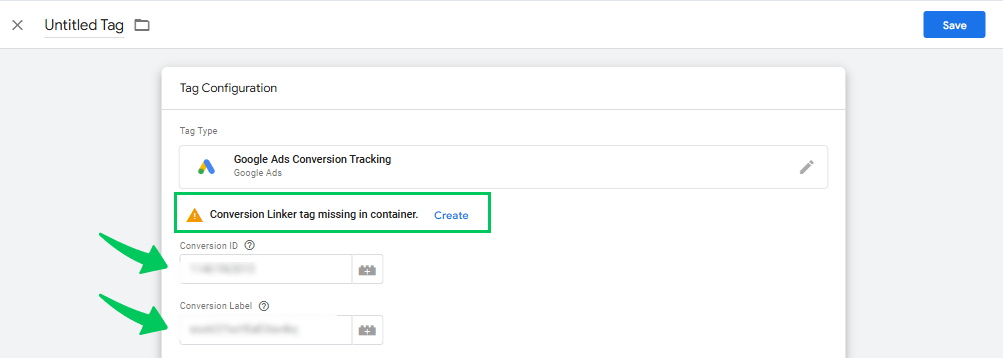
- Then, Select the Google Ads Conversion Tracking tab.
- Enter the Conversion ID and Conversion Label obtained from Google Ads. Although observe the warning “Conversion linker tag missing in container”. Try to resolve it first.
Step 5: Add a Conversion Linker Tag
- To resolve the warning, create a Conversion Linker Tag.
- Click “Create” next to the warning.
- Use the default trigger “All Page Views.”
Step 6: Configure Tag Triggering
- Define a trigger for the interaction you are tracking (e.g., Purchase).
- Choose the custom event tab. For custom events (e.g., Purchase event), ensure it is pushed to the data layer upon action completion.
- Add the event name ( e.g ., Purchase ) and title the trigger, e.g. (Custom Event – Purchase).
- Assign the trigger to the Google Ads conversion tag.
Step 7: Test the Conversion Tracking Tag
- Enable Preview Mode in GTM by clicking the “Preview” button.
- Enter your website’s URL and click on the connect tab. After establishing a connection with the tag assistant, perform the tracked action (e.g. , Purchase).
- In GTM Preview Mode, check the left-hand navigation for your event.
- Ensure the Google Ads conversion tag fires correctly.
Step 8: Publish the GTM Container
- Once testing is complete, return to GTM and click “Submit.”
- Click on the Publish tab.
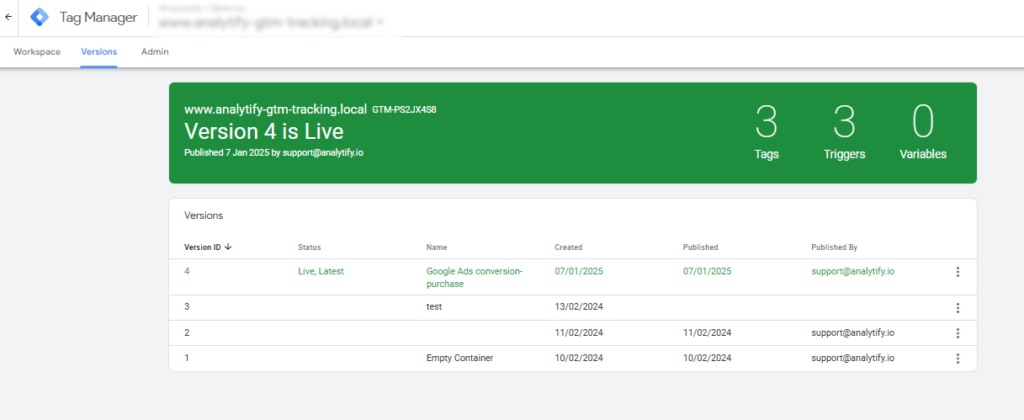
- After publishing the container, the conversion tracking tag will live on your site.
Following these steps ensures an accurate and efficient setup of Google Ads Conversion Tracking using GTM.
When setting up conversion tracking for your Google Ads campaigns via GTM, a reliable data layer is essential for passing transaction details and user interactions to your tags.
If you suspect that your conversion data isn’t being captured accurately, it might be due to an issue with your data layer implementation. Our guide on the Google Tag Manager Data Layer explains how to configure and troubleshoot your data layer, ensuring that all the necessary information is correctly transmitted for optimal conversion tracking.
Method 2: Setting Up Conversion Tracking with Analytify (Easy Method)
Analytify is the best WordPress plugin that simplifies the integration of Google Ads and Google Analytics with your WordPress site. It enables seamless conversion tracking while offering an intuitive and user-friendly interface designed for all levels of users.
Join 50,000+ beginners & professionals who use Analytify to simplify their Google Analytics!
There are the following features of Analytify:
- User-Friendly Interface: Analytify offers an intuitive dashboard that makes viewing and managing your analytics data easy, even if you’re not a tech expert.
- Seamless WordPress Integration: Designed specifically for WordPress, Analytify integrates effortlessly with your site to connect Google Ads and Google Analytics.
- Automated Reporting: Generate detailed reports automatically, tailored to your campaign performance and website activity.
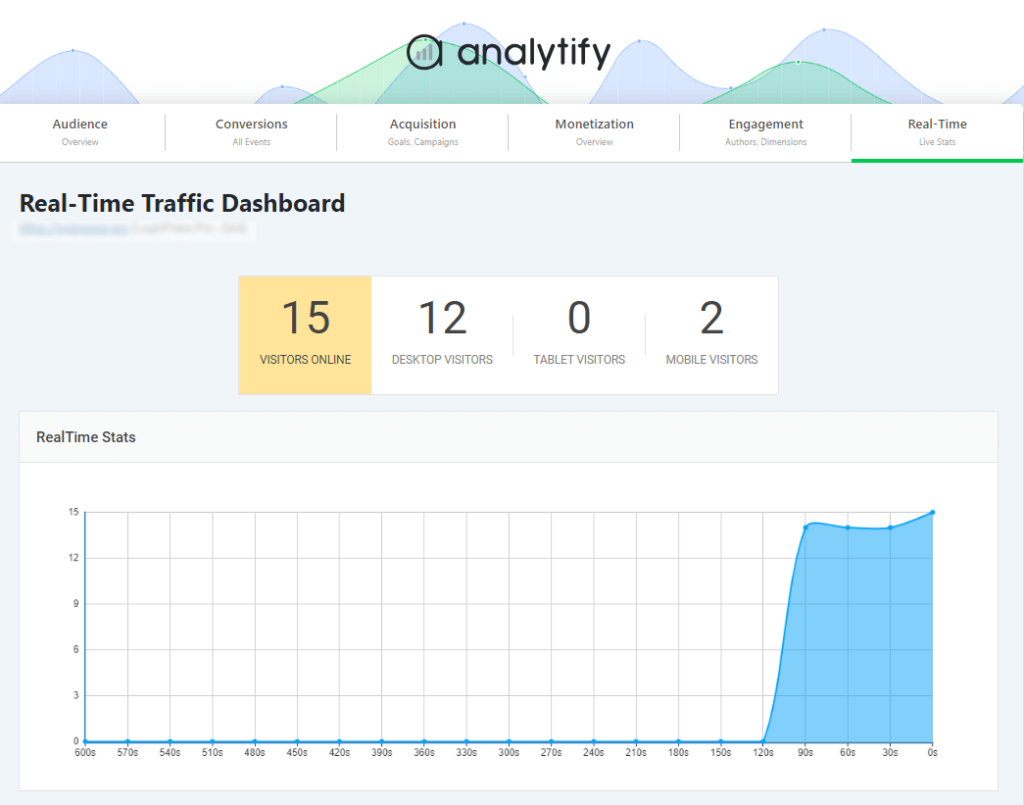
- Real-Time Conversion Tracking: Get instant updates on how your Google Ads campaigns are performing with real-time updates on conversions.
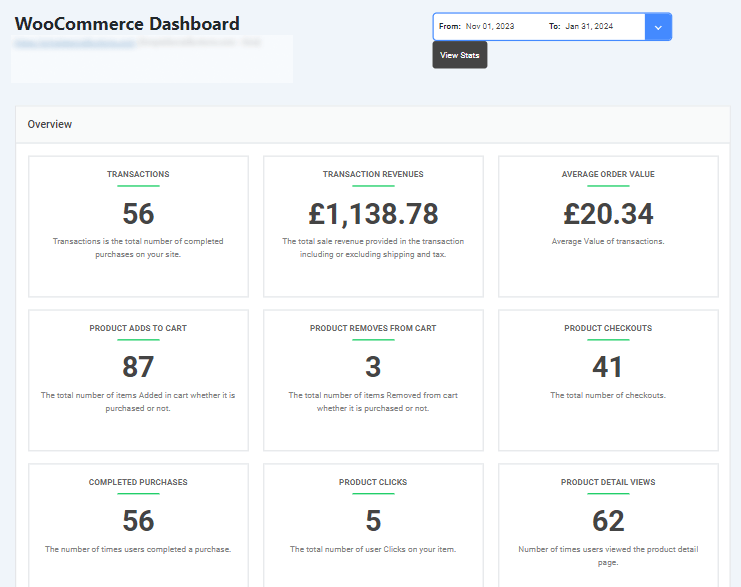
- Enhanced eCommerce Tracking: Track sales, revenue, and other metrics easily when analyzing your online store’s performance with the help of Analytify woocommerce add-on.
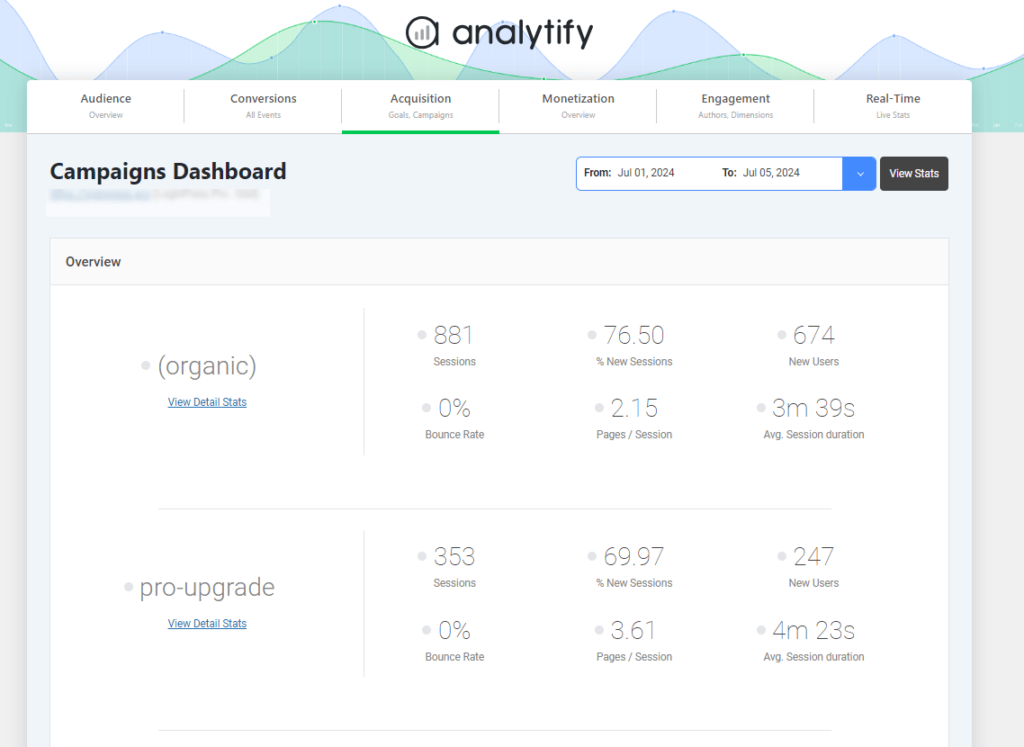
- Campaign Insights: Analyze the effectiveness of your Google Ads campaigns directly from your WordPress dashboard via the campaign tracking add-on.
- Multi-Channel Attribution: Understand how various marketing channels contribute to conversions for a complete view of your customer journey.
Using Analytify, you can efficiently track conversions on your WordPress site and optimize your Google Ads campaigns.
Now follow these steps to install and activate analytify and Google Ads tracking:
Step 1: Install and Activate the Analytify Plugin for GA4
For the WordPress crowd, Analytify streamlines the entire process. No coding is required; just a few clicks and Google Analytics is running. Analytify is a popular WordPress plugin that simplifies the installation process for GA4.
Here’s how to do it:
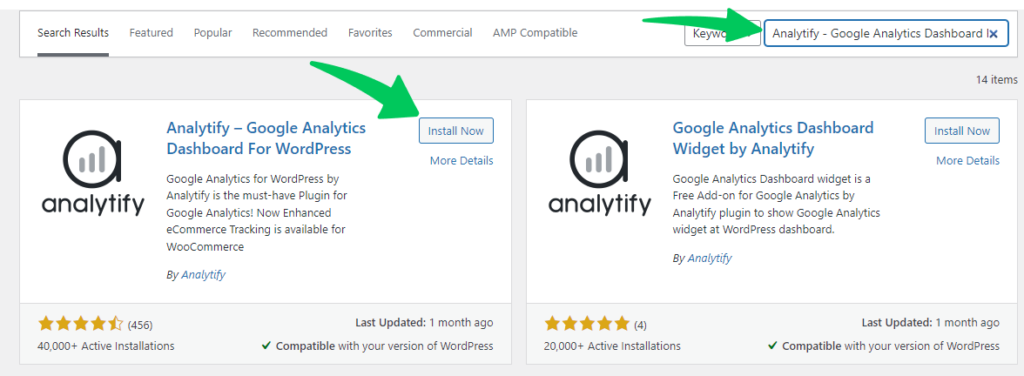
- Navigate to WordPress Dashboard >> Plugins >> Add New.
- Search Analytify and install the plugin.
- Once the plugin is installed, go to Plugins >> Analytify and click on the Settings tab.
Step 2: Link Google Analytics with Your WordPress Site
- Go to the Analytify settings in your WordPress dashboard.
- Follow the prompts to connect your Google Analytics account and link it with your WordPress website.
For more details, read How to Integrate Google Analytics 4 with Analytify.
Step 3: Enable Google Ads Conversion Tracking
- In your WordPress dashboard, go to Analytify >> Add-ons.
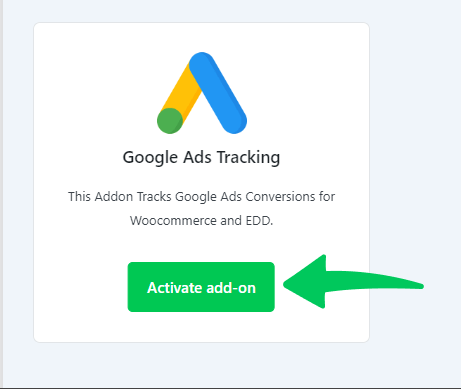
- If you haven’t already, activate the Google Ads Tracking add-on. This will allow Analytify to connect with your Google Ads account.
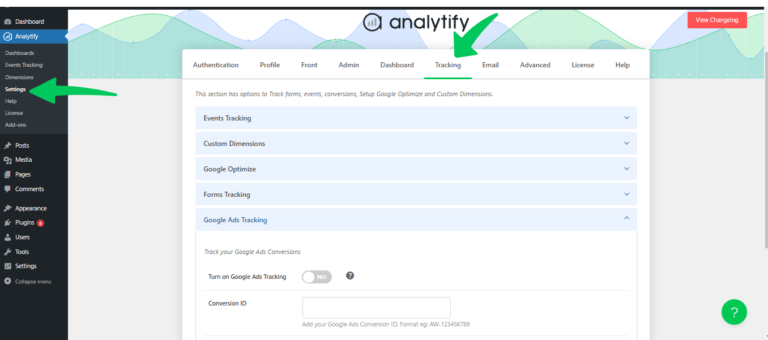
- After activating the add-on, go to Analytify >> Settings >> Tracking tab.
- In the Tracking section, find the Google Ads Tracking option and toggle it to On.
- Once Google Ads Tracking is enabled, you’ll see fields for Conversion ID and Conversion Label.
Copy and paste the Conversion ID and Conversion Label from your Google Ads account into these fields. - Don’t forget to click Save Changes to ensure your settings are updated.
Congratulations! You’ve successfully set up Google Ads Conversion Tracking with Analytify. Now, you can monitor the performance of your Google Ads campaigns directly within Google Analytics.
Advanced Tips for Google Ads Conversion Tracking
To make the most of your Google Ads campaigns, going beyond basic conversion tracking is essential. Advanced techniques, such as enabling Enhanced Conversions and tracking conversions with dynamic values, allow you to gain deeper details into user behavior and campaign performance. Let’s explore these two advanced tips to elevate your Google Ads tracking strategy:
Enable Enhanced Conversions in Google Ads
Enhanced conversions allow you to capture user information, such as email addresses or phone numbers, to improve the accuracy of conversion tracking in Google Ads. This feature helps Google refine attribution and deliver more insightful reports.
Let’s assume your developer has configured your website to push user email addresses into the Data Layer. Follow these steps to enable and set up enhanced conversions:
Step 1: Activate Enhanced Conversions in Google Ads
- Go to Goals >> Conversions> > Settings in your Google Ads account.
- Under the Enhanced Conversions section, check the box labeled “Turn on enhanced conversions.”
- Select the Google Tag Manager method for implementation.
Step 2: Update the Google Ads Conversion Tracking Tag
- Open your Google Ads Conversion Tracking tag in GTM.
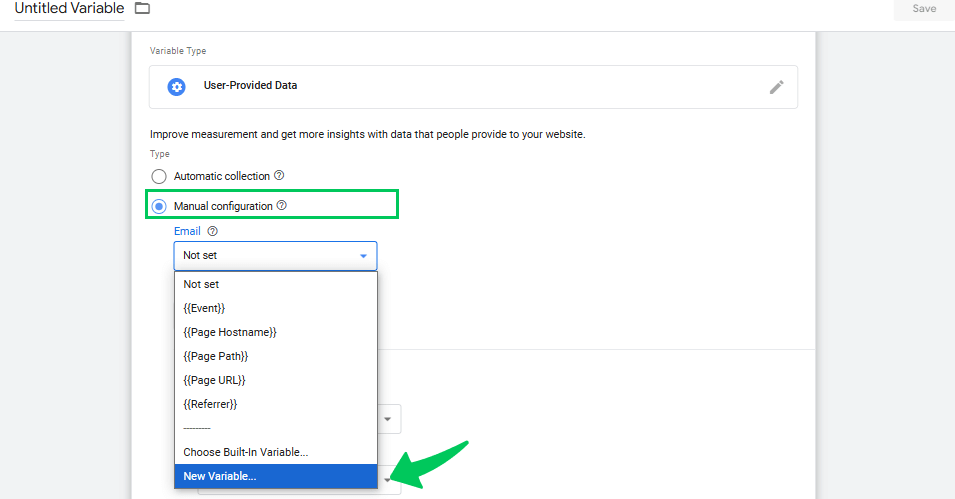
- Check the box to include user-provided data from your website.
- From the drop-down menu, select New variable.
- Choose Manual configuration to have greater control over the data you track.
- Under the Email section, Select the new variable.
- Create a New Data Layer Variable using the exact name of the variable visible in the Preview mode. Save the variable.
- Save the changes in a tag by clicking the save tab.
- Add additional user-provided data if needed, then save your changes.
Step 3: Testing Enhanced Conversions
- Install the EC Assist Chrome Extension
- Download and activate the EC Assist Chrome extension by enabling it in your browser’s extensions panel.
- Verify in GTM Preview Mode
- Enter GTM Preview mode, perform the tracked conversion action, and ensure the tag fires successfully.
- Use the EC Assist extension to check for detected conversions. The extension will display events and collected user data.
- Review the Data
- Select the detected conversion in the EC Assist extension to view detailed information, including the hashed data sent to Google.
If you’re tracking users in regions like the European Union or the UK, implementing Consent Mode is often required to comply with local regulations. While this guide doesn’t cover Consent Mode in detail, it involves adjusting tracking based on user consent preferences.
For further details on Consent Mode and its implementation, refer to our guide on Google EEA Compliance and Consent Signals.
Track Google Ads Conversions with Dynamic Values
Tracking conversions with dynamic values in Google Ads is a powerful feature, particularly for e-commerce businesses. By sending dynamic values to Google Ads, you can quickly assess your Return on Ad Spend (ROAS).
Imagine someone purchases an item worth $25. To measure this, you can add a specific value to the Purchase event in your website’s Data Layer. Now, you want to connect this value to a conversion in Google Ads.
You can send that exact value to Google Ads, which calculates and displays how much revenue each ad or campaign has generated for your business. This detailed tracking is essential for optimizing campaigns and maximizing profitability.
To use dynamic values in Google Tag Manager, follow these steps:
Step 1: Create a Data Layer Variable:
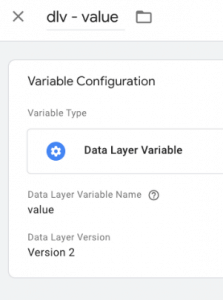
- Navigate to Variables >> New >> Data Layer Variable in GTM.
- Enter the exact key name stored in the Data Layer, e.g., value.
Step 2: Update the Google Ads Conversion Tag
- Insert the newly created Data Layer Variable as the Conversion Value field in your Google Ads Conversion Tracking tag.
- For businesses operating in a single currency, add the appropriate currency code (e.g., USD for US dollars, EUR for euros).
Once you’ve configured your tag, save it and publish the changes in Google Tag Manager. This setup ensures that your Google Ads reports reflect accurate dynamic values, helping you make good decisions about your ad campaigns.
Conversion Tracking Common Errors and Troubleshooting
When setting up conversion tracking, users often encounter different challenges related to Google Tag Manager (GTM). Addressing these issues promptly ensures accurate tracking and avoids discrepancies in your data. Here’s how you can tackle common errors and optimize your setup:
GTM: Debugging Triggers and Tags
Integration issues with Google Tag Manager frequently arise due to misconfigured triggers or tags. For instance, triggers may not align with the specific user actions you want to track, or tags may not fire as expected. Debugging involves:
- Verifying that the triggers are set to fire based on the appropriate conditions, such as button clicks, form submissions, or page views.
- Using GTM’s Preview and Debug mode to confirm that tags fire at the correct time and data is sent to Google Analytics without errors.
To avoid these pitfalls, ensure your GTM setup is configured correctly from the start. For more guidance, check our detailed articles on Setting up Google Tag Manager.
Analytify: Ensuring Correct Account Linking and Plugin Activation
For WordPress users relying on Analytify, errors often occur when the plugin is not linked to the correct Google Analytics account or has not been activated properly. To resolve these issues:
- Confirm that the plugin is configured with the correct Google Analytics account by reviewing the settings in your WordPress dashboard.
- Ensure the plugin is up-to-date to avoid compatibility issues and access the latest features.
If you’re using WordPress, Analytify simplifies tracking by eliminating complex setups and offering built-in solutions for GA4 and Google Ads tracking. Using Analytify, you can bypass many of the common integration challenges faced with GTM and focus on analyzing your data effectively.
Google Ads Conversion Tracking FAQs
1. Why are my Google Ads getting clicks but no conversions?
If your ad copy lacks impact, users may click out of curiosity but fail to convert because they are not convinced of the value of your product or service. To improve your ad copy, focus on the benefits of your product or service, use clear and concise language, and include a strong call to action.
2. What is the Google Ads Conversion Tracking ID?
The Google Ads Conversion Tracking ID is a unique identifier used to link your Google Ads account with your tracking tag. It ensures that conversions are correctly attributed to the corresponding ads. You can find this ID in your Google Ads account.
3. Can I track conversions using a Google Ads Conversion Tracking App?
Yes, some apps integrate with Google Ads to help you set up and manage conversion tracking easily. These apps often support eCommerce platforms like Shopify or WooCommerce, allowing seamless integration for tracking purchases, sign-ups, and other key events.
4. How to check conversion tracking in Google Ads?
To check if conversion tracking is working:
Go to your Google Ads account and navigate Tools & Settings > Measurement > Conversions.
Look for your conversion actions in the list and verify the “Tracking Status.”
Use the Tag Assistant tool to troubleshoot any tracking issues.
5. How does Google Ads Conversion Tracking help optimize campaigns?
Conversion tracking helps you measure the effectiveness of your ads by identifying which campaigns, ad groups, and keywords drive valuable user actions. With this data, you can optimize bids, refine targeting, and improve your overall return on investment (ROI).
6. Can I track multiple conversions with one tag?
Yes, but it’s generally recommended to use separate tags for different conversion actions to keep tracking organized.
Final Thoughts: Google Ads Conversion Tracking
Google Ads Conversion Tracking is crucial for optimizing the success of your campaigns. Businesses can improve ad targeting, allocate budgets effectively, and maximize ROI by understanding how users interact with your ads and tracking their actions.
If you’re looking for greater flexibility and control, GTM may be your go-to, especially for advanced users and those working on large-scale campaigns. For WordPress users, Analytify offers a more user-friendly approach with built-in Google Ads and Analytics integration. Whichever method you choose, tracking conversions is the key to measuring success and achieving growth in your Google Ads campaigns.
Check out our article for more detailed guidance on finding Google Ads reports in Google Analytics.
Feel free to share your thoughts or ask questions in the comments below!

