How to Add Google Analytics Annotations (2025 Update)
Ever wondered how you can add context to your Google Analytics data to make sense of the fluctuations you see? Google Analytics Annotations in GA4 are the perfect solution for tracking important events, campaigns, or changes that could impact your metrics.
GA4 is packed with new features, and annotations are one of them. In this guide, we’ll show you how to add annotations in Google Analytics 4, why they matter, and how you can use them to improve your data analysis.
Google Analytics Annotations (TOC):
What are Google Analytics Annotations?
Google Analytics Annotations are notes that you can attach to specific dates in your data. These notes help explain what happened on a certain day or during a particular period.
For example, you might add an annotation to explain why there was a sudden spike in traffic or why your conversion rate dropped.
GA4 annotations are a little different than in Universal Analytics. While they may not be as easy to spot, they are still essential for tracking important events and understanding your data.
Why are GA4 Annotations Important?
GA4 Annotations are incredibly valuable because they help you understand the “why” behind your data. Without annotations, it can be difficult to connect changes in your metrics with real-world events. For example, a sudden drop in traffic or an unexpected increase in conversions might seem confusing. But with annotations, you can link these changes to specific actions or events, like a product launch, a special promotion, or even external factors like holidays or industry news.
Here are a few reasons why you would need to annotate Google Analytics:
- Tracking Key Events
Annotations allow you to mark important events that could impact your data. For example, if you run a special sale, launch a new marketing campaign, or make changes to your website, you can add an annotation to track how these events affect your performance. This makes it easier to analyze your data and understand the cause behind any significant spikes or drops. - Data Context and Insights
Annotations provide context for your metrics. They allow you to look back at specific dates and instantly understand what happened on those days. This is essential when you’re analyzing trends over time or comparing performance across different periods. Instead of guessing why a certain change occurred, you can refer to your annotations for a clear explanation. - Improving Team Collaboration
If you’re working with a team, annotations can help everyone stay on the same page. When multiple people are accessing the same data, annotations allow you to leave notes about changes, experiments, or campaigns that other team members can review. This ensures that everyone has the same understanding of the data and can make informed decisions based on accurate context. - Making Better Data-Driven Decisions
When you have detailed annotations linked to your data, you can make more informed decisions about your marketing and website strategies. Knowing the impact of certain events or campaigns allows you to adjust your approach for better results. For instance, if an annotation shows that a particular promotion led to increased traffic, you might decide to run similar campaigns in the future. - Handling Long-Term Projects
For businesses or websites running long-term projects, annotations help you track progress over time. Whether it’s a multi-phase marketing strategy or an ongoing product launch, annotations keep a record of key milestones and results. This allows you to evaluate the overall success of long-term efforts and adjust as needed.
GA4 annotations help you maintain a clearer, more organized understanding of your data. They not only save time when analyzing reports, but they also provide a deeper, more actionable insight into what’s working and what’s not.
How to Add Google Analytics Annotations in GA4 (Step by Step)
Adding annotations for GA4 might not be as obvious as it was in Universal Analytics, but it’s still a simple process once you know where to look. Here’s a step-by-step guide to help you add Google Analytics annotations and track important events in your GA4 property.
Step 1: Log in to Your GA4 Property
First, go to Google Analytics and log in to your account. Select the GA4 property you want to add annotations to.
Step 2: Navigate to the Reports Section
- Once you’re inside the GA4 property, go to the Reports section on the left-hand sidebar.
- Choose the specific report where you want to add an annotation. For example, you can select the Reports Snapshot or any of the other predefined reports.
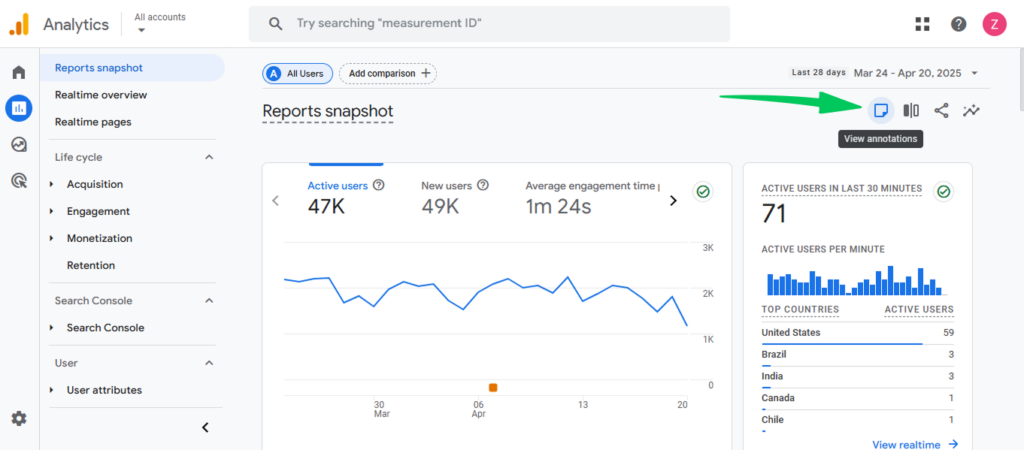
Step 3: Find the Sticky Note Icon
- Look for the sticky note icon in the top-right corner of the report. This is the button you’ll use to add an annotation.
- If you don’t see this icon, it might be because you are in an exploration report, where annotations aren’t available. Annotations are only supported in the Reports section, not in Exploration reports.
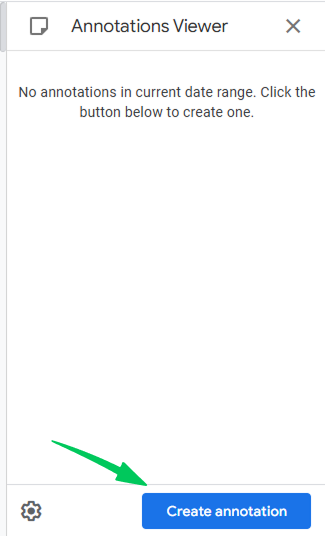
- Click the sticky note icon to open the Annotations Viewer panel. This panel will show any existing annotations for the report.
- If you haven’t added any annotations before, this panel will be empty.
- In the Annotations Viewer, click the Create annotation button to begin adding a new annotation.
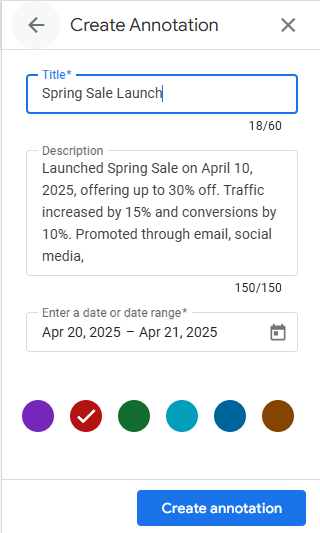
- A pop-up window will appear for you to input details about the annotation.
Step 4: Enter the Annotation Details
- Title: Give your annotation a clear title. For example, “Spring Sale Launch” or “Website Update.”
- Description: Provide more context about the event. This could include details such as what triggered the event (e.g., “Campaign launched on April 10, 2025”).
- Date: Select the date or date range for the annotation. If you’re marking a specific event that happened on a certain day, choose that date.
- You can choose a color for the annotation to categorize it visually. This can help differentiate different types of events, like marketing campaigns or seasonal promotions.
- Click the color picker to select a color.
Step 5: Save the Annotation
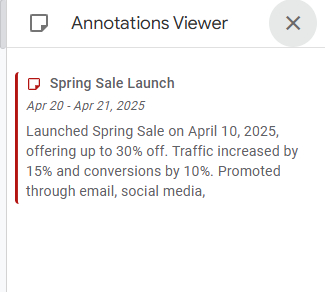
- Once you’ve filled in all the details, click Create annotation to save it.
- The annotation will now appear as a marker on the time series chart for that report, and you’ll be able to see it in the Annotations Viewer.
Step 6: View or Edit Annotations
- To view or edit your annotations, simply click on the sticky note icon again to open the Annotations Viewer. From there, you can click on an annotation to see the details, or select the option to edit or delete it if needed.
Pro Tips for Using Annotations in GA4
Now that you know how to add annotations, it’s important to follow best practices to get the most out of them. Using annotations wisely can help you stay organized, track your progress, and make data analysis more effective.
1. Use Annotations for Major Events
Focus on adding annotations for significant events, such as:
- Marketing campaigns (e.g., ads, promotions)
- Product launches or updates
- Website changes (e.g., redesigns or feature additions)
- Seasonal events (e.g., holidays or special sales)
By tracking these events, you can link performance changes directly to the actions that caused them, making it easier to analyze the results.
2. Be Clear and Concise
Keep your annotations clear and to the point. You don’t need to write long paragraphs; instead, aim for a brief, descriptive note. For example:
- “Launched Spring Sale campaign”
- “Implemented website redesign”
- “Traffic spike due to Holiday sale”
These short annotations will give you enough context to understand what happened without overwhelming you with unnecessary details.
3. Regularly Review and Update Annotations
Over time, your website and campaigns will evolve, and so should your annotations. Regularly review and update them to reflect new events and ensure they remain relevant. If you’re running multiple campaigns or making frequent updates, make sure to add annotations for each of them to keep everything organized.
4. Use Annotations to Explain Data Outliers
Data outliers can sometimes look confusing or misleading. For instance, a sudden spike in traffic might seem strange, but it could have been caused by an influencer’s mention or a viral post. Adding an annotation explaining this outlier helps you and your team understand the reason behind the anomaly, so you don’t misinterpret the data.
5. Collaborate with Your Team
If you’re working with a team, annotations are a great way to share insights and observations. Use them to communicate key events or decisions that could impact your data. For example, if someone in your marketing team runs a new ad campaign, they can add an annotation so others can easily track its impact on your metrics.
6. Link Annotations to Business Goals
Always tie your annotations to specific business objectives. Whether you’re tracking a product launch or a website change, make sure your annotations are aligned with the goals you’re working toward. This helps you assess whether the changes made had the intended impact on your performance metrics.
How Analytify Can Enhance Google Analytics for WordPress Users
Join 50,000+ beginners & professionals who use Analytify to simplify their Google Analytics!
Analytify can significantly enhance your experience with Google Analytics in WordPress. It integrates seamlessly with your website and offers advanced tracking and reporting features that make adding and managing annotations even easier.
Here’s how Analytify can benefit WordPress users when working with GA4:
1. Easy GA4 Integration
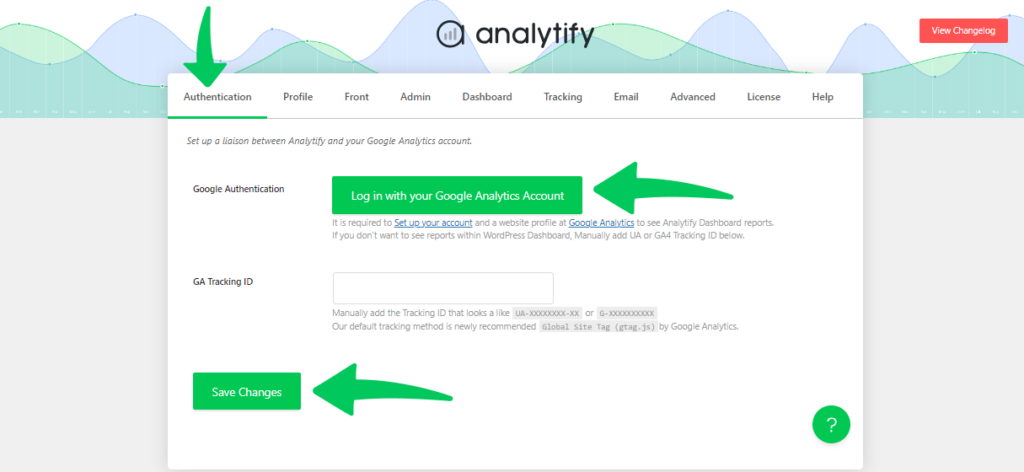
Setting up GA4 on WordPress can be tricky for beginners, especially with the need to manage tags, events, and goals. Analytify takes care of this for you by providing a seamless integration with GA4. It connects your website with GA4 without requiring any coding, allowing you to focus on what matters—your website’s performance.
2. Real-Time Analytics
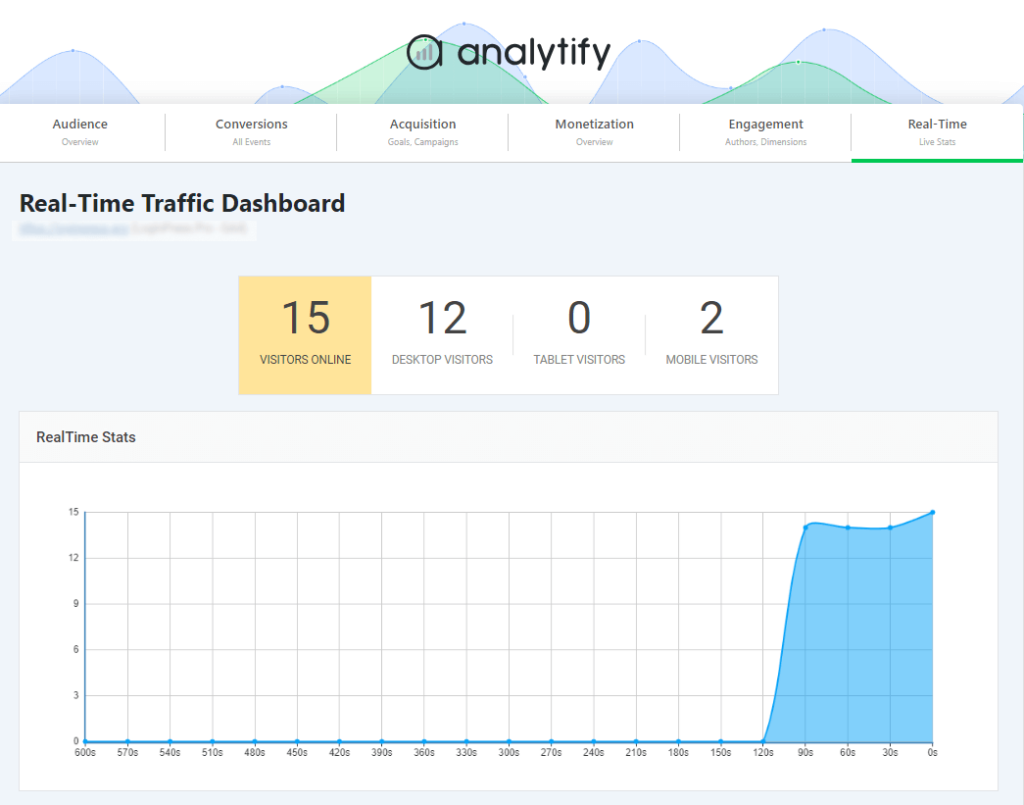
With Analytify, you can view real-time data directly from your WordPress dashboard. This eliminates the need to log into GA4 every time you want to check your website’s performance. You can track real-time metrics, such as active users, traffic sources, and conversions, all in a simple, digestible format. This makes it easier to stay on top of your data without getting overwhelmed by the complexity of GA4.
3. Custom Event Tracking
Even though GA4 offers extensive event tracking, setting it up for specific user actions (like button clicks or form submissions) can be tedious.
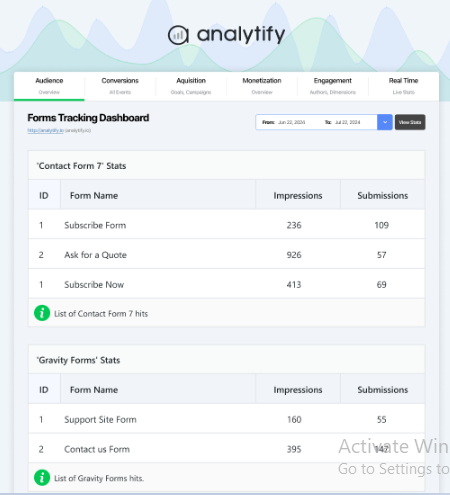
Analytify automates the process by capturing key events on your WordPress site. You can track things like form submissions, product views, or e-commerce transactions without needing to manually configure events in GA4, simplifying the data collection process.
Frequently Asked Questions About GA4 Annotations
1. How do I add annotations in GA4?
To add an annotation in GA4:
Navigate to the Reports section.
Click the sticky note icon in the top-right corner of the report.
Click Create annotation.
Enter a title, description, and select a date or date range.
Optionally, choose a color to categorize your annotation.
Click Create annotation to save.
Annotations will appear as markers on time series charts within your reports.
2. Where can I view my annotations in GA4?
You can view annotations by clicking the sticky note icon in the top-right corner of any report. This will open the Annotations Viewer panel, where you can see all annotations associated with that report.
3. Can I edit or delete annotations in GA4?
Yes, if you have Editor or Administrator access, you can edit or delete annotations. To do so, open the Annotations Viewer panel, click on the annotation you wish to modify, and make the necessary changes or click Delete.
4. Are annotations available in all GA4 reports?
Annotations are currently available in the Reports section, including charts in the Home report, Reports section, and Advertising reports. They are not available in Exploration reports.
5. Is there a limit to the number of annotations I can create in GA4?
Yes, GA4 allows up to 1,000 annotations per property. This limit helps ensure that annotations remain manageable and relevant.
Google Analytics Annotations: Conclusion
Google Analytics 4 annotations are a powerful tool for adding context to your website data, helping you understand the “why” behind changes in your metrics.
By using Analytify alongside GA4’s powerful annotation system, you can stay organized, track important events, and make data-driven decisions that help improve your website’s performance over time. Whether you’re a business owner, blogger, or marketer, integrating these tools will give you a clearer understanding of your website’s metrics and help you optimize for success.
We hope this article helped you understand Google Analytics Annotations.
You may also like to read:
If you have any queries or need help with the GA4 annotations strategy, feel free to connect with us in the comment box.


