How To Get Started With GA4 Custom Dimensions Add-On — Documentation page title
The Custom Dimensions add-on is built into Analytify Pro and extends what Google Analytics 4 tracks by default. You can use it to send additional data about your content — such as the author, post category, post type, or whether a visitor is logged in — directly into GA4, and then view that segmented data inside your WordPress dashboard.
This guide walks you through activating the add-on, configuring dimensions in Analytify, setting them up in GA4, and viewing the data.
Table of Contents
If you’d prefer written instructions, keep reading.
Step 1: Activate the Custom Dimensions Addon in Analytify
To set up Google Analytics custom dimensions on your WordPress site, you’ll need to Activate the Custom Dimensions add-on in Analytify.
Note: We assume that you have already installed the Analytify Pro. If not, check out our detailed guide on How to Install And Activate Analytify Pro?
1.1: Login into Your WordPress Dashboard
Go to your WordPress admin dashboard, and navigate to Analytify >> Add-ons.

1.2: Activate Custom Dimensions
Next, on the add-ons window, navigate to Custom Dimensions >> Activate add-on.

On pressing Activate add-on, Custom Dimension in Analytify gets activated.

Step 2: Create Custom Dimensions in Analytify
Once the Custom Dimensions add-on is activated, it’s time to create Custom Dimensions.
2.1: Add Custom Dimensions in Analytify
To add GA4 Custom Dimensions in Analytify, navigate to Analytify >> Settings in your WordPress admin dashboard.

Then, head toward Tracking >> Custom Dimensions to Add Dimension in a new window.

Once on this page, click Add Dimension and select the required Dimensions. Then, Save Changes.

Dimensions are attributes of your data that can be used to segment and filter your analytics reports. By assigning dimension IDs to your data, you can organize it to make it easier to analyze and extract insights.
To add Dimensions ID (values), we must set them up in Google Analytics.
Step 3: Create Matching Dimensions in Google Analytics 4
Analytify sends dimension data to GA4 automatically, but GA4 needs a matching custom dimension created on its end to recognize and store that data. This is a one-time setup per dimension.
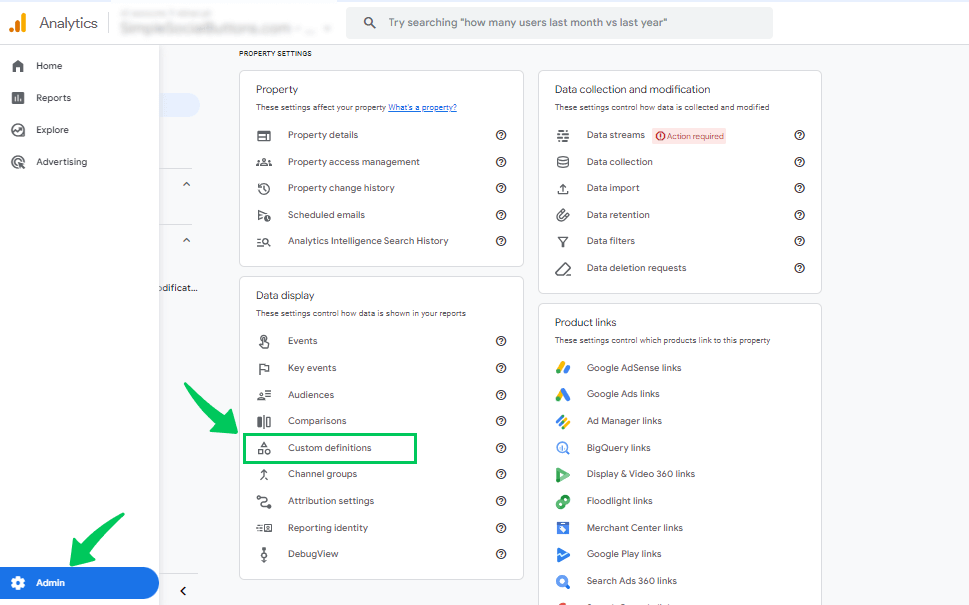
3.1: Open Custom Definitions in GA4
Go to Google Analytics and click the Admin gear icon in the bottom left. Select your GA4 property and navigate to Custom Definitions.
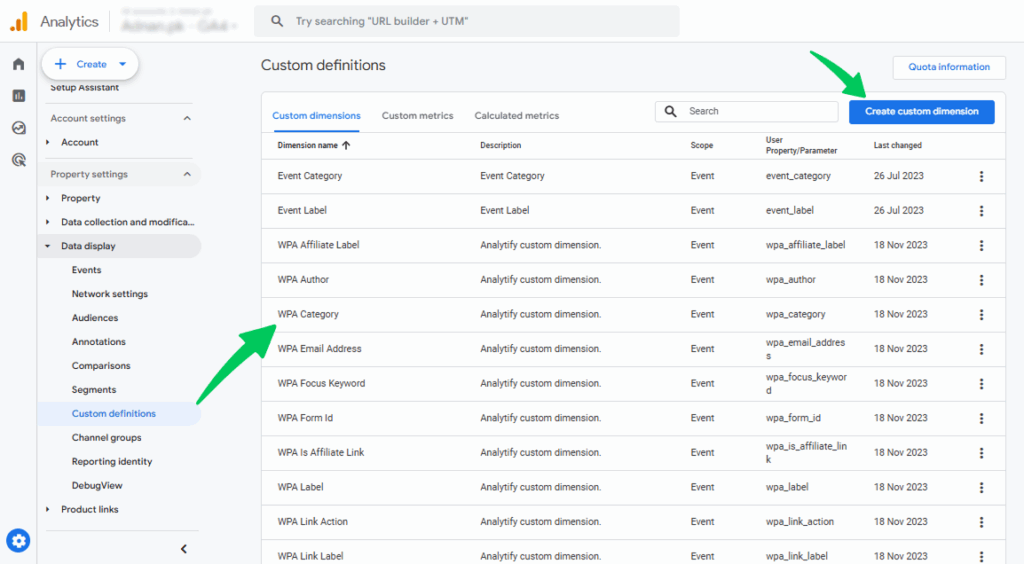
3.2: Create a New Custom Dimension
Click Create custom dimensions and fill in the following:
- Dimension Name — use a clear, descriptive name that matches what you selected in Analytify (for example, “Author” or “Post Category”)
- Scope — set to Event for content-related dimensions. Event scope captures data at the time of each page view or interaction.
- Event Parameter — enter the exact parameter name that Analytify sends to GA4. This must match exactly, character for character, or GA4 will not record the data.
- Description — optional, but useful for identifying the dimension later in your GA4 property
Note: Allow 24 to 48 hours after creating a custom dimension before data starts appearing. GA4 does not backfill historical data for new dimensions.
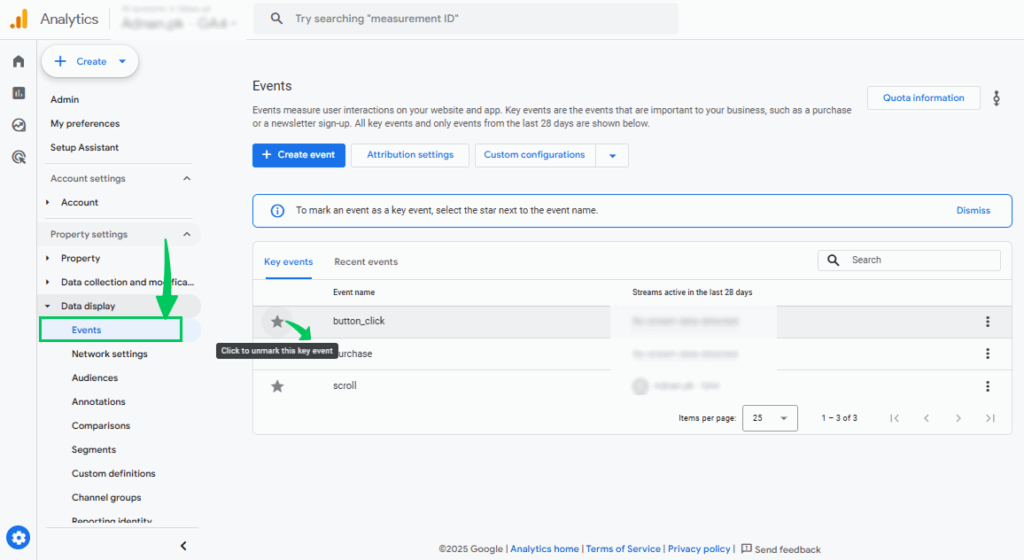
3.3: Mark Events as Key Events (Optional)
If you want to track a dimension tied to a specific user action as a key event, go to Admin >> Key Events in GA4. Find the relevant event and click the star icon to mark it as a key event.
Analytify Pre-Built Custom Dimensions in Google Analytics
Analytify includes nine pre-built custom dimensions that are ready to activate without any manual event parameter setup. These are automatically tracked by GA4 when you add them in Analytify Settings.
| Dimension | What It Tracks |
|---|---|
| Author | Which author wrote the content a visitor is viewing — useful for multi-author sites |
| Post Type | Which WordPress post type (post, page, custom type) is being viewed |
| Category | Which content category a post belongs to |
| Published At | The publish date of the content being viewed |
| Logged In | Whether the visitor is currently logged into your WordPress site |
| User ID | The unique ID of logged-in users for activity tracking |
| Tags | Which post tags are associated with the content being viewed |
| SEO Score | The Yoast SEO score of the post or page (requires Yoast SEO plugin) |
| Focus Keyword | The Yoast SEO focus keyword assigned to the post or page (requires Yoast SEO plugin) |
Step 4: View Custom Dimensions Data in Analytify
Once your dimensions are active in both Analytify and GA4, the data will appear in your WordPress dashboard after the initial 24 to 48 hour processing window.
You can access it two ways:
Option 1: Go to Analytify >> Dimensions directly from the WordPress sidebar.
Option 2: Navigate to Analytify >> Dashboards >> Engagement >> Dimensions.

You have successfully set up Custom Dimensions in Analytify. GA4 will now collect the extra data points you selected and display them in your Analytify dashboard.
If you are using Custom Dimensions to track author performance, see How to Get Started with the Authors Tracking Add-on for the full setup guide.
If you have any questions, contact the Analytify support team.