
How To Get Started With The Forms Tracking Add-on? — Documentation page title
Forms Tracking add-on in Analytify Pro allows you to track form submissions on your website using Google Analytics. With this add-on, you can track the number of form submissions, conversion rates, and other metrics related to form submissions.
By default, Google Analytics does not feature WordPress Forms Tracking. It has to be done by complex coding, but if you are looking for a way to track user interactions with your forms, lead generations, and insights of marketing campaigns via Forms. You are on the right page!
In this knowledge base article, we’ll walk you through how to Set Up the Forms Tracking add-on with Analytify.
How Does Analytify Forms Tracking Work?
Analytify Forms Tracking add-on works with the most popular WordPress Form Plugins as follows:
A few benefits of using the Analytify Forms Tracking add-on are:
- You gain insights into how users interact with your website’s forms.
- It enables you to track form submission rates and conversion rates over time.
- You can use the data to make informed decisions about optimizing your forms and improving your website’s overall performance.
- It helps to understand which forms are most effective at generating leads or conversions.
Activate the Forms Tracking Add-on
Before you begin: This guide assumes you have already installed and activated Analytify Pro. If not, follow our guide on How to Install and Activate Analytify Pro first.
Step 1: Go to the Add-ons Page
Inside your WordPress admin dashboard, go to Analytify >> Add-ons from the left sidebar.
This opens the Add-ons page with all available Analytify add-ons listed as cards.
Step 2: Activate Forms Tracking
Find the Forms Tracking card. Click the Activate add-on button.

Once activated, the button changes to Deactivate add-on, confirming the add-on is now running.
That is all it takes to activate the add-on. No separate zip file download or plugin upload is required — Forms Tracking is bundled inside Analytify Pro.
Enable Forms Tracking in Analytify Settings
After activating the add-on, you need to enable tracking for the specific form plugin you use on your site.
Navigate to Analytify >> Settings in your WordPress admin dashboard.
Then go to Tracking >> Forms Tracking.
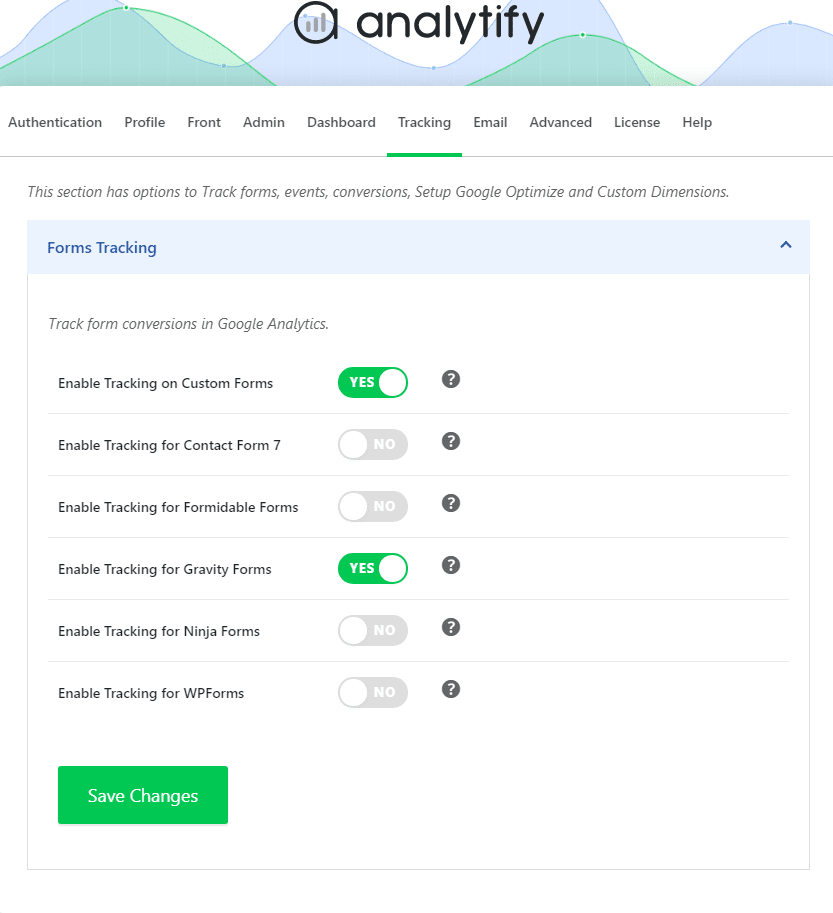
A list of supported WordPress form plugins appears. Enable the toggle for the form plugin you want to track, then click Save Changes.
Note: The form plugin you want to track must be installed and activated on your WordPress site. If you want to track custom-built forms, add the class analytify_form_custom to the <form> tag. See the detailed guide: How to Track Custom Forms in Analytify.
View Forms Tracking Data in Analytify
Once Forms Tracking is active and configured, you can view your form data in two ways:
Option 1: Go to Analytify >> Forms Tracking directly from the WordPress sidebar.
Option 2: Navigate to Analytify >> Dashboards >> Conversions >> Forms Tracking.

Both views show submission counts, conversion rates, and per-form performance data.
That is it. You have successfully activated and set up the Forms Tracking add-on in Analytify.
Want to track other user actions like file downloads, external links, or affiliate clicks? Check out our guide on How to Get Started with the Events Tracking Add-on.
If you have any questions, reach out to our support team.