As a comprehensive Google Analytics solution for WordPress, Analytify stands out as a great alternative to WordPress Google Analytics integrations. Its easy-to-use interface and detailed reporting features make it a strong contender for anyone looking to gain deeper insights into their website traffic.
It not only gives you a quick look at all of your data, but it also gives you stats for each post or page right in your WordPress dashboard. In this post, we’ll show you how to install Analytify free version on your WordPress site and turn it on.
Make sure you have the following before we start:
• A WordPress site that you host yourself.
• Admin Access to your WordPress site.
• An Active Google Analytics account.
If you’d prefer written instructions, keep reading.
There are multiple ways to install the Analytify free version. However, installing Analytify from the WordPress admin dashboard is the easiest method. Simply click the links below to jump to the method you prefer:
Let’s look at how to install the Analytify plugin easily.
You can download the zip file from the WordPress plugins directory.

Once downloaded the zip file, go to your WordPress admin dashboard and navigate to the Plugins option. Select Add New, click the Upload Plugin button at the top, and click Choose File. Then Press Install Now. Without further add, see the screenshot below:

Once the installation is complete, click the Activate Plugin button.

The steps for installing and activating Analytify are pretty easy to follow. Let’s go through them one by one.
1. Log in to your WordPress Dashboard.
2. Navigate to Plugins on the left sidebar menu, then click on Add New.
3. In the search bar, type Analytify – Google Analytics Dashboard Plugin for WordPress.
4. Once the Analytify plugin appears, click Install Now. After the installation process is complete, the Install Now button will change to Activate.


1. Click on Activate to enable the Analytify plugin on your WordPress website.
2. Upon activation, you’ll find Analytify added to your WordPress dashboard menu. Click on it to go to the Analytify settings page.

3. After clicking on Settings, you will see a message to Allow and Continue, click on it, and you’ll start

Now, you need to connect your Google Analytics account with Analytify.
1. Under the Analytify section in your WordPress dashboard, click on Settings.
2. Go to the Authentication tab.
3. Here, you will see a button labeled Log in with your Google Analytics Account. Click on it.

4. After clicking “Log in with your Google Analytics Account,” you will be redirected to the Google Accounts Authentication page; you have to select the Google Account associated with your Google Analytics account.

5. After choosing the account, you’ll need to grant Analytify the required permissions. Allow this access.

6. You’ll be redirected back to your WordPress dashboard.
Note: By default, the option to install the Google Analytics tracking code is set to “Yes.” This means you don’t need to add the tracking code manually. However, if you’ve already added the GA4 code manually, you should check “No” for this option.
You will be redirected back to Analytify >> Profiles. You must select “Profiles for posts” and “Profile for the dashboard.”
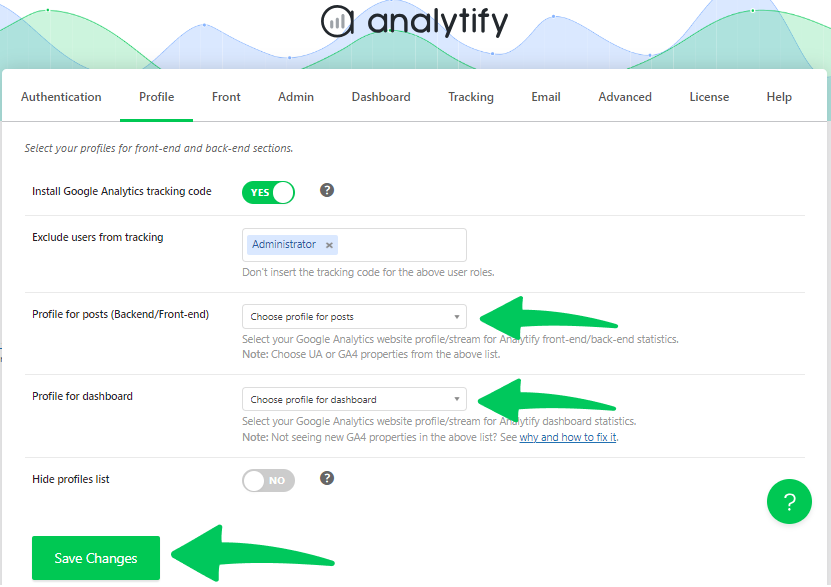
After selection, click “Save Changes.” For most users, both these options will be the same.
And there you have it! You’ve successfully installed and activated the free version of Analytify on your WordPress website.
Integrating Google Analytics with your WordPress website has never been easier with the use of Analytify. As an efficient alternative to WordPress Google Analytics tools, it simplifies the process and offers comprehensive insights into your site’s traffic and performance.
It gives you a lot of information about your website’s traffic, interaction, and much more. By following the above steps, you can easily install and turn on the free version of Analytify, which will improve your website’s data.
Remember that Analytify’s free version has simple analytics features. But if you need more advanced tools like real-time stats, better e-commerce tracking, or automated email reports, consider upgrading to the Pro version of the plugin. No matter which version you choose, Analytify is going to make a big difference in your website analytics. Read our guide to learn How to Install And Activate Analytify Pro Plugin.