Download

Documentation

Print This page

How To Get Started With GA4 Custom Dimensions Add-On

Harness the power of enhanced data tracking with Custom Dimensions addon, an inbuilt add-on of Analytify Pro. It extends Analytify’s functionality by tracking additional custom data in your Google Analytics reports. It can be used to track the author’s performance of your blog posts, the category or tags of your blog posts, Post types, campaign, or source that brought them to your website, and more. 

In this knowledge base article, we’ll walk you through setting up Custom Dimensions GA4 with Analytify.

Video Tutorial 

If you’d prefer written instructions, keep reading.

Step 1: Activate Custom Dimensions Addon in Analytify

To set up Google Analytics custom dimensions on your WordPress site, you’ll need to Activate the Custom Dimensions add-on in Analytify.

Note: We assume that you have already installed the Analytify Pro.  If not, check out our detailed guide on How to Install And Activate Analytify Pro?

1.1: Login into Your WordPress Dashboard 

Go to your WordPress admin dashboard, and navigate to Analytify >> Add-ons. 

analytify addons

1.2: Activate Custom Dimensions 

Next, on the add-ons window, navigate to Custom Dimensions >> Activate add-on.

Activate-add-on custom dimensions

 On pressing Activate add-on, Custom Dimension in Analytify gets activated. 

Custom-Dimensions-Add-on

Step 2: Create Custom Dimensions in Analytify 

Once the Custom Dimensions add-on is activated,  it’s time to create Custom Dimensions. 

2.1: Add Custom Dimensions in Analytify 

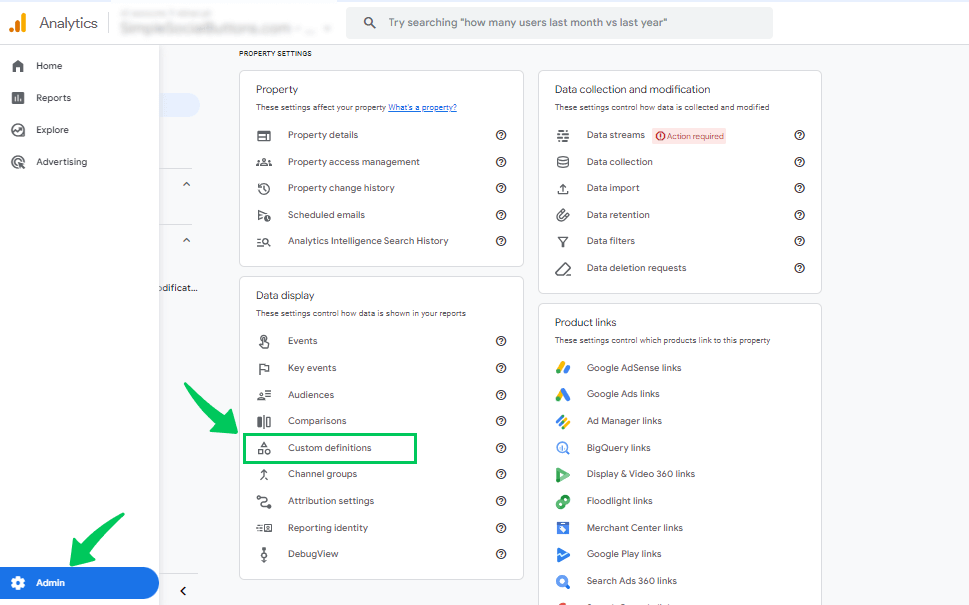
To add GA4 Custom Dimensions in Analytify, navigate to Analytify  >> Settings in your WordPress admin dashboard. 

Analytify-Settings

Then, head toward Tracking >> Custom Dimensions to Add Dimension in a new window. 

Add-Dimension-2

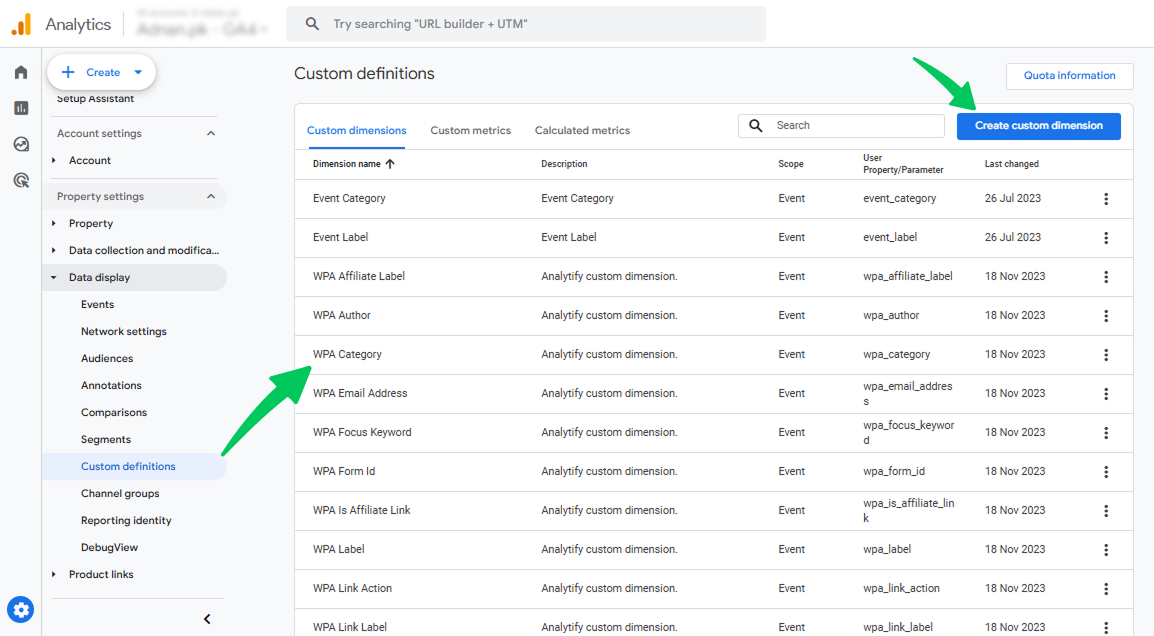
Once on this page, click Add Dimension and select the required Dimensions. Then, Save Changes

choose author dimensions

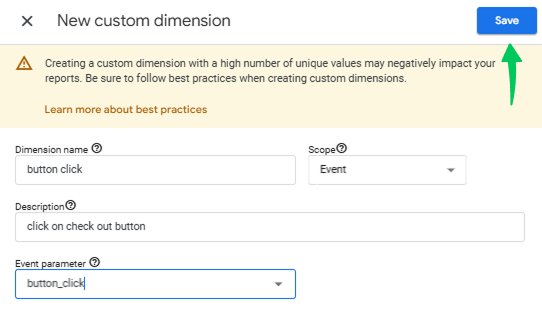
Dimensions are attributes of your data that can be used to segment and filter your analytics reports. By assigning dimension IDs to your data, you can organize it to make it easier to analyze and extract insights.

To add Dimensions ID (values),  we must set them up in Google Analytics. 

Step 3: Set Up Custom Dimensions in Google Analytics 4

  • Go to the Google Analytics account and select your GA4 property.
  • Click on the admin button in the left below corner.  
  • Then navigate to Custom Definitions.
Choose admin and custom defination custom dimensions addon
  • Analytify comes with a number of pre-built Google Analytics custom dimensions, like Author, Form ID, Post Type, Category, and many more. When you set custom dimensions in Analytify, it automatically gets tracked by GA4.  See the picture below.
  • However, you can also create a GA4 custom dimension yourself by clicking on Create custom dimensions.
Group 330 custom dimensions addon
  • After clicking on Create custom dimensions, you’ll be navigated to the new page to create dimensions.
  • Give your custom dimension a name. We suggest you type a descriptive name in the “Dimension Name” box, such as “button click”.
  • Under the Scope heading, decide what it will be used for (user or event).
  • In the Description box, you can add an explanation to help you remember what the custom dimension is for.
  • In the Event Parameter box, enter the exact parameter name you used when setting up your event e.g. (button_click). This must match exactly; otherwise, GA4 won’t record the data.
  • Then, save the dimension.
Configuration of custom dimension custom dimensions addon

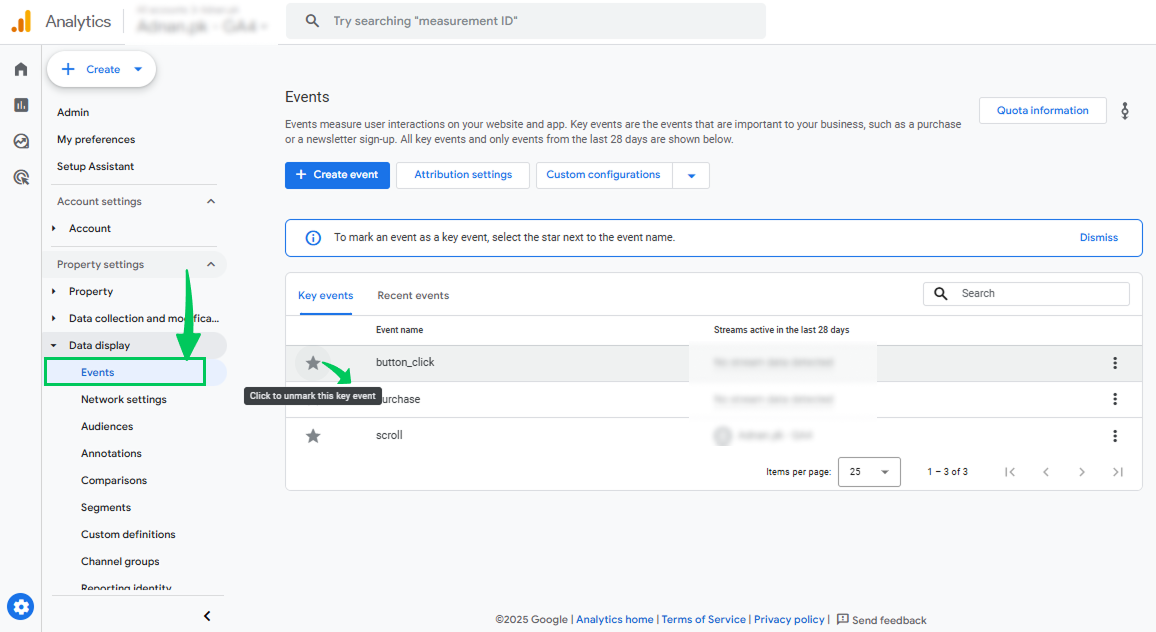
So, if your button click custom dimension is attached to an event like button_click, that event will appear in Admin >> Events once GA4 has recorded it at least once. If it’s not yet marked as a key event, the star icon will be empty, and clicking it will fill the star and change the label to “Unmark this key event”, indicating it’s now being tracked as a key event .Keep in mind, it can take about 24–48 hours for the report to fully populate with data.

mark event as key event 1 custom dimensions addon

Analytify Pre-Built Custom Dimensions in Google Analytics

In Analytify, you can get the following pre-built Custom Dimensions that would be automatically  created in Google Analytics when you authenticate your account with Analytify. . Some of these prebuilt dimensions are following, you can experience more GA4 Dimensions.

  1. Author Tracking: It helps you track the Author’s performance of your blog posts and eventually to see which author’s posts drive most of the traffic, but it will also identify the average time a user spends on that post.
  2. Post Type: It will help you track which WordPress post types are performing better in terms of engagement.
  3. Category: It will help you track which sections of your website are performing well and are the most popular sections on your website.
  4. Published At: The Published At will allow you to track the performance of content/blog posts according to the published date of content/blog post.
  5. Logged in: This custom dimension will help you to track your website visitors/users’ status, whether they are logged in or not on your website.
  6. User ID: With this dimension, you can easily track your website’s logged-in users’ activity on your website. 
  7. Tags: Tags will help you get detailed performance insights/analytics of different posts, enabling you to understand which post performs well.
  8. SEO Score: If you are using Yoast SEO plugin on your website or blog, you can use the SEO score custom dimension to analyze the SEO Score of your post or pages in Google Analytics.
  9. Focus Keyword: If you use the Yoast SEO plugin on your website/blog, then you can use the Focus Keyword custom dimension to analyze the focus keyword of your posts or pages in Google Analytics.

Explore GA4 Custom Dimensions Analytics in Analytify  

Once you have added your custom dimension names and values, Analytify will automatically track this data in your Google Analytics reports and display it in your WordPress dashboard.

To see Custom Dimensions Analytics in Analytify, go to your WordPress dashboard.

Navigate to Analytify >>  Dashboards >> Engagement >> Dimensions. 

Dimensions-Dashboard-analytify

That’s all! You have successfully installed and set up Analytify’s Custom dimensions add-on in your WordPress site. It can help you gain deeper insights into your website’s traffic and user behavior. If you want in-depth tracking of author-related metrics, see our guide on How to Get Started with Authors Add-on.

If you have any doubts or questions related to this matter, please don’t hesitate to contact our support team.