
How to Track Multistep Forms with Analytify
The Analytify Multistep Forms Tracking feature allows you to see how users interact with your complex forms.
You can track multistep forms impressions, step transitions, and abandonment rates directly within your WordPress dashboard.
This forms tracking add-on helps you find exactly where users drop off so you can improve your conversion rates.
In this guide, I will walk you through the simple steps to track Multistep forms in Analytify, ensuring you can start making data-driven decisions in minutes.
Multistep Forms Tracking (TOC):
Prerequisites: Track Multistep Forms
Before you begin, ensure your setup includes:
- Analytify Pro: Installed and activated on your website.
- GA4 Connection: Your Google Analytics property must be connected under Analytify >> Settings.
- Supported Forms: At least one multistep form created with a compatible plugin (using “Page Breaks” or “Steps”).
Step 1: Enable Forms Tracking
You do not need to add any manual code. Analytify automatically detects your forms once the integration is active.
- Log in to your WordPress dashboard.
- Navigate to Analytify >> Forms Tracking dashboard.

- Locate your specific form plugin (e.g., WPForms, Gravity Forms, or Custom Forms).

Step 2: Understand Your Metrics
Once you enable track multistep forms, Analytify sends specific data to Google Analytics (GA4) for each form step. Analytify also fully supports Multistep tracking for forms, allowing you to see exactly where users drop off in complex, multi-page journeys.
- Form Impressions: Logs when a user first views the form.
- Step Views (New): For multistep forms, Analytify tracks every time a user successfully moves to a new step. This is the key to identifying “friction points” in longer surveys or checkout flows.
- Form Submissions: Records every successful completion and final submission.
- Abandonment Rate: Tracks when a user starts a form but leaves the page without finishing. By comparing Step Views against Abandonment, you can pinpoint the exact step that needs optimization.
Pro Tip: Use the Step Views metric to analyze your form’s “completion velocity.” If you notice a high abandonment rate on Step 2 of a 4-step form, it’s a clear signal to simplify the fields on that specific page to improve your overall conversion rate.
Step 3: Verify the Multistep Tracking
To confirm that your forms are sending data correctly, follow these steps:
- Open your website in an Incognito window.
- Go to a page with a multistep form and fill out a few steps.
- Navigate away from the page or close the tab before submitting.
- Check your Google Analytics Realtime report or Analytify Dashboard.
- Confirm that the form_impression, step_view, and abandonment events appear.
Step 4: Analyze Your Reports
You can view this data to pinpoint friction in your user journey.
- Go to Analytify >> Dashboard.
- Look for the Forms Tracking section.
- Review the Form Label to identify specific forms.
- Click on the CSV icon to export a complete report of your forms.
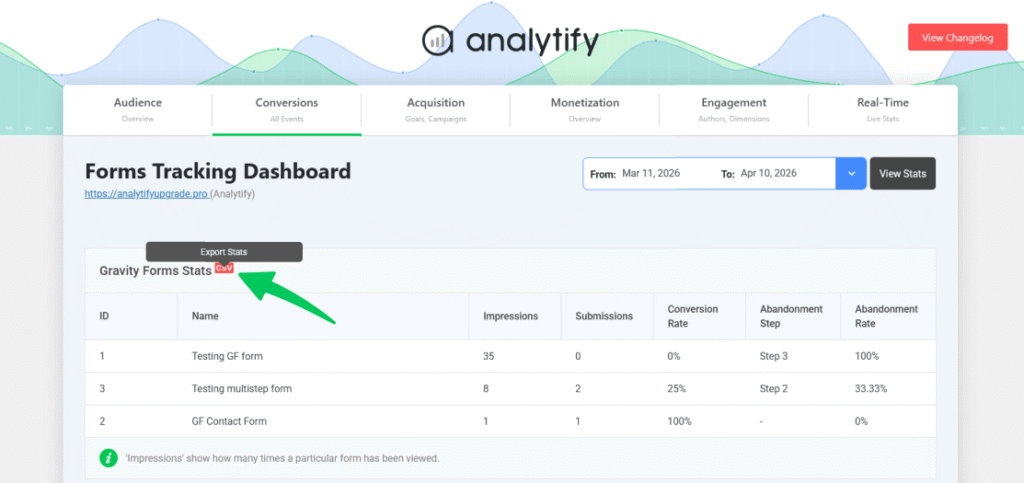
Note: Check the Step Number to see where the highest drop-offs occur. If you notice a high abandonment rate on a specific step, such as a “Detailed Survey” page, consider removing unnecessary fields to make the form easier to complete.
Best Practices for Multistep Tracking
To understand which form elements to optimize or remove, consider these industry-standard approaches:
- Session Tracking: Form impressions fire only once per session to keep your data accurate.
- Cross-Page Tracking: Analytify captures abandonment even if the user clicks an internal link to another page.
- Data Latency: If you rename a form, allow up to 24 hours for the new names to show in your Analytics reports.
Explore more forms tracking documentation below:
- HubSpot Forms Tracking with Analytify
- MailPoet Forms Tracking with Analytify
- WS Form Tracking with Analytify
- Elementor Pro Forms Tracking with Analytify
- JotForm Tracking with Analytify
Still have questions? Feel free to reach out to our live support team.