How to Set Up GA4 Events Without Code for High-Fidelity Tracking?

To set up GA4 events without code, install Analytify, connect your GA4 property, enable the Google Events Tracking add-on, and choose the events to track.
GA4 records every action, from page views to button clicks, as an event.
Many WordPress users find event setup overwhelming because it often requires coding or Google Tag Manager. For the events it supports, Analytify removes that requirement.
Analytify is a WordPress plugin that lets you create GA4 events without code and manage your analytics from your WordPress dashboard.
This guide is for WordPress site owners and beginners who want to track user interactions without writing code. I show you each step in Analytify, from installation to checking your events in the GA4 Realtime report.
Table of Contents
What are GA4 Events? (For Beginners)

GA4 events are the actions or interactions users perform on your website or app, such as clicking a link, watching a video, or making a purchase. In Google Analytics 4, every activity is tracked as an event, allowing you to see how people engage with your content in detail.
But key events are the most important actions you mark to measure conversions and critical user interactions, such as purchases or sign-ups.
GA4 divides these events into four main categories:
- Automatically Collected Events: Tracked by default when you set up GA4 (e.g., page_view, first_visit).
- Enhanced MeasurementEvents: Extra interactions automatically tracked when enabled (e.g., scrolls, outbound clicks).
- Recommended Events: Predefined events suggested by Google for better insights (e.g., purchase, sign-up).
- Custom Events: Events you create to track specific actions unique to your website.
You can track GA4 events automatically using tools like Analytify for WordPress. This makes event tracking GA4 for beginners simple.
Traditional (Manual) GA4 Event Setup and Why it’s Hard
The traditional way to set up GA4 events manually involves using Google Tag Manager, where you must create tags, define event parameters, and configure triggers for each interaction you want to track.
Google Tag Manager offers flexibility, but it can overwhelm beginners. Setup often requires complex settings, code snippets, and careful testing, which increase the chance of human error.
Without event tracking, you miss data on user behavior, conversions, and engagement. GA4 also lets you create an event from an event it already receives: in Admin, under Data display, click Events, then click Create event. That option cannot track interactions that GA4 does not already collect.
How to Set Up GA4 Events Without Code Using Analytify (Step-by-Step)
Join 50,000+ beginners & professionals who use Analytify to simplify their Google Analytics!
You can set up GA4 events without code in six steps with Analytify, a WordPress plugin for Google Analytics tracking.
Follow these steps to get started:
Step 1: Install and Activate Analytify
- Start by installing and activating the Analytify plugin on your WordPress site. Analytify also offers a Pro version that includes advanced features and add-ons for deeper insights and automated tracking.
- You can follow this Analytify Pro installation guide for a quick overview of how to set it up.
Once installed, you’ll be ready to begin no-code GA4 tracking in just a few clicks.
Step 2: Connect Your GA4 Property
- After installation, connect your Google Analytics 4 property by signing in to your Google account. Analytify automatically syncs your tracking ID, so you don’t need to handle any code or complex tag configurations.
Step 3: Enable the Google Events Tracking Add-on
To start tracking events, activate the Google Events Tracking add-on from the Analytify dashboard. The add-on requires Analytify Pro.
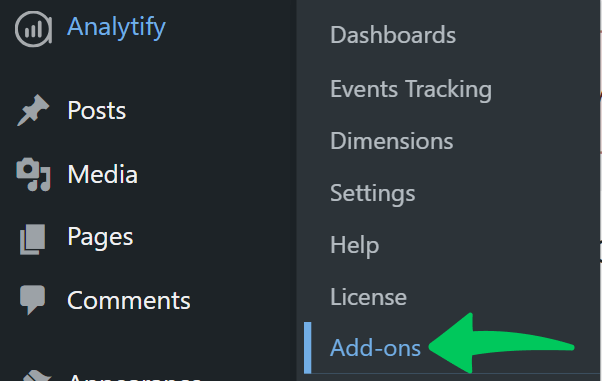
- Navigate to Analytify >> Add-ons.
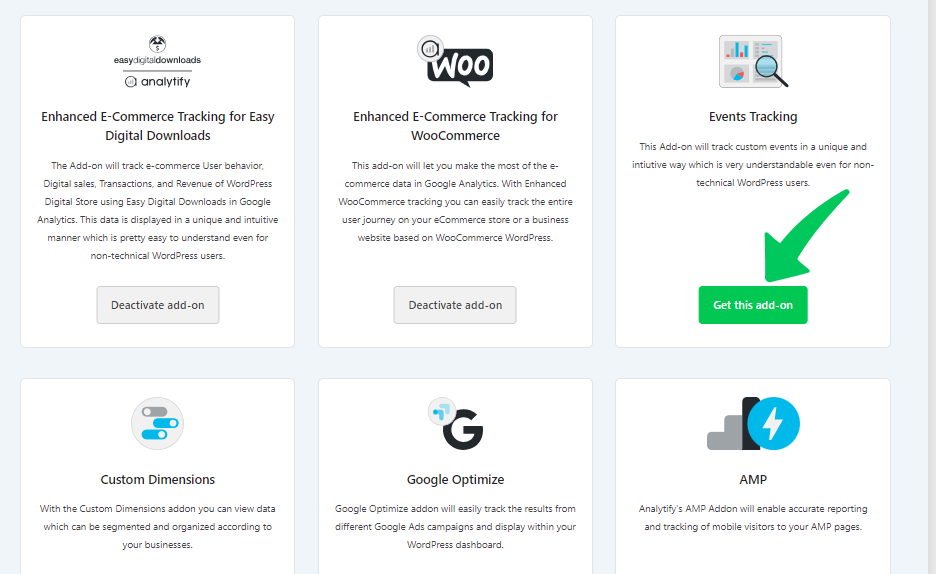
- Find the Google Events Tracking Add-on and click Activate.
- Once activated, a new Events Tracking option will appear under Analytify >> Settings.
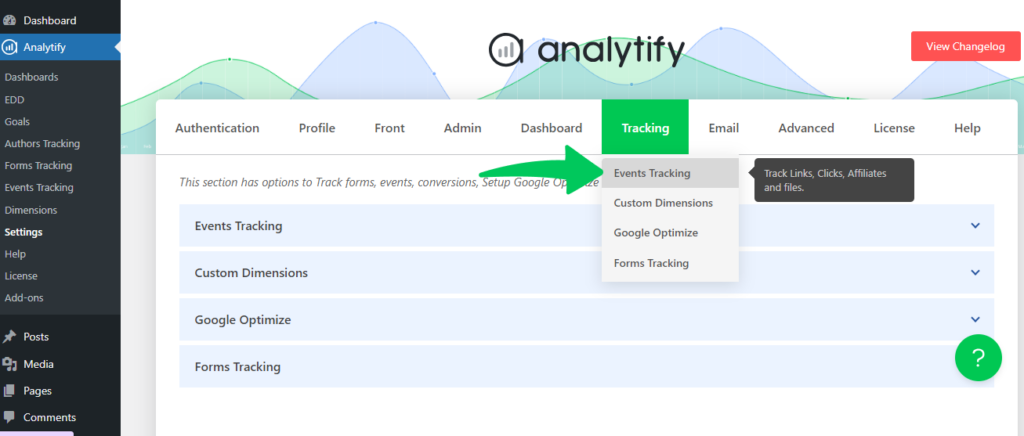
This add-on lets you define specific interactions you want to track, all without code. You can also visit the setup guide for more details.
Step 4: Configure Event Tracking
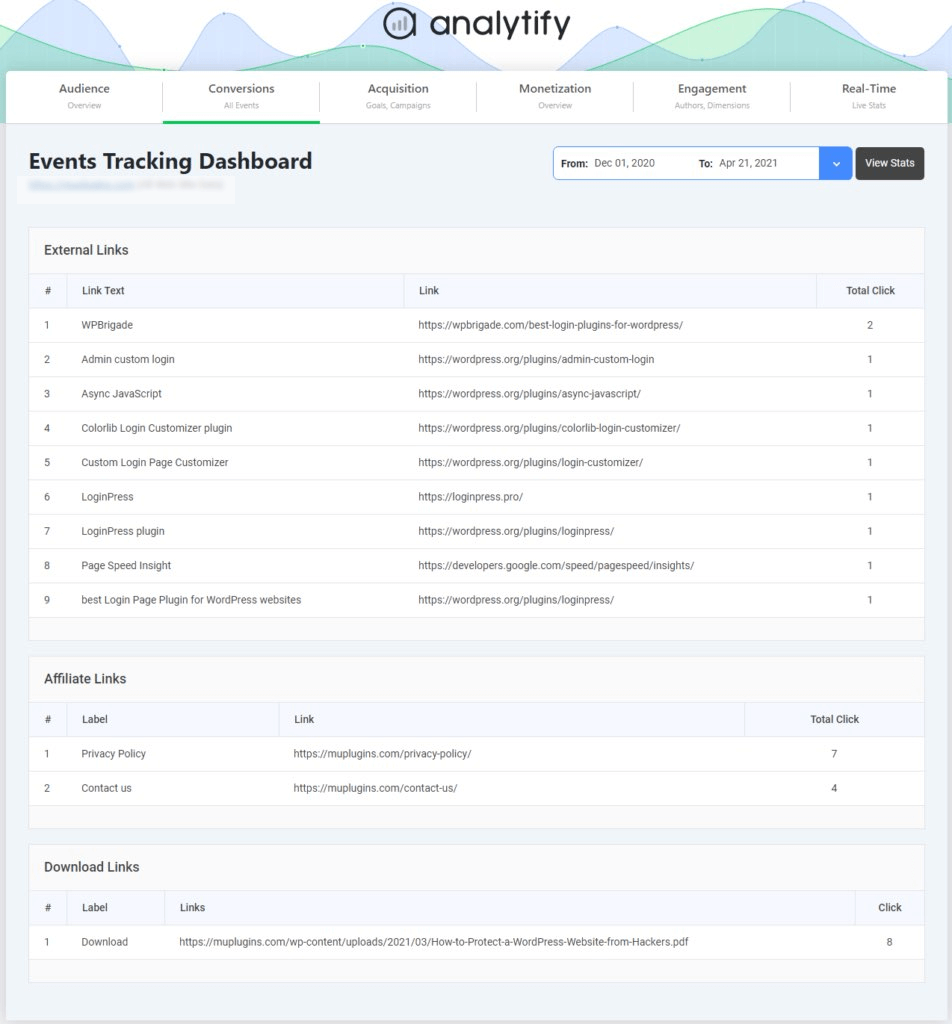
From Analytify >> Settings >> Events Tracking, choose which types of events you want to monitor. You can enable tracking for:
- Button clicks (like “Buy Now” or “Subscribe”)
- Contact form submissions
- File downloads (PDFs, images, documents)
- Affiliate links
Analytify automatically tracks these actions as GA4 events, so you don’t have to code triggers or tags.
Step 5: Verify Your Events in Real-Time Reports
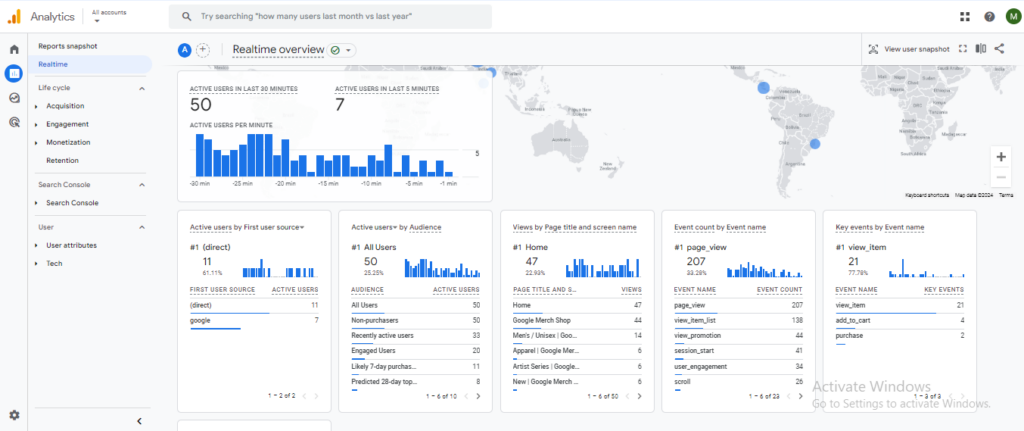
Once configured, open Reports, then Realtime in GA4 to verify your events. Interact with your site (click buttons or submit a form). The matching events should appear in the Realtime report within a few minutes, which confirms that your event setup works.
Step 6: Analyze and Optimize
Use Analytify’s dashboard or your GA4 interface to analyze event performance. You can easily identify which user actions drive engagement or conversions, helping you refine your strategy.
Analytify creates GA4 events without code and shows the reports directly inside your WordPress dashboard.
How Analytify Automates Event Insights for You
Analytify pulls your GA4 event data into the WordPress dashboard, so you can view events without opening GA4. Viewing events needs no coding or complex configuration.
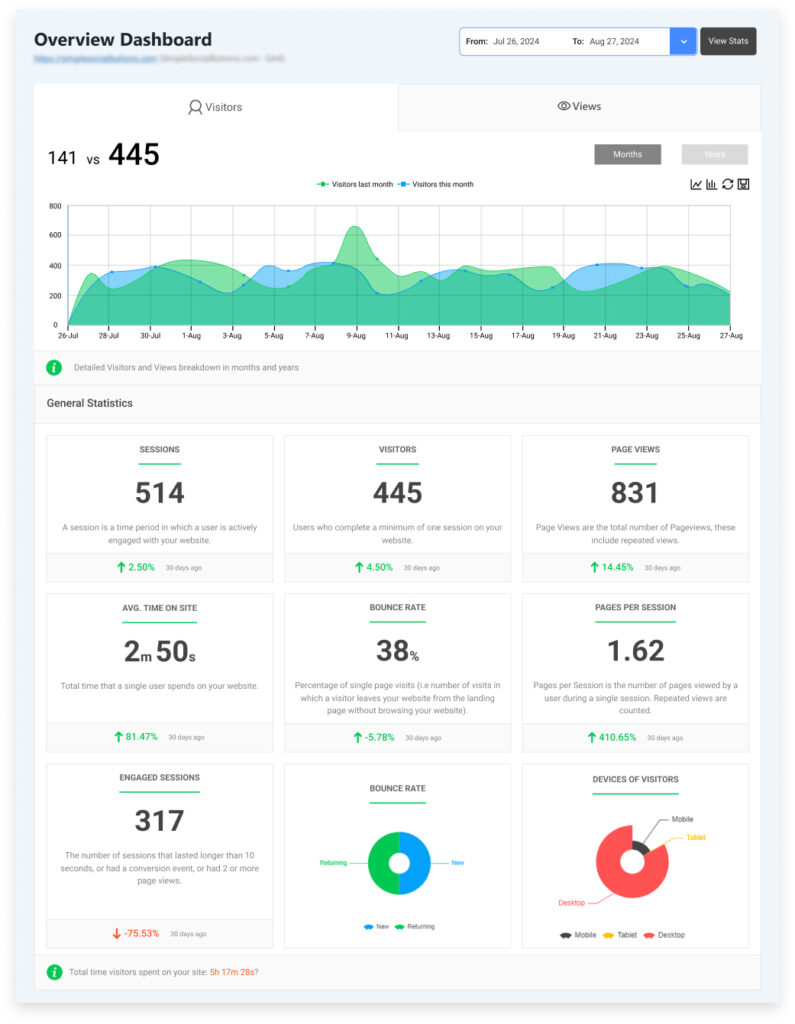
Analytify allows you to view detailed event insights directly from your WordPress dashboard. Each interaction you enable, such as clicks, form submissions, or downloads, is tracked as an event, giving you clear visibility into user behavior.
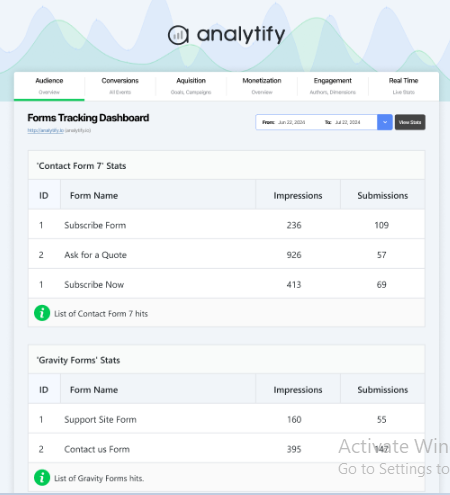
You can instantly see engagement events, conversions, and eCommerce interactions all in one place.
With the WooCommerce Tracking Add-on, Analytify automatically tracks eCommerce events, including product views, add-to-cart actions, and completed checkouts. The WooCommerce Tracking add-on helps you analyze revenue-driving activities.
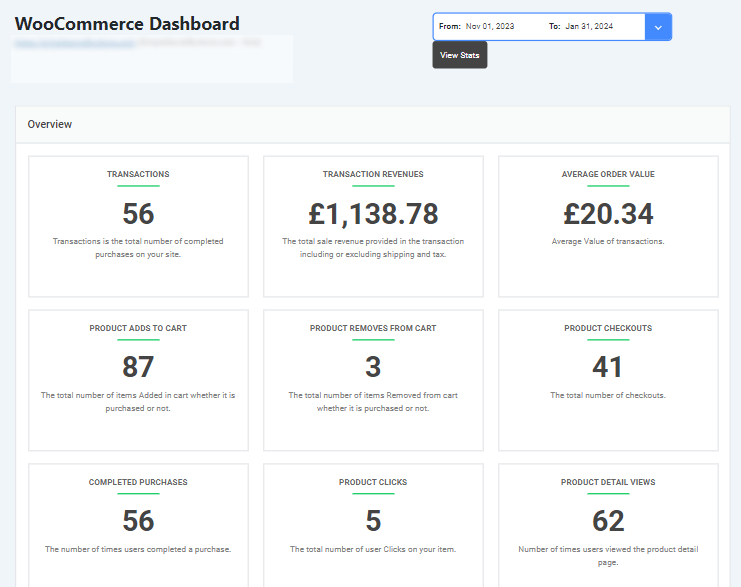
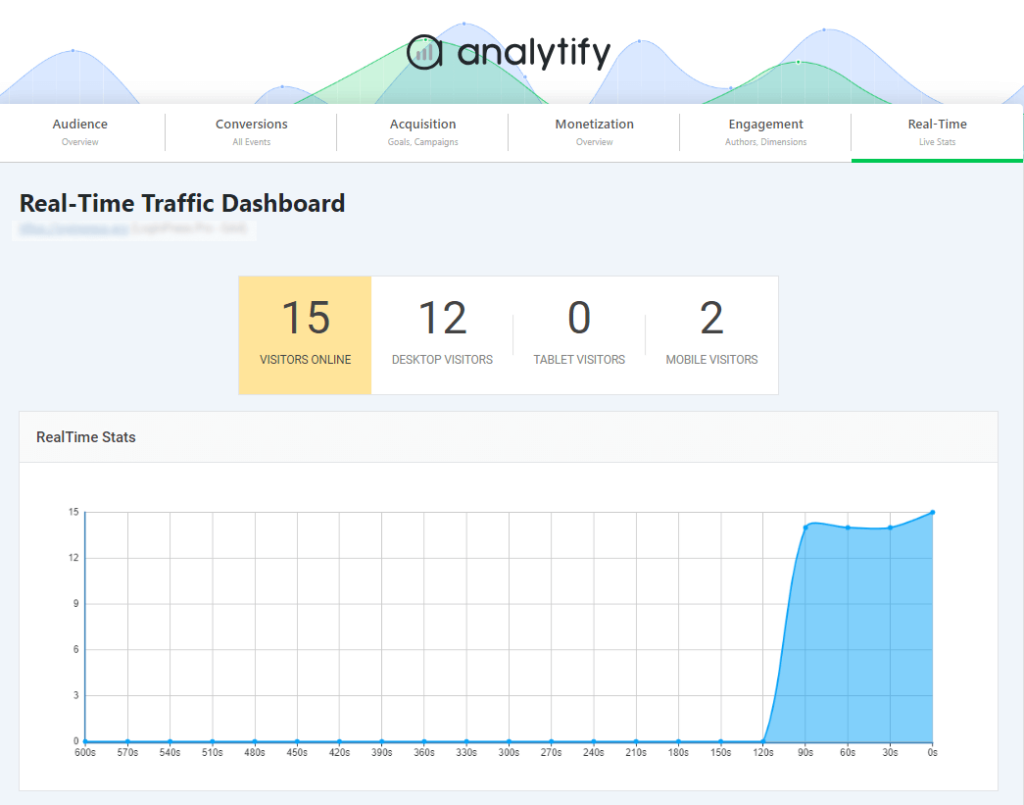
Analytify delivers real-time event insights, showing you active users, page views, and live engagement events as they happen so you can quickly evaluate what’s working on your site.
Using the Email Notification Add-on, Analytify can automatically send detailed performance summaries daily, weekly, or monthly. These reports include your top-performing events, pages, and campaigns for quick performance reviews.
Analytify lets you track key engagement metrics, such as bounce rates, session duration, and overall user behavior, in real time without leaving WordPress.
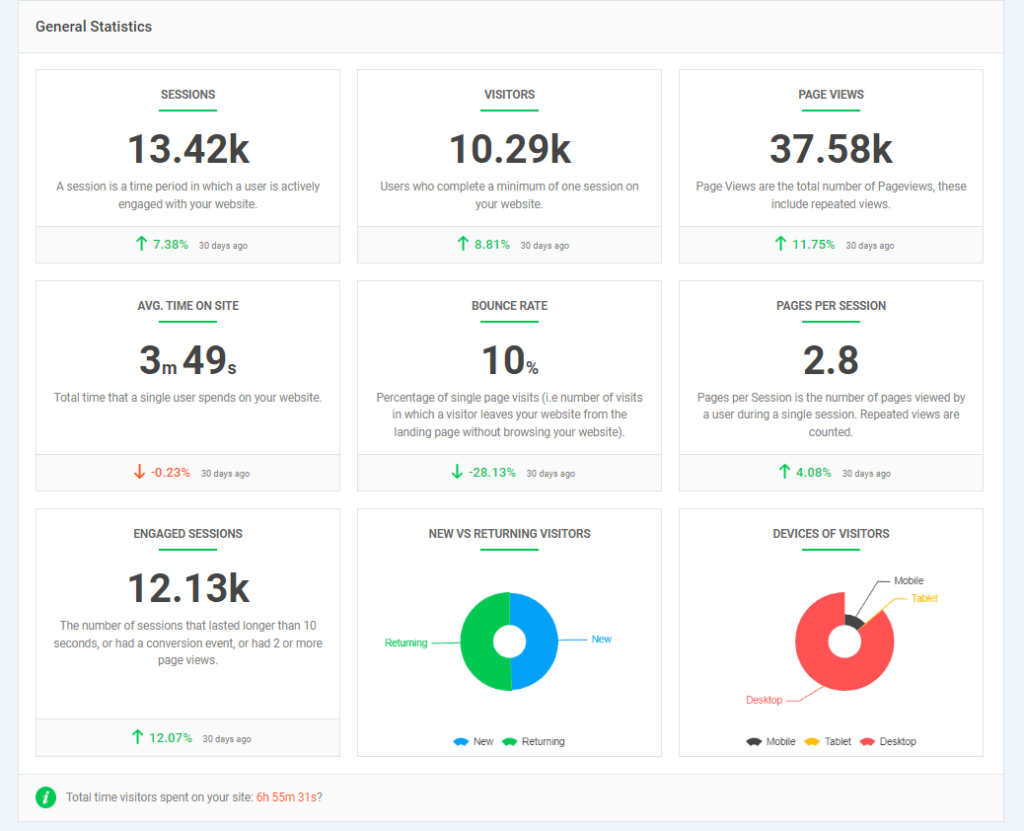
Analytify tracks the events it supports without Google Tag Manager or coding, and it shows the results in your WordPress dashboard.
Common Mistakes to Avoid in No-Code GA4 Event Setup
Here are some common mistakes to avoid when learning how to set up GA4 events without code:
- Forgetting to verify event data in real-time reports, which helps confirm your setup is working correctly.
- Creating overlapping or duplicated events that cause inflated counts in reports.
- Not setting up key events properly, leading to incomplete tracking of key events/actions.
- Inconsistent or mismatched event names make data analysis difficult. GA4 treats event names as case sensitive.
- Ignoring parameter setup, which limits insights from event tracking in GA4 for beginners.
- Failing to test GA4 custom events on WordPress after setup.
- Overlooking plugin updates or permissions that affect no-code GA4 tracking.
Avoiding these mistakes improves the accuracy of your event data.
Advanced Tips: Enhancing Event Data for Better Insights
These tips help you get more insight from your GA4 event data:
- Use UTM parameters to identify and compare different event traffic sources.
- Combine event insights with conversion tracking to analyze campaign ROI more effectively.
- Use Analytify’s real-time dashboard to check campaign performance as it happens.
- Add custom parameters to events to capture details like product type or user intent.
- Use audience segmentation to understand how different user groups engage with events.
- Regularly review your GA4 event reports to spot patterns and optimize event tracking over time.
- Connect GA4 with other marketing tools to build a complete view of user behavior.
Frequently Asked Questions
1. What is no-code GA4 tracking, and why is it useful?
No-code GA4 tracking means setting up Google Analytics 4 event tracking without writing or editing any code. With Analytify, this approach saves time, prevents errors, and makes accurate event tracking accessible to everyone, even those without technical expertise.
2. What is the difference between key events and events in GA4?
In GA4, every user action you track is called an event, but key events are specific actions you mark as most important, such as purchases, sign-ups, or form submissions. These key events replace conversions from Universal Analytics and measure what truly drives your website’s success.
3. Does GA4 automatically create events?
Yes, GA4 can track events automatically through its Enhanced Measurement feature. This includes actions like page views, scrolls, video engagement, and outbound link clicks. It’s a great starting point for event tracking GA4 for beginners, as you can collect essential data without any manual setup or coding required.
4. How to set up events on GA4?
To set up events in GA4, go to the Admin section and create a new event by defining its name and conditions. However, if you want to create GA4 events without code, using a WordPress plugin like Analytify is the easiest way. It simplifies GA4 tracking by automatically capturing user interactions such as button clicks, downloads, and form submissions, ideal for those learning how to set up GA4 events without code.
5. Which tool do we need to set up events in Google Analytics?
You can use Google Tag Manager for manual event setup, which allows you to define triggers and parameters for detailed tracking. However, for WordPress users, Analytify offers a much simpler way to handle GA4 event setup WordPress. It even supports GA4 custom events WordPress, helping you manage everything from a single dashboard without touching any code.
6. Is Analytify suitable for event tracking in GA4 for beginners?
Absolutely. Analytify makes event tracking GA4 for beginners effortless. It uses a no-code approach, automating event setup so beginners can track user engagement and conversions without any technical steps.
Final Thoughts: Create GA4 Events Without Code
To set up GA4 events without code, install Analytify, connect your GA4 property, enable the Google Events Tracking add-on, and choose the events to track. Manual setup through Google Tag Manager is more complex.
Analytify also automates event insights, displaying engagement, conversions, and GA4 custom events in WordPress through the Analytify dashboard.
By avoiding setup mistakes and applying advanced tips such as using UTM parameters and audience segmentation, you can make your event tracking even more valuable.
For further guidance, you can read:
- GA4 Custom Events Not Showing Up (Fixed)
- How to Track Add to Cart Events in Google Analytics
- Google Tag Manager Custom Event Trigger
Have you tried setting up GA4 events without code using Analytify yet? Share your experience or questions in the comments below. We’d love to hear how you’re tracking your website’s success.